Analysis of Windows Computer Startup Process 1
Analysis of Windows Computer Boot Process 1
To truly understand why certain options in WinNTSetup need to be configured the way they are, you need to understand the Windows computer boot process.
Booting the Motherboard UEFI Firmware
When you press the power button, the first step is to boot the motherboard’s UEFI firmware. The UEFI firmware has nothing to do with the Windows system; its full name is Unified Extensible Firmware Interface.
UEFI has replaced the traditional BIOS firmware and is now standard on all newly manufactured computers. Generally speaking, computers manufactured after 2015 boot in UEFI mode.
Before Windows can start, the computer must first boot the UEFI firmware. Through UEFI, the computer can gradually guide the Windows system to boot.
Only Windows 8 and later Windows operating systems support UEFI firmware. Windows 7 and earlier operating systems only support BIOS firmware.
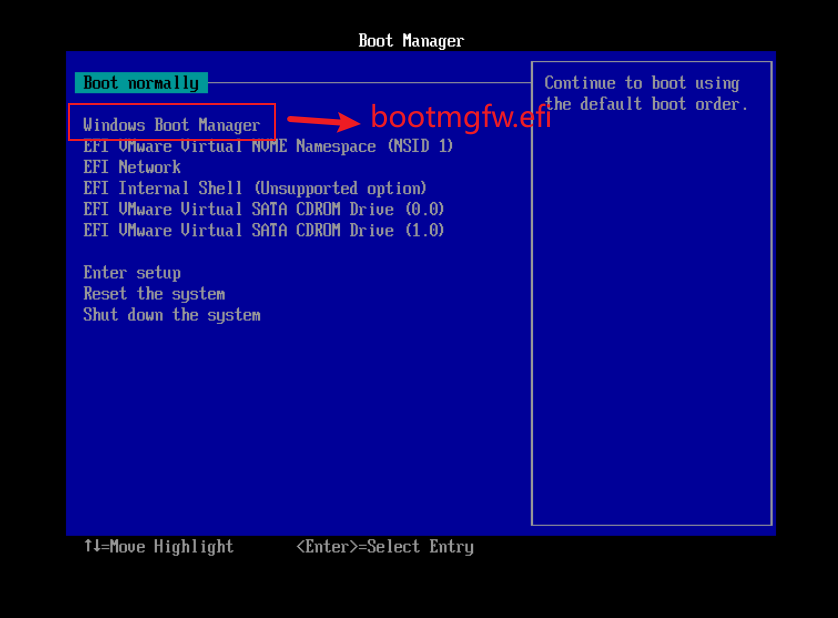
The UEFI firmware boot menu style produced by Intel is the blue interface we see when selecting “Enter Firmware on Boot” in a VM. This is the UEFI boot selection menu interface. Different manufacturers produce different UEFI interfaces, but the functionality is similar.
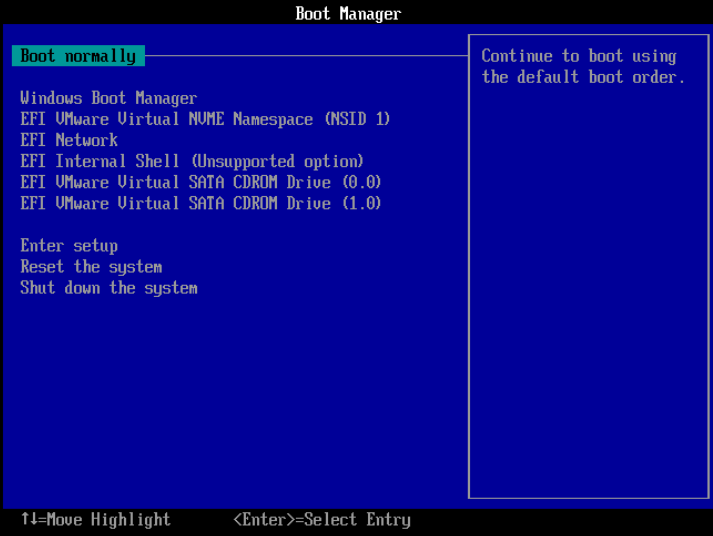
For us, the main role of UEFI is to boot the operating system.
So, how does UEFI accomplish this?
This is closely related to the system boot partition (ESP partition).
ESP Partition
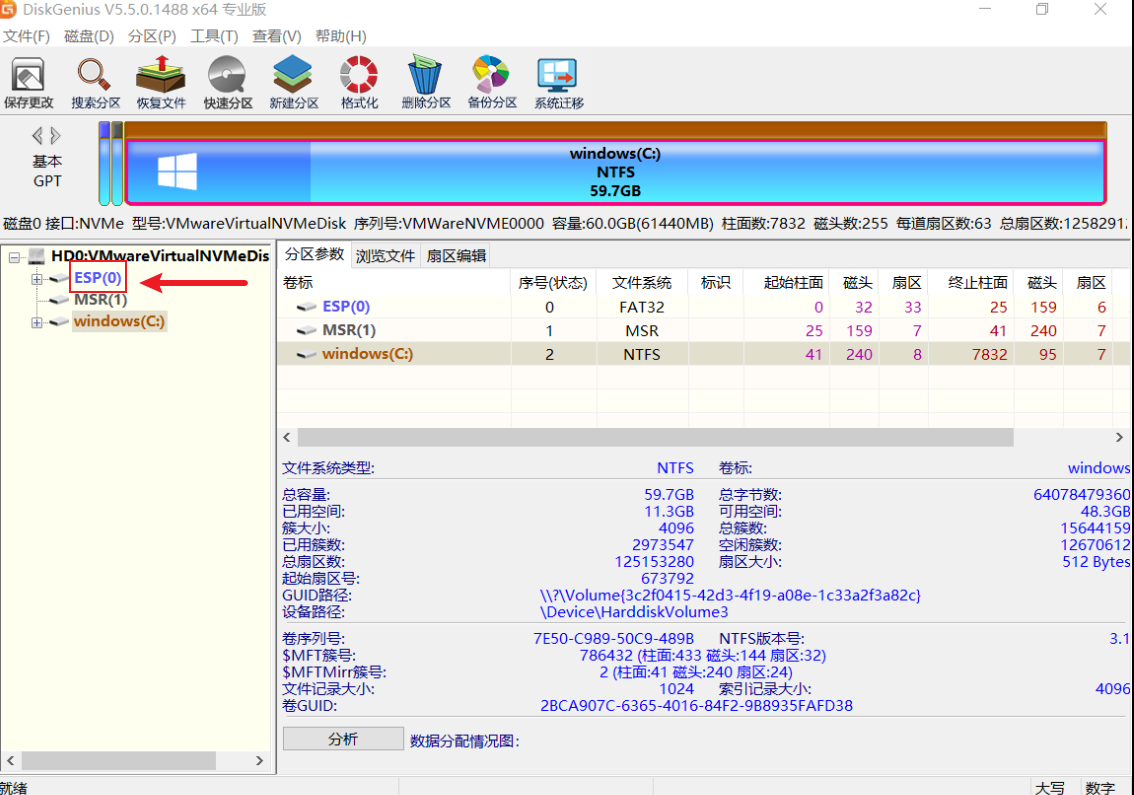
The ESP partition, also known as the EFI partition, is a disk partition that stores operating system boot files. The EFI partition is typically very small, around 200-300 MB.
It’s important to note that the file system of the EFI partition is almost always FAT32 or FAT16!
This is because most UEFI firmware can only recognize and read FAT32 and FAT16 file system types.
File Directory of the EFI Partition
The EFI partition has a fixed file directory structure, designed to meet the requirements of the UEFI motherboard.
The question is, how can you open the EFI partition and view the files inside?
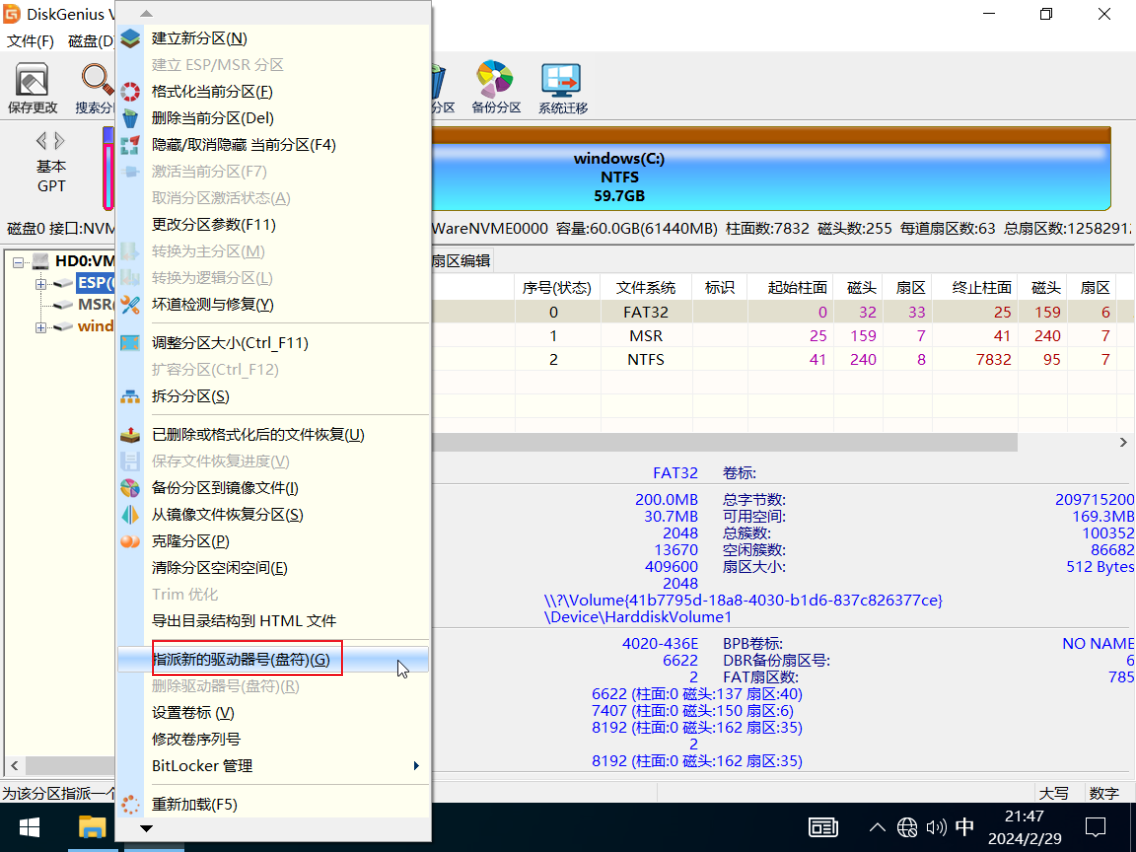
The EFI partition is actually a hidden partition of the operating system with a high level of security. You cannot assign a new drive letter through Disk Management; instead, you need to use third-party software to assign a drive letter.
DiskGenius Disk Management Tool
DiskGenius (abbreviated as DG) is an excellent, long-established disk management software developed by a Chinese developer. With DG, we can perform almost any disk-related operation.
In this round, we’ll use DG to assign a drive letter to the EFI partition. (I provided a DG download link in a previous article.)
Steps:
1. Open DG and find the ESP partition on the left side.
2. Right-click the ESP partition and select "Assign a new drive letter."
3. Confirm.
Once a drive letter is assigned, the EFI partition will appear in File Explorer.
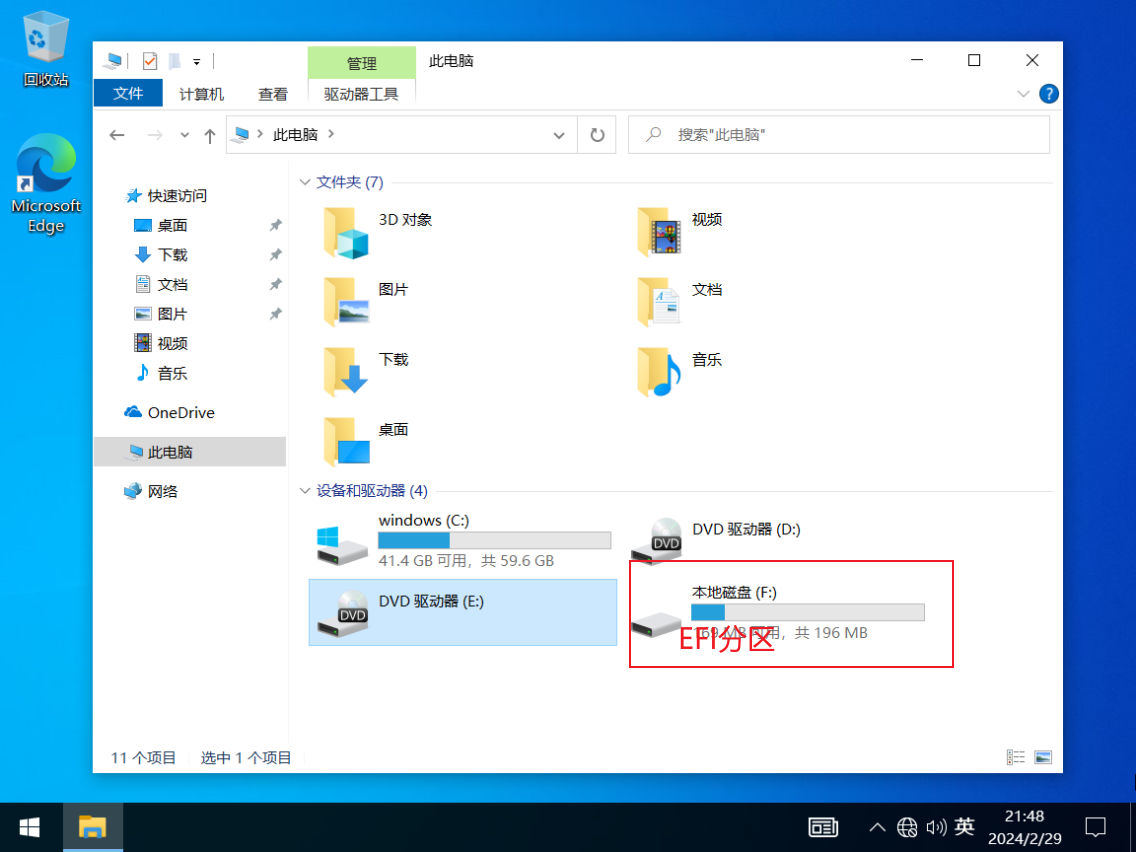
However, the operating system is quite cautious :)
Access Denied.
The operating system means well, as the files inside are extremely important—messing them up could render the computer unbootable.
But in a virtual machine, what’s the worst that could happen? :)
The method mentioned above works in a PE system, which bypasses all permissions and allows you to manipulate any partition freely.
We can directly use DG software to view the files in the EFI partition.
Double-click the ESP partition in DG, or click “Browse Files” in the right panel to view them. You can even right-click a file or folder and copy it to the desktop.
The directory structure of the EFI partition is as follows (no need to memorize):
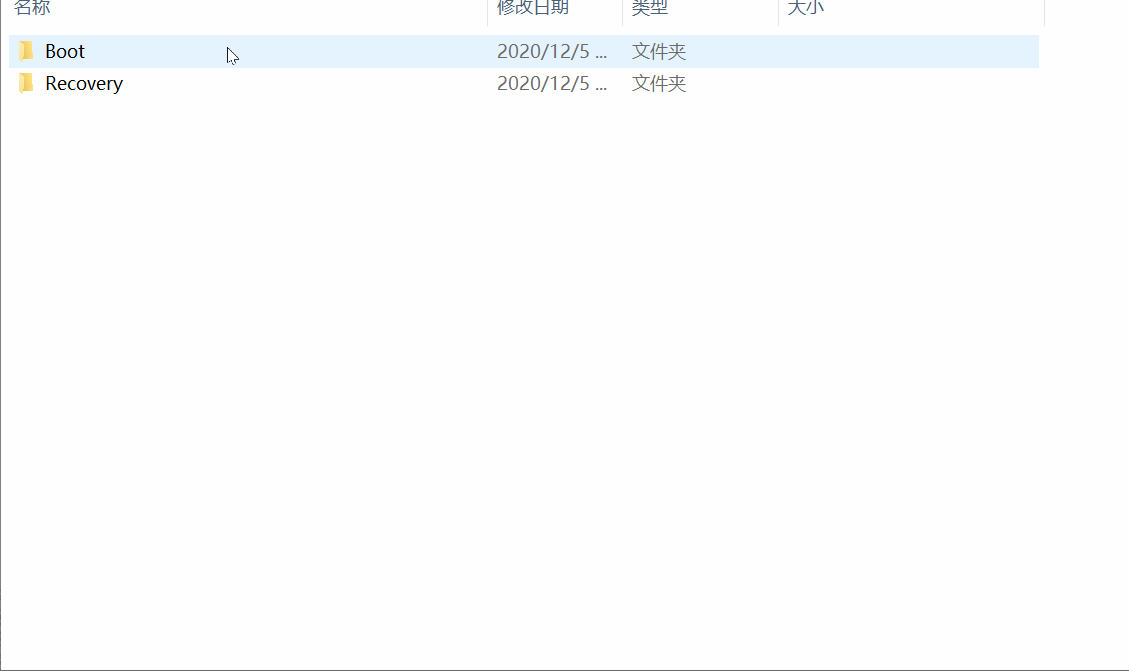
EFI
    ├─Boot
    └─Microsoft
        ├─Boot
        │  ├─bg-BG
        │  ├─cs-CZ
        │  ├─da-DK
        │  ├─de-DE
        │  ├─el-GR
        │  ├─en-GB
        │  ├─en-US
        │  ├─es-ES
        │  ├─es-MX
        │  ├─et-EE
        │  ├─fi-FI
        │  ├─Fonts
        │  ├─fr-CA
        │  ├─fr-FR
        │  ├─hr-HR
        │  ├─hu-HU
        │  ├─it-IT
        │  ├─ja-JP
        │  ├─ko-KR
        │  ├─lt-LT
        │  ├─lv-LV
        │  ├─nb-NO
        │  ├─nl-NL
        │  ├─pl-PL
        │  ├─pt-BR
        │  ├─pt-PT
        │  ├─qps-ploc
        │  ├─Resources
        │  │  ├─en-US
        │  │  └─zh-CN
        │  ├─ro-RO
        │  ├─ru-RU
        │  ├─sk-SK
        │  ├─sl-SI
        │  ├─sr-Latn-RS
        │  ├─sv-SE
        │  ├─tr-TR
        │  ├─uk-UA
        │  ├─zh-CN
        │  └─zh-TW
        └─Recovery
Why can’t the directory structure of the EFI partition be changed?
This brings us to a new file type: .efi files.
*.efi Files
An .efi file can be thought of as a “software” program within the UEFI system (similar to an .exe file). .efi files are also programs.
The role of an .efi program is to boot the operating system. A key task for the UEFI firmware during the boot process is to locate .efi programs and list them in the system boot menu.
.efi programs are stored in the EFI boot partition. Since the EFI partition uses a FAT32 or FAT16 file system, the UEFI firmware can recognize and access the files within it.
Common .efi programs include:
1. bootmgfw.efi
2. bootmgr.efi
3. memtest.efi
4. bootx64.efi
1. bootmgfw.efi: I believe this stands for “boot manager for Windows.” This .efi program is specifically used to boot the Windows system.
2. bootmgr.efi: Likely an abbreviation for “boot manager.” It serves as a backup program when bootmgfw.efi is missing or corrupted.
3. bootx64.efi: The most versatile .efi boot program, capable of booting operating systems other than Windows, such as Linux.
4. memtest.efi: A computer memory diagnostic tool.
As mentioned earlier, the UEFI firmware lists .efi programs in the system boot menu. So, how does UEFI locate these .efi programs?
The reason the EFI partition’s directory structure cannot be changed lies here. The UEFI firmware “remembers” the directory structure of the EFI partition. All manufacturers must follow this directory structure when storing their EFI partition files.
In other words, the process by which the UEFI firmware locates the bootmgfw.efi program is as follows:
1. Scan the EFI partition (a partition with a FAT32 or FAT16 file system).
2. Enter the EFI partition and search for the .efi program in the order: EFI -> Microsoft -> Boot -> bootmgfw.efi.
3. Once found, list the information contained in bootmgfw.efi on the UEFI boot menu (called "Windows Boot Manager").
In the next section, we’ll dive into the working process of bootmgfw.