Install VHD System
Installing a VHD System
VHD, short for Virtual Hard Disk, is a virtual technology developed by Microsoft. Its primary purpose is for use with Microsoft’s Hyper-V virtual machine, serving as the virtual machine file for installing virtual machines.
You might be wondering: Aren’t virtual machines only about VMWare? Where did Hyper-V suddenly come from?
In reality, VM is just one player in the virtual machine market—it’s just exceptionally good, overshadowing other virtual machine solutions. Hyper-V is a virtual machine software developed by Microsoft with functionality similar to VM. For Windows 10 Professional systems, this virtual machine comes built-in. However, for Windows 10 Home edition, this feature is not available.
We don’t actually need to use the Hyper-V virtual machine software, because VHD has a much more important feature: As a physical file, VHD can be used to boot a real physical machine.
Now you might ask: Why can’t the virtual machine files created by VMWare boot a physical machine?
The reason is simple: VMWare wasn’t developed by Microsoft, but VHD was! :)
Features of VHD
As a virtual machine file, VHD has the following characteristics:
1. Single-file type: Unlike VM virtual machines, a VHD file is a single file. That means one VHD file contains an entire Windows system, various software, hardware, and so on. In contrast, a VM-created virtual machine resides in a folder, and running it requires numerous files within that folder.
2. Differencing capability: This is a crucial feature of VHD systems and one of the main reasons we’re introducing them. For a VHD file with a system already installed, we can create its differencing child file. This child file is also a VHD file and can boot a virtual machine. It can be thought of as the “child” of the first VHD system. Initially, all files in this child are identical to those in its parent.
However, it’s important to emphasize that this child does not fully copy all files from its parent (which is evident from the creation speed of the differencing file—it’s created instantly, impossible for copying a system-sized file). Instead, it uses a method similar to “referencing.” When you check the properties of the child, you’ll see it’s only a few MB at first, but double-clicking it reveals all the files inside its parent.
A metaphor can help understand this parent-child relationship. The parent VHD is a piece of paper completely filled with writing (the “writing” represents files). The child VHD is a piece of glass placed on top of this paper. Through the glass, we can see all the files in the parent VHD. We can also write on the glass, meaning we can perform various operations within the child VHD system.
Clearly, writing on the glass (running the child VHD system) has no impact on the parent VHD system (the paper). If we accidentally write a virus on the glass, causing the child VHD system to crash, we can simply throw away that glass and replace it with a new one, obtaining a fresh system identical to the parent VHD!
This special property leads to the third major feature of VHD systems:
3. Instant backup, instant restore.
Instant backup: For a functioning parent VHD system, we can create a differencing child VHD system. From then on, we only use the child, keeping the parent “enshrined.” This is called instant backup.
Instant restore: If the child “dies,” we delete it and create a new child, effectively restoring the parent VHD system to its original state. However, any files we added to the dead child are also deleted along with it. This is a common drawback of system backups.
4. Creating a differencing system tree: In fact, we can give the parent VHD many children, then create differencing files for those children, forming grandchildren VHDs, great-grandchildren VHDs, and so on—a vast VHD family. Since each differencing layer is just a “sheet of glass,” they initially occupy very little disk space. Leveraging this property, we can create countless differencing systems on our physical machine, as if our computer had countless systems installed.
Many people use this feature to give each family member their own system, all of which are actually differencing subsystems.
However, for safety, I still recommend installing the VHD system inside a VM virtual machine and creating its differencing files, even if it seems odd—installing a virtual machine within a virtual machine (Russian nesting dolls). :)
Understanding VHD Systems
VHD is essentially a file with the extension .vhd or .vhdx. Among these, .vhdx is more advanced, and I recommend using the .vhdx format.
A .vhdx file is actually a compressed archive that contains all the necessary files for a system. When we click on a VHD file, a new partition appears in File Explorer, typically with the drive letter Z:. This means the operating system has attached the VHD file, treating it as a virtual disk. At this point, opening Disk Management reveals a new disk—the VHD virtual disk. We can perform various operations on this virtual disk just like a regular disk. When installing a system, we can directly choose to install the system files onto the VHD virtual disk.
Initial Installation of a VHD System
In VMWare, create a new virtual machine. The steps are the same as before, but instead of directly selecting the system ISO disc, choose “Install operating system later.” After creation, edit the virtual machine’s hardware, add the MicroPE ISO image, so the new virtual machine can boot from the PE system.
Once inside the PE system, edit the virtual machine settings again and add the Windows 10 ISO image. This completes the initial configuration of the virtual machine.
Installing a VHD System Using WinNTSetup
A key step in installing a VHD system is creating the VHD file. Once the VHD file is successfully configured and mounted as a virtual disk, the remaining steps for installing the operating system are not much different from the traditional method. First, use DG to initialize the VM’s virtual disk, allocating an EFI partition and a C drive partition.
1 | |
Dynamic expansion: Uses only as much space as needed (the virtual disk only grows, never shrinks; deleting files inside the virtual disk does not free up actual disk space)
Fixed size: Directly occupies 25GB of space
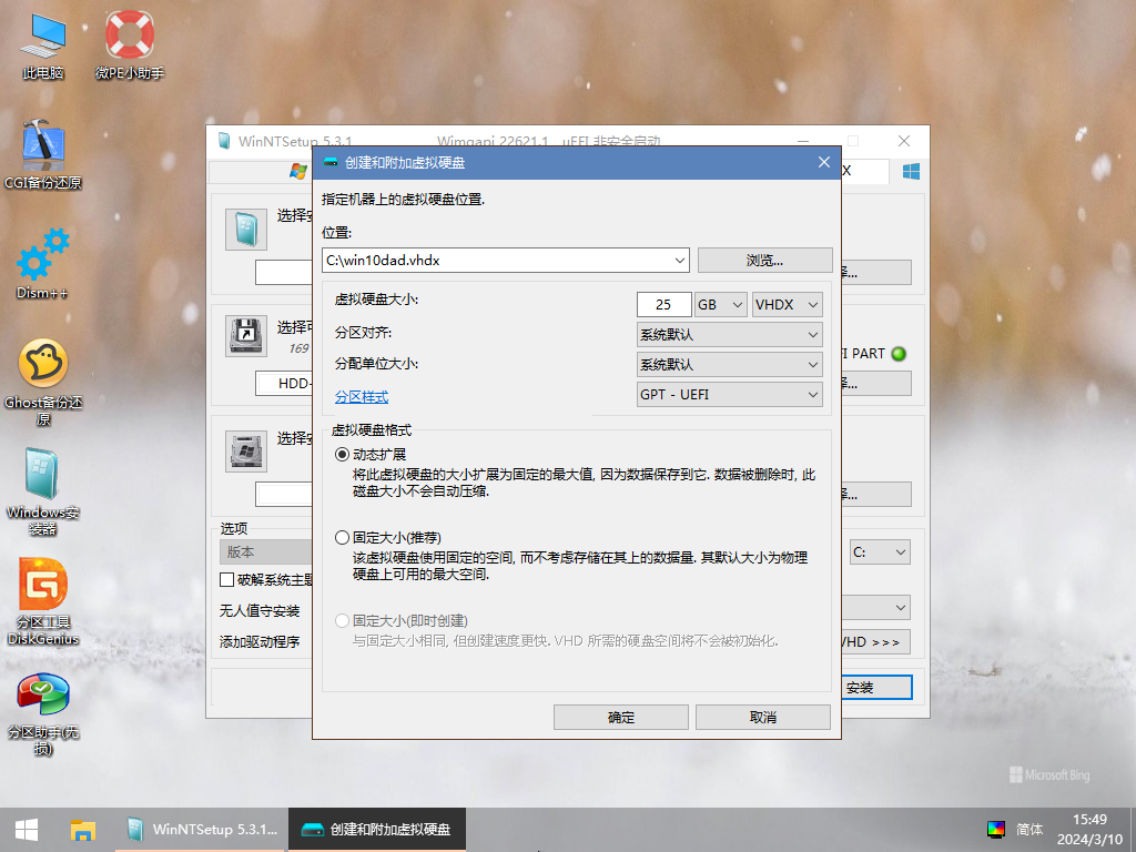
1 | |
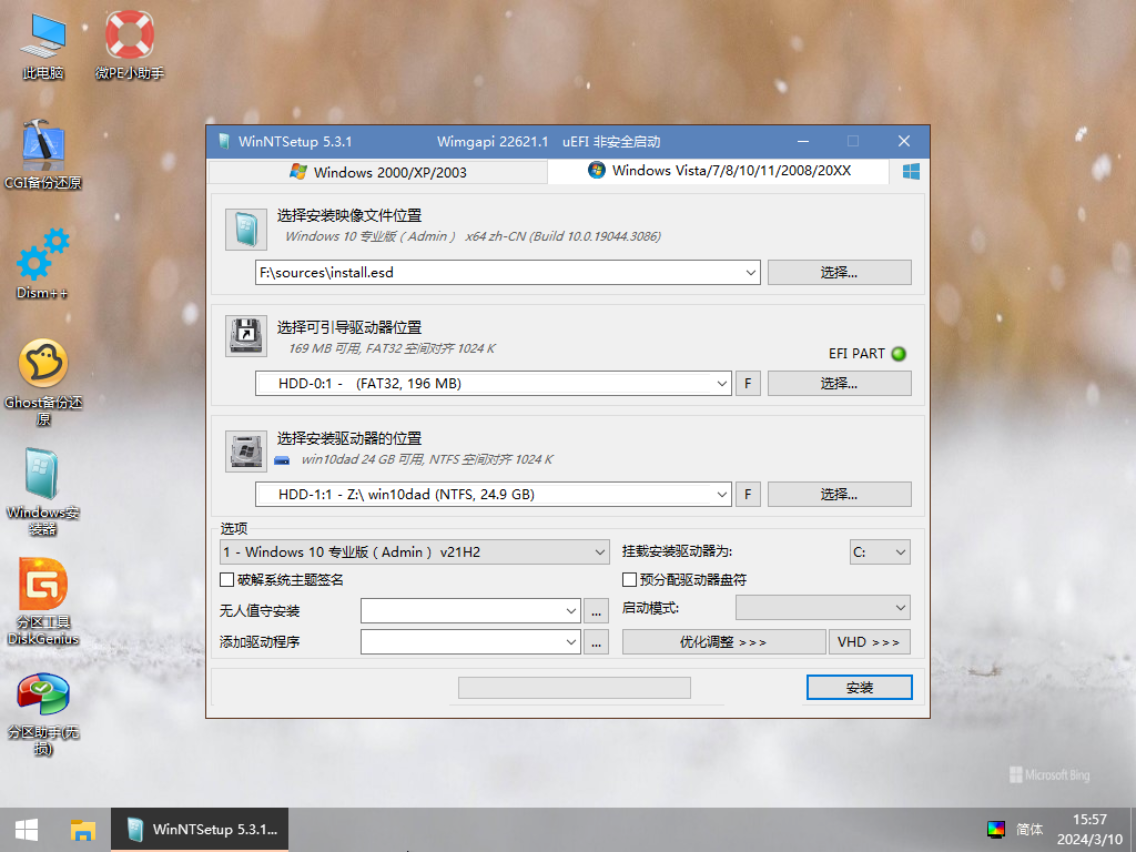
Think about it: Why can’t we select the EFI partition of the VHD virtual disk as the boot partition?
If we did, our goal would be for the UEFI firmware to scan and recognize this EFI partition. But where is this EFI partition actually located?
That’s right—it’s inside the .vhdx file!
Can we really expect the UEFI firmware to first recognize the .vhdx file, then mount the EFI partition inside it, and then recognize that partition?
UEFI currently does not have this capability.
So, how does a VHD system boot?
This is thanks to the Windows Boot Manager.
Although UEFI cannot read .vhdx files, the Windows Boot Manager can. The essence of this capability is that bootmgfw.efi can read .vhdx files. Through this EFI program, we can achieve VHD booting.
Creating VHD Differencing Subsystems
Now, the parent VHD system has been installed. Let’s start creating its descendants!
Many tools can create VHD differencing subsystems. Here, we recommend BOOTICE, a powerful lightweight tool.
Differencing systems must be created within a PE system!
1 | |
In your chosen directory, a new .vhdx file will appear. The author named it win10son1.vhdx.
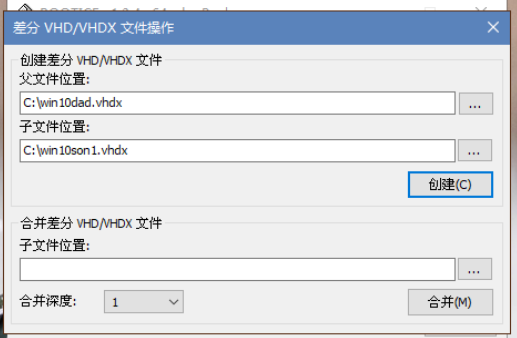
At this point, a child VHD has been created.
Adding a BCD Boot Menu for the Child VHD
Although the child VHD has been created, it doesn’t have its own BCD boot menu. So, we need to manually create its boot menu.
Steps:
1 | |
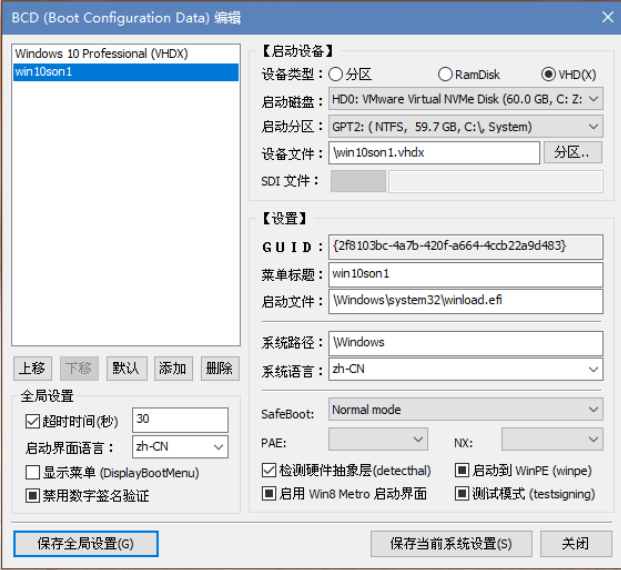
Now, the BCD boot file for the child VHD is ready. You can restart the virtual machine and check if there are two options in the Windows Boot Manager menu.

Note: After differencing, the parent VHD becomes unusable. That means we cannot boot the parent VHD system. It’s not that it’s impossible to boot, but if we do, the link between it and its child will break, causing the child to fail to boot properly. Therefore, for safety, we usually remove the parent VHD’s entry from the BCD menu to prevent accidental booting of the parent VHD system, which would render its differencing subsystems invalid.
Similarly, if a child VHD system has its own differencing subsystems, it effectively becomes a “parent” and cannot be booted either. If it is booted, the grandchild VHD will not be able to run.
VHD subsystem files can be copied. So, after creating one child VHD using BOOTICE, we can make many copies of it, each of which is a child VHD. We can add a BCD boot entry for each copy (though this can be tedious). The author once created 10 child VHDs at once, all of which ran normally in a VM virtual machine.
Booting into a VHD System
Based on the nature of VHD systems, we can infer some characteristics:
1. The .vhdx file of the running VHD system should be read-only within that VHD system.

2. The size of this .vhdx file should display as the maximum size of the VHD virtual disk, since it has been virtualized as the system drive. The author’s is 25GB.

3. The parent file of a child VHD should also be read-only within the child VHD system.
Common VHD Issues
Sometimes, due to various reasons, a VHD system may fail to boot. Here are some common issues:
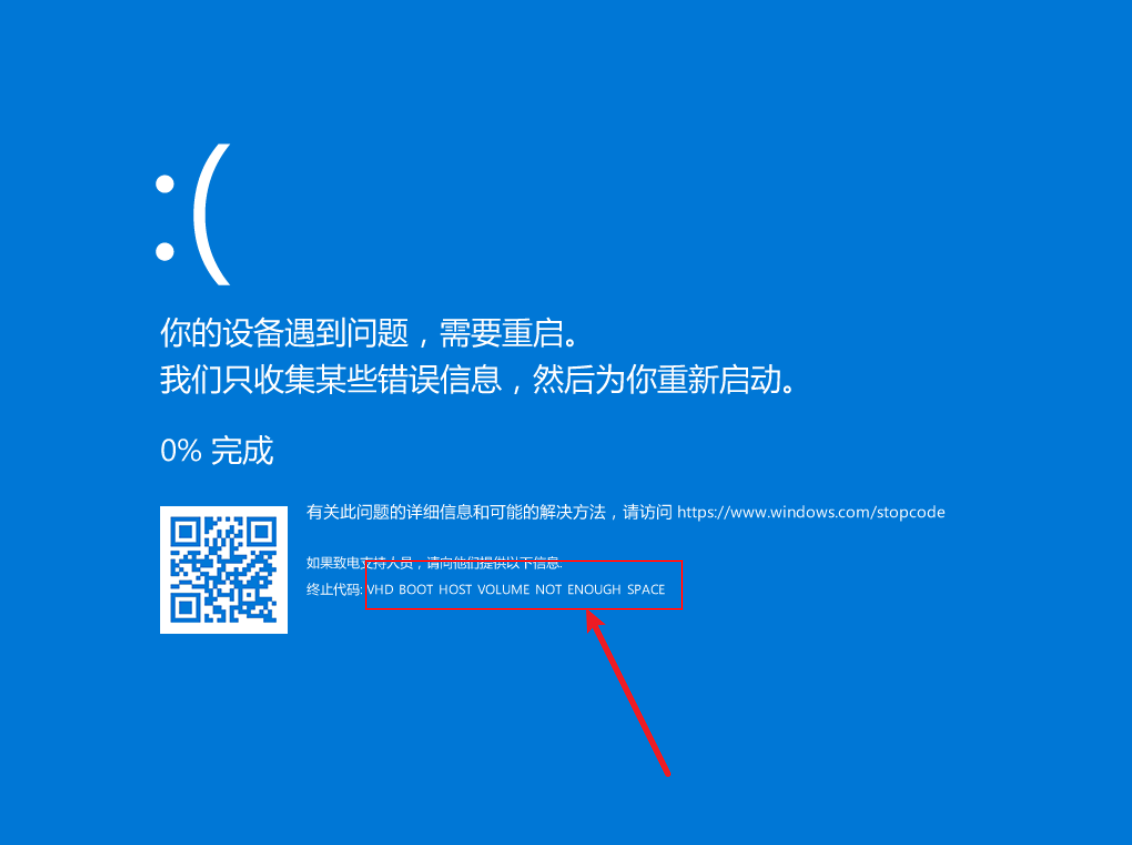
1. Scenario: I created one parent VHD and several child VHDs, but some VHD systems boot while others don’t. My BCD file is correct. Error code: VHD BOOT HOST VOLUME NOT ENOUGH SPACE
Cause analysis: This is likely due to improperly shutting down the virtual machine.
During testing, it’s easy to make the mistake of immediately shutting down the virtual machine after seeing the VHD system boot successfully, to proceed with the next test. When shutting down immediately, we often use the “Shut Down (O)” option from the dropdown menu. This operation is essentially like “pulling the plug” on the virtual machine—a hard power-off. This causes a serious issue: the VHD virtual disk is not properly unmounted. As a result, the 25GB .vhdx file seen inside the VHD system actually “becomes” 25GB in size. If the system is shut down normally, the VHD virtual disk is properly unmounted, and the .vhdx file returns to its original size (usually a few hundred MB initially, growing with use).
So, if your disk is only 60GB and you always perform a “hard power-off,” after booting two VHD systems, the VM’s disk will already be using 50GB. Booting a third new VHD system still requires 25GB, and the remaining 10GB is clearly insufficient. Therefore, you need to manually “release” these unmounted VHD virtual disks. The specific method is to boot into a working system or PE system, double-click to open the unmounted VHD virtual disk, and then close it, which completes the unmounting.
2. Scenario: VHD subsystem fails to boot.
Analysis: Recall whether you booted the parent system after creating the subsystem. If you did, the subsystem will fail to boot because this breaks the differencing chain.