WimBoot+VHD+Differential Subsystem Trinity: Building an Invincible Windows – Principles + Practical Operations
WimBoot+VHD+Differencing Disks | The Trinity for an Unbeatable Windows | Theory + Hands-On
Introduction to WimBoot Installation: WimBoot Boot Mode Explained
Introduction to VHD Installation: VHD System Installation Guide
As we know, WimBoot can drastically save disk space on the C drive, allowing a full Windows system to occupy only 1-2GB.
As we also know, VHD is a virtual disk format developed by Microsoft. It can be used as a boot disk to directly start a physical computer and run Windows, offering an experience nearly identical to a conventionally installed Windows system.
The first major advantage of a VHD system is instant backup and instant restore. In an instant, we can create a differencing disk for the VHD system drive, which is essentially an instant backup. In an instant, we can delete this differencing disk and give it a brand new one, which is essentially an instant restore. This means that no matter what catastrophic system failure occurs, the VHD system can be restored to the state at the moment of the instant backup.
The second major advantage of a VHD system is that it can create countless differencing disks. This fulfills the desire of some people to “install 100 systems” on the same computer. Since each differencing disk takes up an extremely small amount of space when first created (typically 4MB), an ordinary hard drive can hold many differencing disk copies.
Based on this characteristic of VHD systems, we can assign a separate system to each user of a public computer, ensuring that each user only uses their own differencing disk, achieving absolute non-interference. If one user’s differencing disk becomes corrupted, we can simply use the “instant restore” method to create a new differencing disk for that user.
So, can we combine the advantages of both WimBoot and VHD technologies? The answer is yes. Today, we’ll walk through a hands-on operation to configure a computer with WimBoot + VHD + differencing disks, achieving “instant backup, instant restore, and multi-user non-interference” while saving space to the extreme.
Step 1 | Obtain a Custom Windows WIM File
To use WimBoot, you must have a WIM file.
To get a WIM file, you first need a running Windows system. We’ll back up this running Windows system into a WIM file.
The installation location of this running Windows system is arbitrary. We only need the WIM file backed up from this system; it doesn’t matter if it’s installed on a local disk, a VHD disk, or a removable drive.
In short, as long as we have a satisfactory, problem-free Windows system, that’s all we need. This system is the prerequisite for all our operations.
Please note that only Windows 8/8.1/10/11 and above are supported!
How to Obtain a WIM File?
We’ll use the powerful tool Dism++ to package the current system into a WIM file.
Open Dism++ in PE or Windows:
- Click on
Recovery Functions->System Backupin the top-left corner. - Click
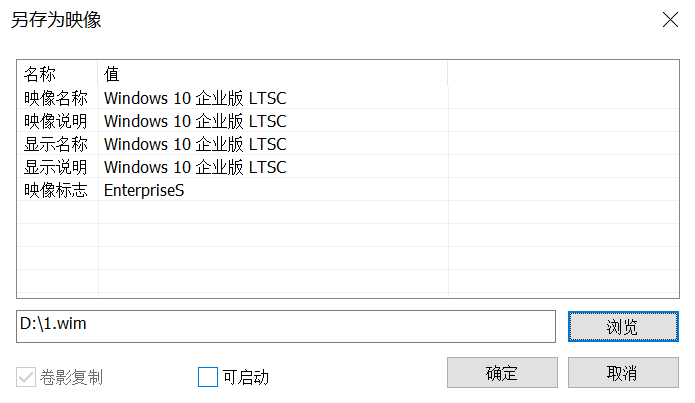
Browseto select the location to save the system backup package. - In the “Save As” dialog, under
Save as type, you can choose from 5 compression types.- No Compression: Saves system files directly into the WIM without compression.
- WimBoot Compression: A compression method suitable for WimBoot, but according to Dism++’s official statement, it has a very low compression ratio and is not very useful. Not recommended.
- Fast Compression: Higher compression ratio than WimBoot compression. This is the default method. The author recommends Fast Compression.
- Maximum Compression: Saves as an ESD format, offering the highest compression ratio, taking the longest time, and producing the smallest file.
※Note: ESD files cannot be used to create WimBoot. So we must not choose ESD compression.
- Click Save.
- If you are performing a hot backup within the current Windows system,
Volume Shadow Copyis checked by default. - If you are backing up Windows in a PE system, you do not need to check Volume Shadow Copy. (Backing up in PE is recommended to reduce error probability.)
- Click OK.
Wait for the backup to complete. You will then find the successfully backed-up WIM package at the chosen location.
Through the above steps, we have obtained a WIM file of a Windows system. This WIM file is the system package we will later deploy to the VHD virtual disk.
Step 2 | Create a VHDX File
The VHDX format virtual disk file, introduced later by Microsoft, is superior to the VHD format. Therefore, we will use the VHDX format.
How to Create:
- Right-click the Start menu icon and open “Disk Management.”
- First, click on a
Disk X(e.g., Disk 0) in the lower list. Select the disk where you want to save the VHDX file. - Click
Actionon the menu bar →Create VHD. - Click
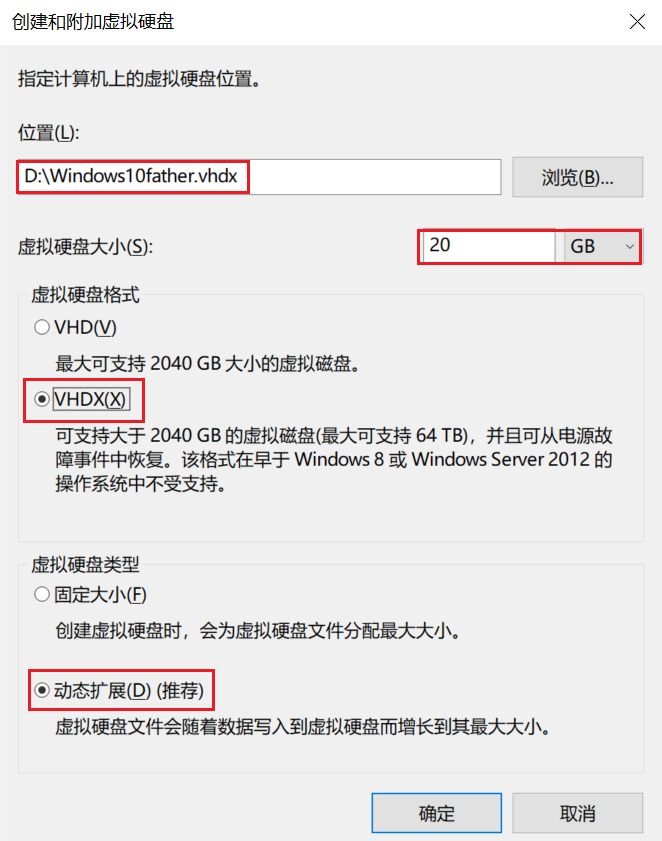
Browseto choose the location to save the VHDX file, then set its name (the author set it to Windows10father.vhdx). There is no restriction on the VHDX location, but please avoid folders with special characters. Virtual hard disk size:This is the size of the system drive. I set it to 20GB.- Select the VHDX format below.
Virtual disk type:Dynamically expanding.
Initialize the VHDX Virtual Disk:
- Right-click the disk in Disk Management and click “Initialize Disk.”
- Select GPT and click OK.
- Right-click the “Unallocated space” on the right and click “New Simple Volume.”
- Click “Next” all the way through until finished.

You will now see a new partition in This PC. A new VHDX virtual disk file is now configured. This virtual disk behaves just like a real disk; we can read, write, partition, and perform other operations on it freely.
Step 3 | Install the WimBoot System
Now we can use WimBoot technology to install the Windows system into the VHDX virtual disk.
Open your preferred Windows installation tool (e.g., WinNTSetup, CoolInstall Plus, System Installation Toolkit, Dism++, WIT, SGI, IQI, etc.)
The system installation package is the WIM file we backed up in Step 1. The target system drive is the partition on the VHDX.
Below, I’ll use WinNTSetup to explain the installation process.
- Open WinNTSetup in PE or Windows. For the first item,
Select the location of the Windows installation files, choose the WIM package you just backed up. - The boot partition selection is the same as a normal installation (ensure the green dot on the right is lit). Select the partition on the VHD disk for the system drive.
- The only difference is that in the bottom-right corner, select WimBoot as the boot mode.
- Click Install, then OK.

Installing a system via WimBoot is much faster than the conventional method, finishing in under a minute. This is because creating pointer files doesn’t take much time.
The WimBoot system installation is complete. Open the VHDX virtual disk, and you’ll see a complete C drive directory, but the space usage is only a few hundred MB to a few GB. This is the power of WimBoot’s space-saving capability.
Important!
After creating the WimBoot, the WIM file used for backup must not be modified! Do not delete or move it; you can only copy/paste it!
So, choose a safe location for this WIM file before installing WimBoot.
Step 4 | Create a Differencing Disk
First, right-click the partition of the VHDX virtual disk in This PC and click “Eject” to safely unmount it, just like ejecting a USB drive.
Many tools can create differencing VHDX files. I recommend the BOOTICE tool.
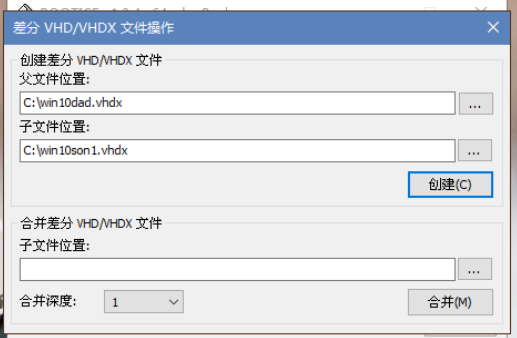
- Open BOOTICE. Click on
Disk Image->Differencing VHD. - Select the parent file location and the desired child file location. The parent file is the VHDX file we just created with WimBoot installed.
- Choose
*.vhdxas the save file type. - Click Create.
A new VHDX file will appear in the directory you chose. The author named it win10son1.vhdx.
A child VHDX has been created.
Do not follow the file paths in my screenshot above! That’s just an example. Set your own file path and name.
- Open BOOTICE. Click on
Double-click to open the child VHDX. You will see the complete Windows system C drive files. These are “shadows” mapped from the parent VHDX virtual disk. Since we used WimBoot, the contents of the parent VHDX file are themselves “shadows” mapped from the WIM file.
Important!
Once a VHDX differencing disk is created, it is strictly forbidden to open the parent VHDX file!
If the parent VHDX file is opened, the parent-child relationship will be broken!
Here are some details:
- The child VHDX file is initially very small (about 4MB).
- After double-clicking to open the child VHDX, its displayed size will be the maximum size set for the parent VHDX (20GB).
- After right-clicking and ejecting the child VHDX, the file size returns to its actual small size.
- The child VHDX can be directly copied and pasted to create copies. Each copy is a valid child VHDX.
Step 5 | Add a BCD Boot Entry for the Child VHDX
Although the child VHDX has been created, there is no BCD menu entry to boot it. So, we need to manually create its boot entry.
First, right-click the partition of the child VHDX virtual disk in This PC and click “Eject” to safely unmount it.
Steps:
- Open the BOOTICE tool.
- Click on
BCD Edit. - Click
Edit current system BCD(if you are in PE, locate the BCD file in your hard drive’s boot partition). - Click
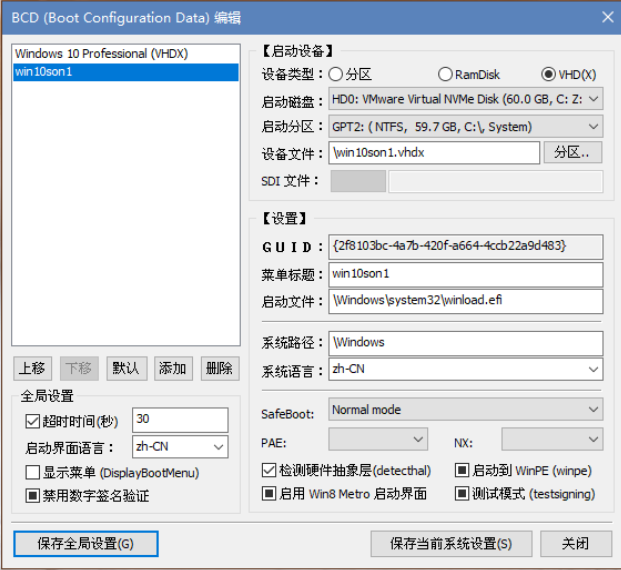
Add->New VHD boot entry. - For
Boot diskandBoot partition, select the “real” disk and partition. “Real” here refers to the physical disk and partition relative to the VHD virtual disk. Choose the actual disk and partition on your computer. - For
Device file, enter the location of your child VHDX file. Since the disk and partition are already selected above, we only need to provide the relative path. For example, if my child VHDX is in the root of the C drive, I would enter\win10son1.vhdxhere (note: you must start with a backslash\). - You can change the menu title to a name of your choice. The author changed it to win10son1.
- The
Timeouton the left is the countdown for the Windows Boot Manager. Set it as you wish. - Click
Save current system settings->Save global settings.
The BCD boot entry for the child VHD is now ready.
Strongly Recommended!
Delete the BCD boot entry for the parent VHDX system to prevent accidentally booting into it!
If the parent system is booted, all parent-child chains will be broken!
(In reality, a broken parent-child chain can be repaired, but it’s troublesome and unnecessary.)
Completion
We can now restart the computer and boot into the differencing disk system. Initially, this differencing disk system is identical to the system backed up in the WIM file. As we use it, new changes will be written to the child VHDX file, causing it to gradually grow in size.
If this differencing disk system encounters problems, we can simply delete this child VHDX and use BOOTICE to create a new one in the same way. If the new child VHDX has the same path and name as the old one, we may not even need to modify the BCD boot menu to boot into the new differencing disk system.
When the child VHDX system is running, the actual process on the computer is as follows:
Read child VHDX system files → Traverse to parent VHDX to read files → Traverse to the WIM file to extract real files into memory
If you feel confused after reading this article, I strongly recommend opening the two article links at the beginning. In those articles, I provide detailed explanations of the WimBoot boot mode and the VHD system installation and boot process.