WinntSetup Complete User Guide
The Complete Guide to Using WinNTSetup
WinNTSetup is an excellent Windows system installation tool with powerful capabilities. It supports installing Windows using normal mode, WIMBoot mode, and VHD mode, and offers many system customization options before installation. This article will walk through all these convenient and powerful features of WinNTSetup, helping beginners quickly get familiar with this robust system installation software.
WinNTSetup Versions and Download
As of now, the latest version of WinNTSetup is v5.4.1.
Follow my official account and reply with “nt” in the backend to get the high-speed download link for the latest WinNTSetup version.
WinNTSetup Main Interface
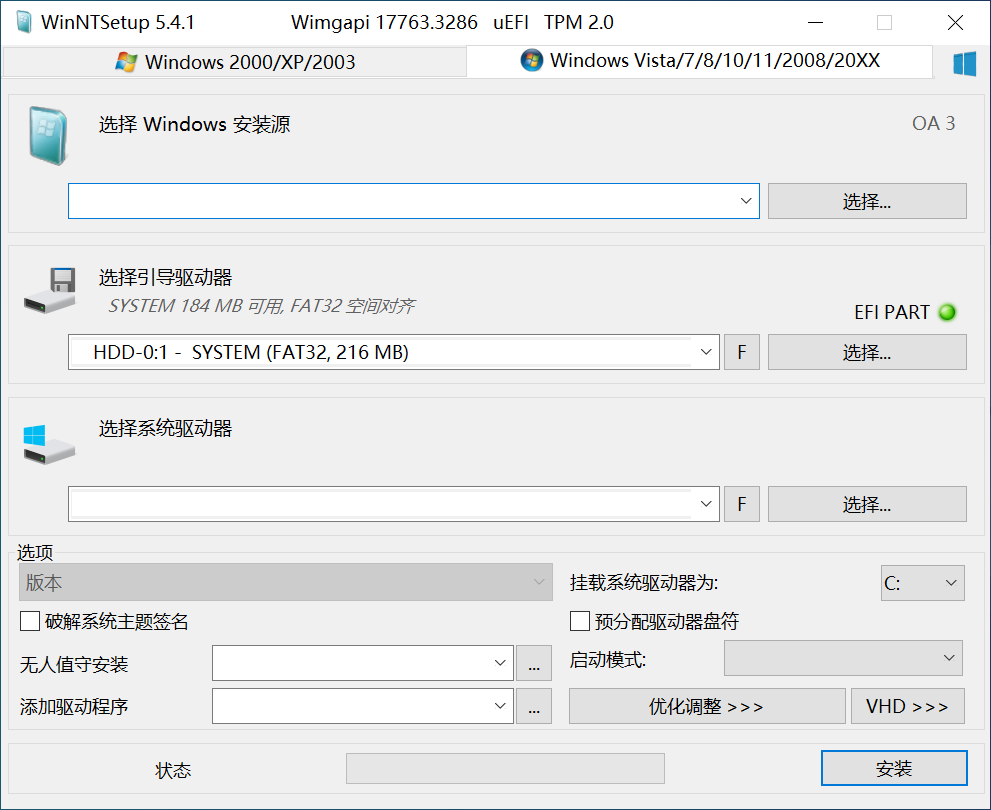
This is the main interface of WinNTSetup. It consists of two main areas: the upper section is the selection area, and the lower section is the customization area.
Select Windows Installation Source
- Choose the location of the Windows system image. The Windows system image can be located on a disk, removable hard drive, CD, or USB drive. The file format can be WIM, ESD, or SWM. However, if you are using a standard ISO system image released by Microsoft, you can directly select the ISO file. WinNTSetup will automatically parse the ISO, navigate to its
sourcesfolder, find theinstall.wimfile, and select it.
- Choose the location of the Windows system image. The Windows system image can be located on a disk, removable hard drive, CD, or USB drive. The file format can be WIM, ESD, or SWM. However, if you are using a standard ISO system image released by Microsoft, you can directly select the ISO file. WinNTSetup will automatically parse the ISO, navigate to its
Select Boot Drive
- The selection of the boot drive depends on the computer’s firmware. For computers manufactured after approximately 2015, the firmware type is UEFI. Therefore, you need to select the EFI partition (a small partition with FAT/FAT32/FAT16 file system) on the disk.
For older computers with BIOS firmware, you need to select the active primary partition on the disk.
- The selection of the boot drive depends on the computer’s firmware. For computers manufactured after approximately 2015, the firmware type is UEFI. Therefore, you need to select the EFI partition (a small partition with FAT/FAT32/FAT16 file system) on the disk.
Select System Drive
- The system drive is commonly known as the C drive, i.e., the partition where you want to install the system.
- Before installing the system, ensure there are no residual Windows system files in the selected system drive; otherwise, installation may fail or the system may fail to boot properly.
About the Two “F” Buttons
- On the WinNTSetup interface, to the right of “Select Boot Drive” and “Select System Drive,” there are two “F” buttons, which mean “Format Partition.” The boot drive does not need to be formatted before selection, but it is recommended to format the system drive.
About the “Green Dot”
- If the selected partition (drive) is usable and meets the standards, a green dot will be displayed. If there are issues, a red or yellow dot will appear, indicating the need to investigate the problem. These issues are usually caused by an inactive primary partition or an incorrectly selected EFI partition.
“Options” Section
- Select the Windows version to install: Since a Windows image may contain multiple versions, you need to choose the version here. For general personal use, it is recommended to select Professional or Enterprise, while Home and Education editions are not recommended.
- Patch system theme signature: If checked, you can install unsigned system themes after installation.
- Unattended installation: The first boot into the OOBE phase can be time-consuming. Microsoft provides an unattended feature to simplify this step. Using an unattended file (typically named
unattended.xmlorautounattend.xml) allows the newly installed Windows system to automatically configure itself and boot to the desktop without manual intervention.
WinNTSetup includes several pre-built unattended files for Windows 7, Windows 10, and Windows 11. If you have the expertise, you can also customize your own unattended file for system customization. - Add drivers:
This feature injects hardware drivers into the system before its first boot. Select a folder containing driver files, and WinNTSetup will use DISM to import the drivers. This driver folder is typically exported and backed up using DISM in advance. - Mount system drive as:
Define the drive letter for the new system’s system drive. If you select C (default), the system drive will be C. If you select A, it will be A.
It is recommended to keep the default C drive, as selecting another letter may cause compatibility issues with many applications. - Boot mode:
This section lists WIMBoot and Compact boot modes. If the dot is green, the mode is available; if yellow or red, it is not.- WIMBoot: Install the system using WIMBoot mode. For a detailed introduction to WIMBoot, search for the keyword “WIMBoot” on my official account homepage or check the featured articles.
- WIMBoot: WIMCopy: Almost identical to WIMBoot, except that the WIM package used for installation is copied to the
System Volume Informationfolder on the C drive and used as the WIMBoot source. - The English text after “Compact” indicates the compression ratio for Compact mode installation. The higher the compression ratio, the smaller the size. LZX offers the highest compression ratio.
- For details on installing the system using Compact mode, search for the keyword “Compact” on my official account homepage.
- Optimization adjustments:
Provides system optimization methods before installation, which is essentially pre-configuring the system.
The core mechanism is modifying the registry. - VHD:
Microsoft’s VHD virtual hard disk feature.
The main function is to create a customized VHD virtual disk.
For detailed content on VHD system installation, search for the keyword “VHD” on my official account homepage. I have previously written two very detailed articles on VHD system installation.
“Windows Logo” in the Top Right Corner
- Load Configuration: Read a previously saved configuration file.
- Save Configuration: Save the current WinNTSetup configuration state for future direct loading.
- Local System Installation: Functions related to existing system installations.
- Capture WIM: Generate a WIM image backup of the selected system.
- Patch Uninstall: Uninstall patches.
- Drivers: Install or uninstall drivers.
- Reset Password: Delete the Windows login password.
- Windows Command Processor: Open the CMD command prompt window.
- Registry Editor: Open the Registry Editor.
- Disk Management: Open Disk Management.
- Run Diskpart Script: Run a pre-written Diskpart script (TXT file) for convenient disk partitioning.
- WIM API:
Determines which tool the software uses to install Windows.- WimGAPI: Microsoft’s official API.
- wimlib: A third-party open-source API.
The difference between the two is minimal, mainly in installation speed, backup speed, and backup file size. You can search online for reviews and comparisons.
- Bootice: Run the Bootice tool.
- IMdisk: Run the IMdisk tool.
- Drivers:
- DISM Mode: Supports boot-critical drivers.
- Also adds drivers to WinRE.
- COPY Mode: Simply copies driver files and lets the system use them during device installation.
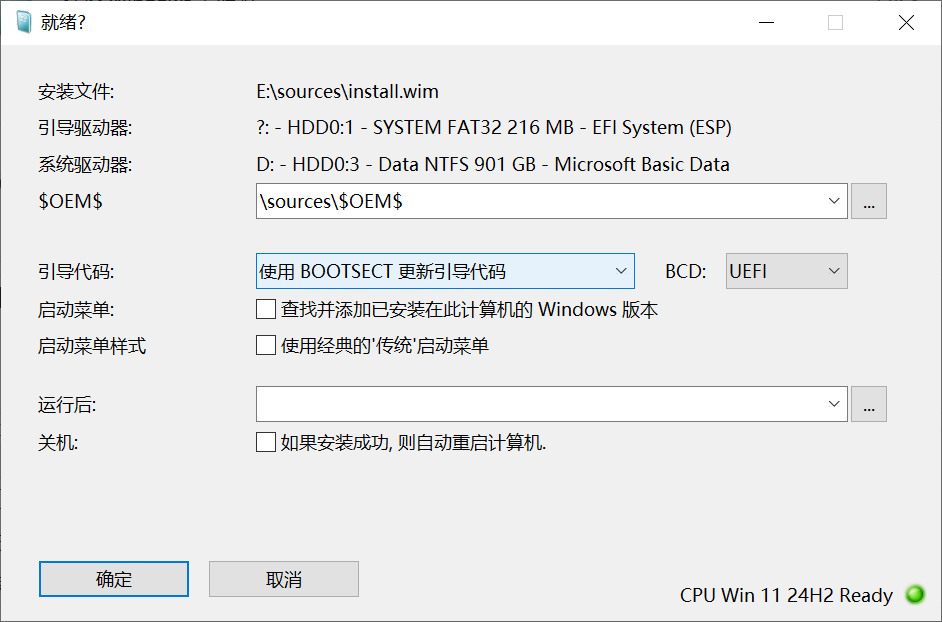
WinNTSetup Installation Interface
This is the installation interface of WinNTSetup.
- $OEM$
- The location of the
$OEM$folder. The$OEM$folder is pre-installed by computer manufacturers during Windows pre-installation. Its contents are executed during the first boot of Windows, typically BAT, CMD scripts, or EXE programs. - The main use of this
$OEM$folder is to automatically run Windows activation after boot. Tools like HEU_KMS_Activator and MAS_AIO have the ability to export the$OEM$folder.
- The location of the
- Use BOOTSECT to Update Boot Code
- Use the BOOTSECT tool to update the boot code of the current computer’s BIOS or UEFI, prioritizing booting from the disk where Windows is installed.
- BCD
- Choose whether to create boot files for UEFI firmware, BIOS firmware, or both.
- NONE: Do not create boot files.
- BIOS: Create BIOS boot files.
- UEFI: Create UEFI boot files.
- ALL: Create both BIOS and UEFI boot files.
- Choose whether to create boot files for UEFI firmware, BIOS firmware, or both.
- Boot Menu
- Find and add installed Windows versions on this computer: Automatically scan all Windows systems on the disk and create BCD boot menu entries for all of them.
- Use the classic “Legacy” boot menu: Use the black-and-white “Windows Boot Manager” interface instead of the modern Metro-style blue Windows Boot Manager interface.
- Run After
- Select programs to automatically run after boot.
- If installation is successful, automatically restart the computer.
The above is the complete guide to using WinNTSetup. I recommend following and bookmarking this guide.