Core Configuration: Detailed Explanation of BCD Files and Practical BOOTICE Editing
Core Configuration: BCD File Deep Dive & BOOTICE Editing in Practice
Reading Order for This Series:
- Computer Firmware Boot Principles: Windows Boot Process Part 1
- A Complete Guide to UEFI Firmware Booting Windows
- Core Configuration: BCD File Deep Dive & BOOTICE Editing in Practice
- BIOS Firmware Booting Windows
- General Methods for Repairing Windows Boot
What Do bootx64.efi and bootmgfw.efi Actually Do?
After understanding and running EFI programs, we’ll now explore what these two EFI programs actually do to boot Windows.
First, rest assured: bootx64.efi and bootmgfw.efi are essentially the same file, just with different names. They are identical programs, so their operational principles are identical.
Why two identical EFI programs with different names? I’ll explain that later.
bootmgfw.efi is the Windows Boot Manager.
You may have seen these two interfaces:
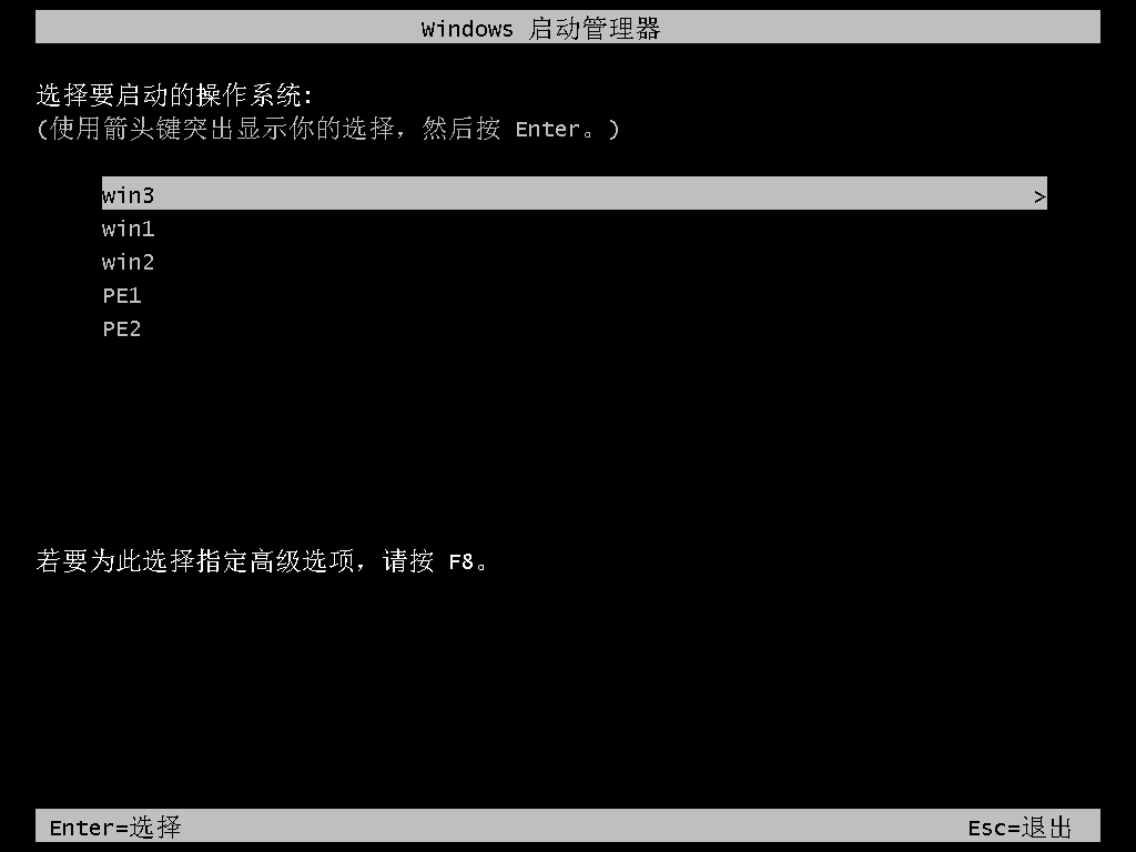

Both interfaces belong to the Windows Boot Manager, meaning they are both the UI of bootmgfw.efi.
Why two different interfaces?
Microsoft introduced the flat, tile-based Metro design starting with Windows 8 to improve usability on touch devices.
The black interface is the legacy Windows Boot Manager UI, while the blue one is the modern Metro interface introduced with Windows 8.
Their essence is the same — the blue interface is simply more visually appealing. However, the modern interface may slow down boot time on multi-boot systems.
You can manually configure the BCD file to choose between these two interfaces.
I’ll explain how to configure the BCD file later.
bootmgfw.efi, the Windows Boot Manager, presents a boot menu of operating systems for you to choose from.
For example, the images above show systems like win1, win2, win3, PE1, and PE2 available for booting.
So, the next question is: where does this list of bootable systems come from?
The BCD File
That’s right — the BCD file contains this system list.
What is a BCD file?
BCD (Boot Configuration Data) stores boot configuration data.
The BCD file records boot information for operating systems, including system location, boot mode, boot program, menu name, and more. It’s essentially the dictionary index for Windows boot.
BCD files are only applicable to Windows systems.
The BCD file is like the boot order records in NVRAM — both store menus. However, NVRAM boot order is for UEFI, while BCD is for bootmgfw.efi.
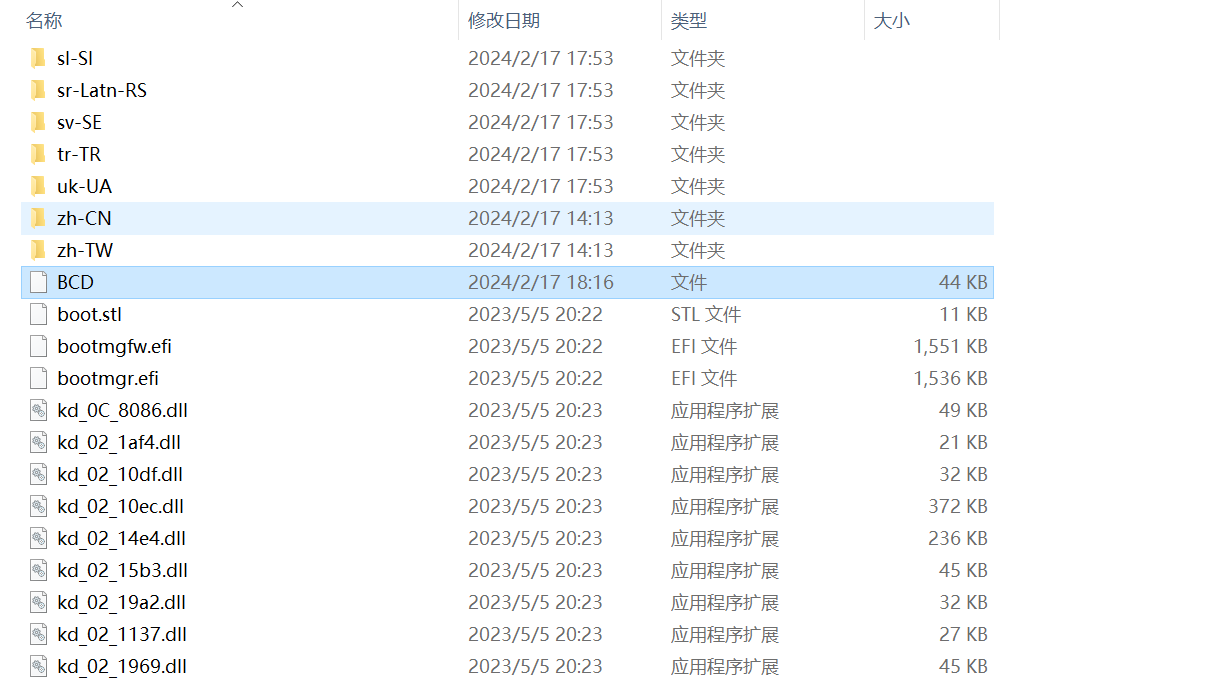
The BCD file resides in the same folder as bootmgfw.efi. Generally, the file locations within the EFI partition must not be changed; doing so may cause the UEFI firmware and EFI programs to fail to find the files, resulting in boot failure.
For more details, read my 60th article: “In-Depth Exploration of UEFI Booting: Are EFI Boot Program Locations Fixed?”
Learning how to edit BCD is a critical step toward advanced system administration.
Editing BCD
You cannot edit the BCD file with a regular text editor because the data is encrypted. You can use third-party GUI tools or Microsoft’s command-line tool bcdedit to edit BCD.
Since the command-line tool is not user-friendly for beginners, I’ll introduce the excellent third-party tool BOOTICE for editing BCD menus. Interested readers can also learn the command-line method.
BOOTICE is available on various platforms. Here’s a download link for convenience:
Open BOOTICE, click "BCD Edit" -> Select Current System BCD -> Smart Edit Mode to edit your own computer’s BCD.
BCD is critical boot configuration data. Operate with caution — incorrect edits can prevent your system from booting.
It’s recommended to practice editing BCD in a virtual machine.
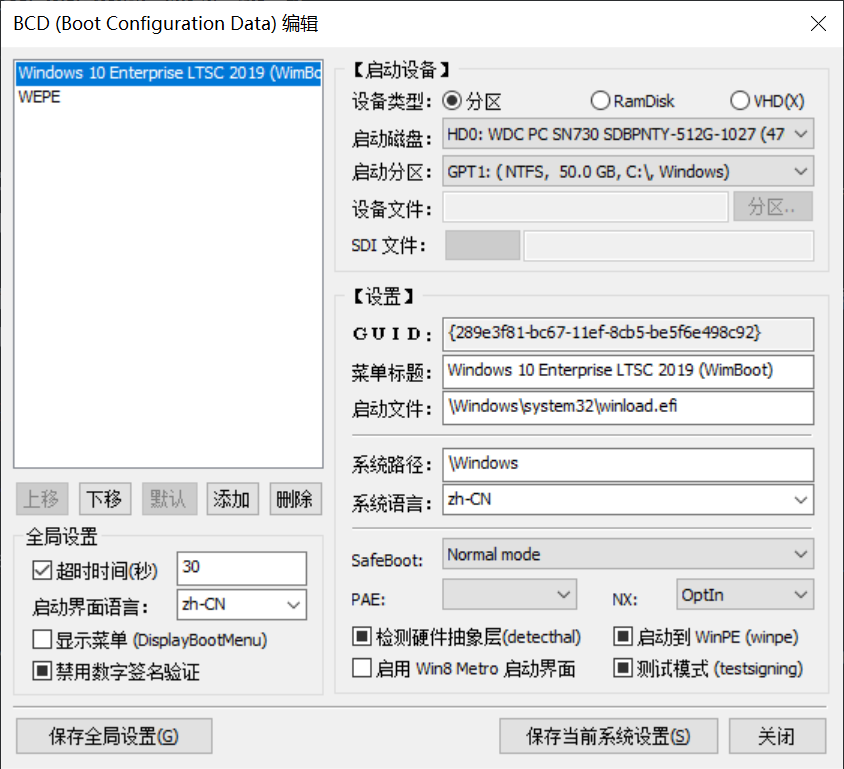
This interface is roughly divided into two parts: the left panel and the right panel. The upper part of the left panel shows how the operating system boot menu appears in the Windows Boot Manager (bootmgfw.efi). The rest contains BCD editing options.
I’ll explain in detail.
Move Up, Move Down, Default, Add, Delete: Move a boot entry up or down in the menu, set it as the default boot entry, add a new boot entry, or delete an existing one.
Global Settings
- Timeout: When multiple boot entries exist, set a waiting time. After this time, the default boot entry will automatically start.
- Boot Interface Language: Select the language for the Windows Boot Manager interface. Whether it takes effect depends on the language files in the language folder of the EFI partition.
- Display Menu: If checked, the Windows Boot Manager menu will always be displayed at boot, regardless of the number of boot entries.
- Disable Digital Signature Verification: Disables digital signature verification for boot programs.
Boot Device
- Device Type: The boot type of the system. Normal Windows systems boot from a partition (i.e., Windows is installed in a partition). Ramdisk and VHD are two other boot types, which will be covered in future articles.
- Boot Disk: The disk where the installed Windows system resides.
- Boot Partition: The partition where Windows is installed (commonly known as the C: drive).
- Device File, SDI File: These are dependency files for Ramdisk and VHD, not required for normal Windows boot. They will be covered in future articles.
Settings
- GUID: The “ID card” (globally unique identifier) of this boot entry — cannot be changed.
- Menu Title: The name displayed in the Windows Boot Manager menu, used to distinguish which menu corresponds to which system. You can name it freely (Chinese characters are not recommended).
- Boot File: The first program executed to boot Windows. For UEFI firmware computers, this program is located at
\Windows\system32\winload.efion the system drive. - System Path:
\Windows— this is also fixed. - System Language: The system language.
Safeboot: Safe boot, typically set to Normal Mode.
PAE: Enabling this allows 32-bit CPUs to access more than 4GB of memory.
NX: A technology that prevents malicious code from loading.
Detect HAL: Detects whether the abstraction layer between the OS and hardware is functioning properly.
Boot to WinPE: If this boot entry starts a PE system, check this option.
Enable Win 8 Metro Interface: When checked, bootmgfw.efi will display the blue tile-style Windows Boot Manager interface. Unchecked uses the black background interface.
Test Mode: I’m not sure about this one. Currently, it doesn’t seem very useful, so I won’t cover it.
Save Current System Settings: Saves the settings for a specific boot entry.
Save Global Settings: Saves the entire BCD file.
Above is a complete introduction to all the button functions in BOOTICE’s BCD editing interface.
Now that the functions are explained, editing BCD becomes straightforward. I’ll emphasize a few practical tips.
- To create a new BCD menu for Windows 7/8/8.1/10/11, click
Add -> New Windows 7/8/8.1 Boot Entry. - For a standard Windows installation, the device type is
Partition. - Select the disk where Windows is installed for Boot Disk.
- Select the partition where Windows is installed for Boot Partition.
- Set the menu title as you like — English is recommended.
- Boot File: For UEFI firmware, it’s
winload.efi. (For BIOS firmware, it’swinload.exe.) - Leave System Path and System Language unchanged.
- Don’t forget to add a backslash () before all paths!
- Keep Safeboot, PAE, and NX at their default settings.
- Do not enable the Win 8 Metro interface (it’s only cosmetic and slows down menu selection).
- Do not check (or leave half-checked) “Boot to WinPE”.
- After each edit, first click
Save Current System Settings, then clickSave Global Settings. - Set the timeout according to your preference (long enough to react).
- Leave other options at their defaults.
You might wonder: why do some options have three states — checked, unchecked, and half-checked?
There’s no unified explanation online, but based on my experience, a half-checked state means the feature will be enabled if possible, otherwise not — a middle-ground state that depends on the boot environment conditions at startup.
This concludes the BCD editing explanation.
After editing BCD, the operating system boot process is nearly complete.
The Final Stage of UEFI Windows Boot
bootmgfw.efi reads the BCD file and lists the operating system boot menu on the Windows Boot Manager interface for user selection.
After the user selects an entry to boot, bootmgfw.efi loads and runs the boot file recorded in the BCD for that entry (i.e., \Windows\system32\winload.efi).
Then, bootmgfw.efi hands over control of the computer to the winload.efi program.
winload.efi is responsible for loading the Windows kernel and starting Windows.
The Windows boot process under UEFI firmware mode is now complete.
Q&A
Why can’t I see the EFI partition in File Explorer?
- The EFI partition is critically important. If a user mistakenly changes files inside it, Windows may fail to boot after shutdown. For such a vital partition, the OS hides it to prevent user access.
- You can see the EFI partition using the built-in
Disk Managementtool, or use third-party software like DiskGenius to browse and edit its files.
Why do two identical files — bootx64.efi and bootmgfw.efi — exist?
- In fact, the UEFI specification designates bootx64.efi as the default boot program for UEFI firmware. That is, when NVRAM has no records, the UEFI firmware loads bootx64.efi by default.
- bootx64.efi has a fixed location:
\EFI\boot\bootx64.efion the EFI partition. - Microsoft uses bootx64.efi as a fallback boot option. If bootmgfw.efi is damaged or missing, the UEFI firmware can still boot bootx64.efi to start Windows.
- For more details, read my 59th article: Detailed Explanation of Windows Boot Manager, Bootmgfw.efi, Bootx64.efi, and bcdboot.exe
Reading Order for This Series:
- Computer Firmware Boot Principles: Windows Boot Process Part 1
- A Complete Guide to UEFI Firmware Booting Windows
- Core Configuration: BCD File Deep Dive & BOOTICE Editing in Practice
- BIOS Firmware Booting Windows
- General Methods for Repairing Windows Boot