Create Your Own WIM Package + DIY Microsoft Official ISO File!
Create Your Own WIM Package + DIY Microsoft Official ISO!
Every time we install Windows 10, 11, or other systems, we go through a complete out-of-box experience (OOBE) process, which can feel tedious when deploying systems in bulk. Can we customize our own system WIM package and turn it into a bootable ISO image?
Customizing the System WIM Package
- Create a new virtual machine in VMWare
- Install a fresh system (preferably with only one disk partition)
- Customize the system (install software, Microsoft runtime libraries, lock updates, adjust common settings, etc.)
- Customize drivers (pre-install driver detection tools like DriverGenius, or directly inject drivers for the target computer)
- Use Dism++ to back up the system and package it as a WIM file (Note: Dism++ can only back up the C drive)
This way, we can obtain our own personalized WIM package.
Creating a Bootable ISO
Sometimes, we need to turn this WIM package into a bootable ISO image for easy virtual machine booting or USB burning. We can create our own bootable ISO by directly “borrowing” from Microsoft’s official ISO.
Steps:
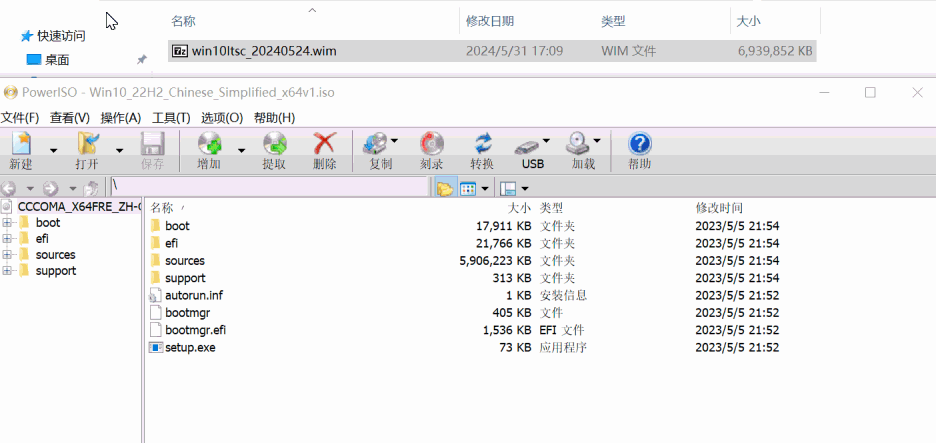
1. Use PowerISO or UltraISO (cracked version download links provided in my previous article “35 DIY MicroPE WIM Image”) to open Microsoft’s official Windows system ISO file.
2. Open the sources folder and delete install.wim inside.
3. Place your self-made WIM package in the same location (i.e., the sources folder) and rename it to install.wim.
If we stop here and directly save or save-as this ISO image, we can indeed obtain a bootable ISO containing our custom WIM package. However, it won’t work during actual installation.
The Windows installer will throw an error during system installation, indicating that our WIM package is invalid. This may be Microsoft’s anti-piracy strategy.
Therefore, to install our own WIM, we cannot use Microsoft’s installer and should instead use a PE system.
But some might say, if I have to use a PE system anyway, why bother burning this ISO to a USB drive? Why not just create a PE bootable USB and install the WIM package directly?
That’s indeed a valid point.
It’s easy to understand: the Windows installer’s runtime environment is actually a PE system as well, just without a desktop environment. So, why not replace this PE system used by the Windows installer with another PE system we’re more familiar with?
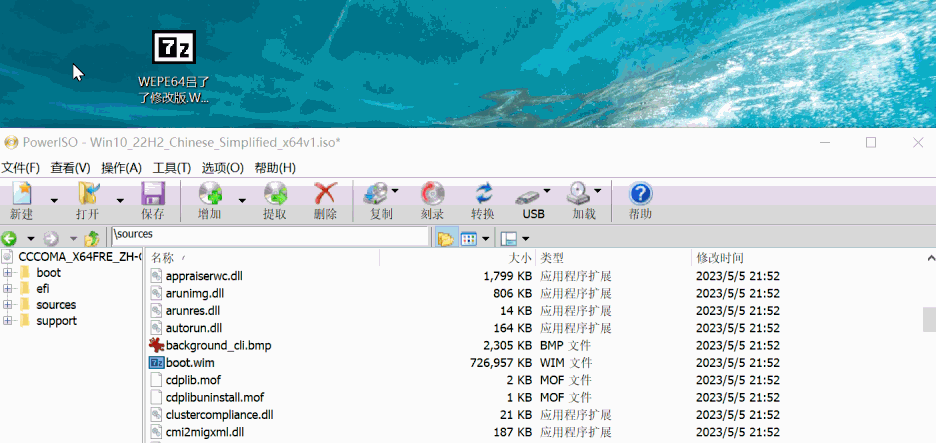
The PE system for the Windows installer is located in the sources folder and is named boot.wim—also a WIM package.
Extract the WIM package WEPE64.WIM from the MicroPE toolbox ISO file, use it to replace the original boot.wim, and rename WEPE64.WIM to boot.wim. This completes the replacement of Microsoft’s official PE system.
When using this ISO to burn a USB drive, a disc, or boot a virtual machine, it will directly enter the MicroPE toolbox interface.
Tests show that this ISO can boot on both BIOS and UEFI firmware.
UEFI:
BIOS:
This is merely a workaround, not a perfect solution—after all, we haven’t successfully made the Windows installer directly install our WIM package.
If any experts in the comments have a better solution, please don’t hesitate to share!