Dual System Installation Tutorial
Dual Boot Installation Tutorial
Today, I’ll show you how to install a dual-boot system on a single computer (one Windows 10 and one Windows 11).
When installing the system, you can use a PE system or an existing Windows system. Here, I’ll explain how to install a dual-boot system using a PE system. If your computer already has a system installed, you can simply treat that existing system as the PE system—the operation is exactly the same.
Disk Partition Requirements
- Each Windows system must be installed in its own separate partition.
- One partition can only host one Windows system.
- The partition’s file system must be NTFS.
- The recommended partition size is at least 30GB, with no upper limit.
Therefore, your disk needs at least two NTFS partitions.
Materials Needed
- A Windows 11 ISO disc image file (or WIM)
- A Windows 10 ISO disc image file (or WIM)
- A PE system USB drive (WeiPE recommended)
Installation Process
- Boot into the USB PE system
- Open the Windows installer on the desktop
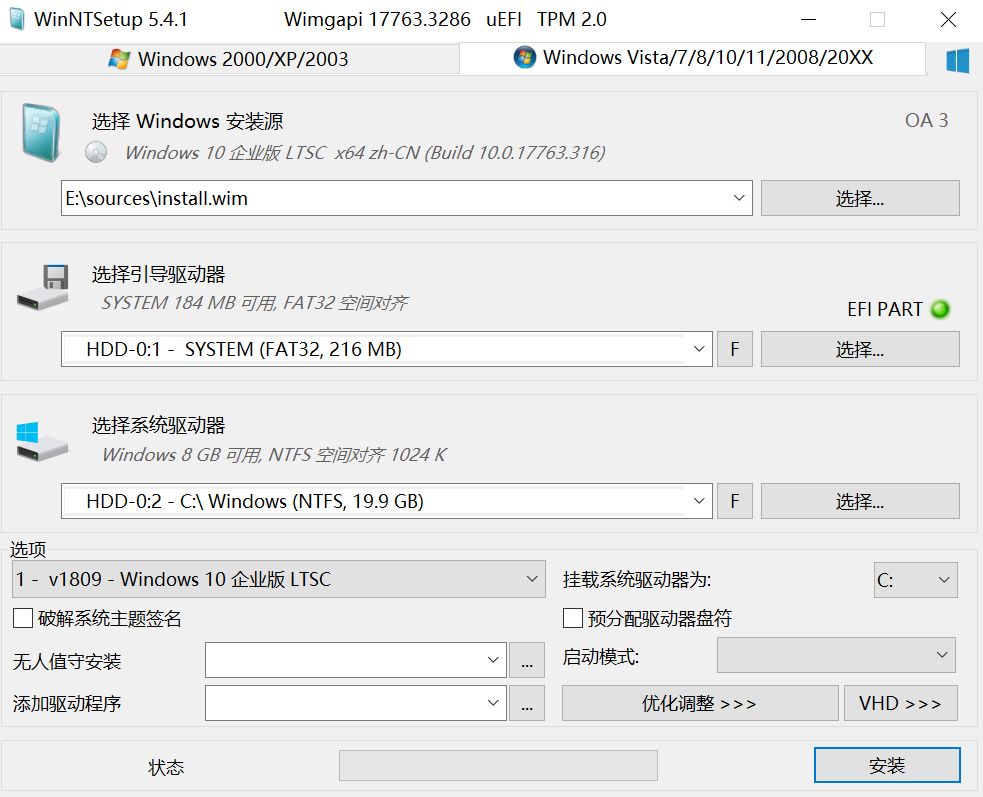
- Select Windows Installation Source:
- Choose the Windows 10 or 11 ISO disc image file
- Select Boot Drive:
- Generally, the Windows installer will auto-select it for you. For UEFI firmware, you’ll see a green “EFI PART” on the right.
- For BIOS firmware, you’ll see three green dots on the right.
- If any dot is red instead of green, it indicates an issue with the boot drive, and the system may fail to boot after installation. You’ll need to troubleshoot the configuration accordingly.
- Select System Drive:
- Simply put, choose a partition to act as the C: drive—the partition where the system will be installed.
- “Options” Section
- Select the Windows system version to install
- For personal use, Professional and Enterprise editions are recommended; Home and Education editions are not recommended.
- Select the Windows system version to install
- Leave everything else as is
- Click “Install” at the bottom right
- Click “OK”
Follow the above steps to install the first Windows system.
Once the progress bar completes, do not shut down or restart. Use the Windows installer again to install the other Windows system using its ISO file. The method is identical to the one above. Make sure to select a different partition than the one used for the first system.
This way, we have successfully installed a dual-boot system.
Restart the computer. On the Windows Boot Manager screen, use the up/down arrow keys to select a boot entry and press Enter to boot into the corresponding system and complete the out-of-box experience (OOBE).
After configuring the first system, return to the Windows Boot Manager, select the second system, and go through the OOBE again.
And that’s it—your dual-boot system is ready.
So, what’s the essence of installing a dual-boot or multi-boot system?
The answer is: use the WinNTSetup (Windows installer) software to install different Windows systems into different NTFS partitions.
Whether you’re in a normal Windows environment or a PE environment, the operation is exactly the same. Installing a system is simply a process of extracting and deploying files from a WIM package to an NTFS partition. The only differences arise from the boot method and boot files, which vary depending on whether the firmware is UEFI or BIOS.
The configuration of the BCD boot file, the EFI partition directory, and the active primary partition directory are all handled automatically by the Windows installer (WinNTSetup)—no manual configuration is needed.