Decrypting the Technical Principles of UD Partition on Boot Disks | FBinst Theory + Hands-On DIY All-in-One Three-Partition Boot Disk
Decrypting the Technical Principles of UD Partition on Bootable USB Drives | FBinst Theory + Hands-On Guide to Creating an All-in-One Triple-Partition Bootable USB
In the realm of PE bootable USB drives, there is a production mode known as the “All-in-One Triple-Partition Bootable USB.” Specifically, once such a bootable USB is created, the disk partition layout looks roughly like this:
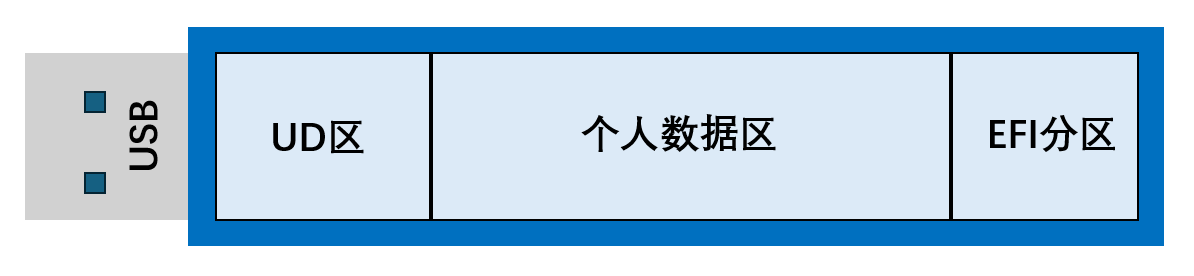
When viewed in DiskGenius, the partition structure of this disk appears as follows:

You may notice that DiskGenius shows 300MB of free space. Why is there free space? What purpose does this free space serve?
Today, we will unveil the mystery hidden within this 300MB of free space.
20 Years Ago…
In 2006, I was just born. Back then, the BIOS on computer motherboards was wildly inconsistent.
Various BIOS implementations showcased their quirks, and support for booting from different types of firmware was all over the place—a real mixed bag. It was common for a properly created bootable USB to boot into a PE system on one computer but immediately throw an error on another.
What caused this? To understand, we need to look at how the BIOS firmware guides the system boot process.
When you press the power button, the BIOS on the motherboard starts running. First, it scans the disks connected to the computer, then reads the MBR of that disk.
What is the MBR?
The MBR is binary code located at cylinder 0, head 0, sector 1 of the disk, with a total size of 512 bytes. In other words, the MBR is the binary data stored at the very beginning of the disk.
It is not a file, but a stream of 0101010110101…
The MBR may look like a chaotic mess. But we must clearly understand that the MBR is explicitly divided into three components.
- Master Boot Code. Size: Occupies the first 446 bytes of the MBR.
- Function: Guides the operating system to boot.
- Disk Partition Table. Size: Occupies 64 bytes.
- Function: Records the partition layout of the entire disk. Each partition entry takes 16 bytes, allowing for a total of four partitions (16x4=64). This means an MBR disk can have at most four primary partitions.
- End Signature. Size: The last 2 bytes of the first sector.
- Function: It is always the hexadecimal value
55 AA. If this part is not55 AA, the hard drive is considered invalid.
- Function: It is always the hexadecimal value
With an understanding of the MBR’s components, we have a clearer picture of the disk boot process.
After pressing the power button, the BIOS locates the first 512 bytes of the disk’s first sector and loads them into memory. Then, the BIOS checks whether the last two bytes of these 512 bytes are 55 AA. If the check passes, the BIOS sends a jump instruction to the CPU, which then executes the first 446 bytes of the MBR boot code. From that point on, the BIOS plays a minimal role.
Given this, the first 446 bytes of boot code become the main battleground for experts. The quality of these 446 bytes directly affects the system’s ability to boot.
The Stability of Big Companies
Generally, when installing a Windows system, the Windows installation tool overwrites the first 446 bytes of the 512-byte MBR with its own boot code. The data written is Microsoft’s own boot code.
Microsoft’s MBR is quite simple and straightforward. Its only function is to let the CPU find an active primary partition and then execute the PBR of that active primary partition.
So, what is an active primary partition? What is a PBR?
An active primary partition is a primary partition on an MBR disk that is marked as “active.” An MBR disk can have only one active primary partition. Where is it marked? The answer is in the MBR. Remember the 64-byte partition table after the 446 bytes? The flag for the active primary partition is within these 64 bytes.
For example, if a disk has four primary partitions and the second one is the active primary partition, the first byte of the 16-byte partition table entry for the second partition will be the hexadecimal value
0x80.The first byte of the 16-byte partition table entries for the other three partitions will be
0x00.
So, the CPU just needs to look at the partition table, find a partition with 0x80, and that’s it.
Now, what is a PBR?
PBR stands for Partition Boot Record. Each partition has a PBR.
As the name suggests, the PBR is a piece of code, similar in nature to the MBR. The PBR is located at the beginning of each partition.
The PBR records partition information, various metadata about the partition, partition attributes, and more.
The PBR of an active primary partition differs from that of a regular primary partition. The PBR code of an active primary partition has a specific function: it tells the CPU to find a program named BOOTMGR in the root directory of that partition and then execute it.
This BOOTMGR is the famous Windows Boot Manager.
At this point, you might be familiar with the Windows Boot Manager—it’s that black-and-white text interface where you can select a bootable operating system.
Of course, why does the PBR look for BOOTMGR? Because it’s Microsoft’s PBR, and it naturally looks for Microsoft’s own boot manager.
Let’s summarize the boot process for BIOS firmware with Microsoft’s official MBR/PBR:
BIOS runs → Loads MBR → CPU executes the first 446 bytes of MBR → Finds the active primary partition → CPU executes the PBR of the active primary partition → Finds BOOTMGR → Runs Windows Boot Manager → Boots Windows.
For what happens after
BOOTMGRstarts, please refer to the pinned article in this public account.
The Flexibility of the Community
The boot process above seems flawless.
However, the wildness of BIOS 20 years ago was beyond our imagination. The biggest issue with Microsoft’s MBR back then was its rigidity.
20 years ago, old BIOS only supported traditional CHS addressing and simple DOS standard MBR, while Microsoft’s XP/2000 official MBR used LBA extended addressing, strict partition validation, and more complex real-mode boot logic. The mismatch in hardware/software standards and non-standard BIOS interrupt implementations made boot failures very common.
Thus, the legendary developer “bean” from the Wuyou Startup Forum stepped in, and FBinst was born.
FBinst was created to solve the pain point of wildly inconsistent BIOS boot behavior. It uses a technology that intelligently identifies the USB drive’s boot mode, allowing the CPU to dynamically detect the USB boot type (ZIP, HDD, FDD) during startup, perfectly resolving the incompatibility issues that prevented USB PE systems from booting.
From what we’ve learned, it’s easy to see that bean’s “ultimate weapon” was the first 446 bytes of boot code in the MBR.
He completely discarded Microsoft’s MBR boot code and wrote his own 446-byte MBR, implanting it into the first disk sector.
At the same time, since only the first 446 bytes of the disk were modified, the subsequent 64-byte disk partition table remained unaffected. This allowed Windows to properly recognize the disk partitions and read their contents.
The Hidden UD Partition
The UD partition, short for “Unrecognized Data,” is created by FBinst. As the name implies, this partition is completely hidden, and Windows cannot recognize it at all.
In simple terms, bean created a new file system from scratch, and the UD partition uses this file system.
Only FBinst can recognize and read the contents of this proprietary file system. To Windows, the data here looks like meaningless 1010101.
Even DiskGenius cannot recognize this file system, so it displays it as “unallocated space.” In reality, the data in this “unallocated space” is meaningful to FBinst.
This is easy to understand. For example, Windows cannot recognize the ext4 file system commonly used in Linux or Apple’s APFS file system. The UD partition’s file system is the same—Windows cannot recognize it either. It’s the same principle.
File systems that Windows can recognize include: Disk file systems: NTFS, exFAT, FAT (FAT16, FAT32), ReFS; optical disc file systems; network drives, etc.
How FBinst Boots
First, the BIOS always reads the first 446 bytes of boot code from the first sector and passes them to the CPU. The CPU executes this code, and then the next action is: search for a file named grldr in the UD partition.
Let’s set aside the question of why grldr is in the UD partition or where it comes from for now. But you might wonder: if even Windows cannot recognize the UD partition, how can the CPU recognize the data inside it?
This is because the MBR written by bean contains code that can recognize the UD partition’s file system. When the CPU executes this code, it can parse the UD partition, recognize the files inside, and then find and run grldr.
What is GRLDR?
GRLDR is the core boot program of the GRUB4DOS open-source project on GitHub. Its role is equivalent to the Windows Boot Manager (BOOTMGR). It is a system boot loader.
GRLDR has a powerful feature: it can directly boot ISO disc image files.
Sounds a lot like Ventoy’s functionality, right? But Ventoy is not based on GRLDR; it’s based on GRUB2.
So things become simple: just place the PE system’s ISO file on the USB drive, let GRLDR find it, and GRLDR can boot the PE system.
According to bean’s design, the PE system’s ISO disc image file is also placed in the UD partition.
Diving Deeper into FBinst
In fact, GRLDR and FBinst are not bound together. However, since both were created by experts from the Wuyou Startup Forum who were in the same circle, their technologies naturally support each other.
GRLDR also has its own MBR boot code and can run independently without relying on FBinst. At the same time, GRLDR has built-in support for parsing the UD partition, which is why it can load and boot PE systems located inside the UD partition.
Note: GRLDR cannot boot PE system WIM files; it can only boot PE system ISO files.
For the UD partition, broadly speaking, the UD partition is internally divided into two parts: the primary partition and the extended partition.
- Primary Partition: Typically 8MB. It usually contains only one file:
grldr. - Extended Partition: We can customize its size, but it must be smaller than the total USB capacity. It contains the PE system’s ISO file.
Why split it into two parts? What’s the purpose?
It’s all about compatibility. Bean considered that some BIOS motherboards might be so quirky that due to compatibility issues, they cannot read data beyond the first 8MB of a disk in its initial state. Therefore, this 8MB is always located at the very beginning of the disk. Placing grldr here ensures that GRLDR can be recognized, loaded, and executed by the CPU under any extreme circumstances.
The capacity beyond 8MB is the extended partition. Generally, it just needs to be large enough to hold one PE system ISO file. For example, using WePE, setting the extended partition to 350MB is sufficient.
We must always remember: UD partition = Primary partition + Extended partition.
Note: The “primary partition” and “extended partition” here are not the same as the primary and extended partitions we usually talk about in MBR disks. They are concepts specific to the UD partition.
Let’s summarize the FBinst boot process:
Power on → BIOS loads the first 446 bytes of MBR → CPU finds and runs grldr in the UD partition → GRLDR finds and boots the PE system ISO file in the UD partition → PE system starts
Hands-On Practice | Manually Creating an FBinst Bootable USB
With the theory above, we now have the confidence to practice. (Though I learned the theory while practicing.)
Our goal this time is to create a dual-partition bootable USB that supports FBinst.
The “All-in-One Triple-Partition” bootable USB mentioned at the beginning of this article is built on top of the FBinst dual-partition bootable USB we are about to create, adding support for modern UEFI firmware.
Tools Required:
- FBinstTool software
- grldr
- USB drive
- PE system ISO disc image file
FBinstTool is the graphical user interface for FBinst. Since FBinst is a command-line tool, using it directly would require typing commands.
Various clean, unbundled PE system ISOs can be obtained from my shared articles. However, I recommend using WePE, as it has good support for older computers.
Download links for FBinstTool and grldr: Follow this public account and reply with
fbin the background to get an unlimited-speed download link.
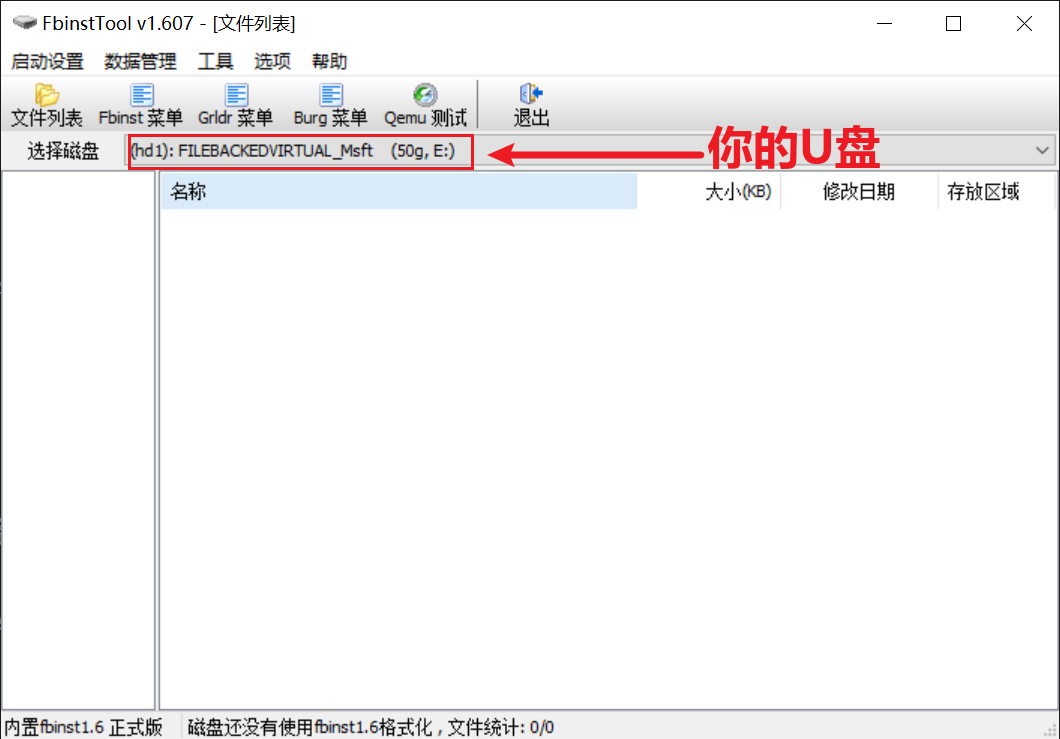
- First, insert your USB drive and open FBinstTool. The name of your USB drive will be displayed at the top of FBinstTool.
- Click “Boot Settings” → “Format” in the top-left corner.
- Check “Force Format” and “UD Extended Partition,” then enter the size for the UD extended partition. The size should be slightly larger than the PE system ISO. I use WePE’s ISO, so I set it to 350MB.
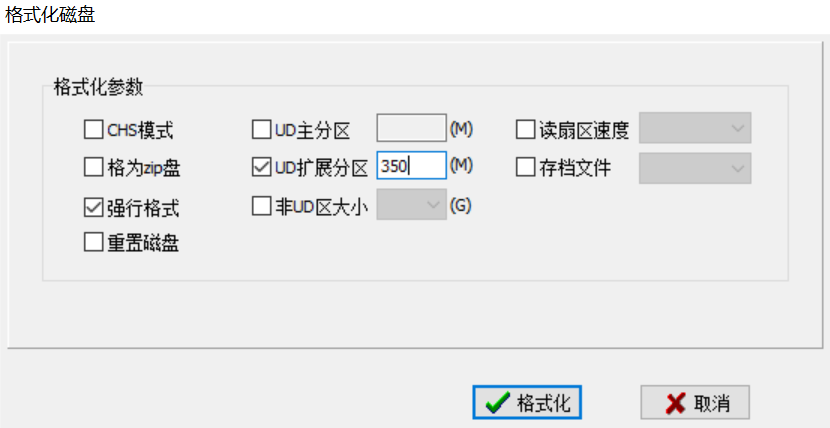
- Click “Format” directly. A prompt will appear: “The –force option is used. This option will delete all data on the USB drive. Continue?” Click “Yes.”
This will delete all data on the USB drive! Please back up your personal data!
Is it possible to create FBinst without formatting the USB drive? Yes, it is! I will explain how to create FBinst without formatting later.
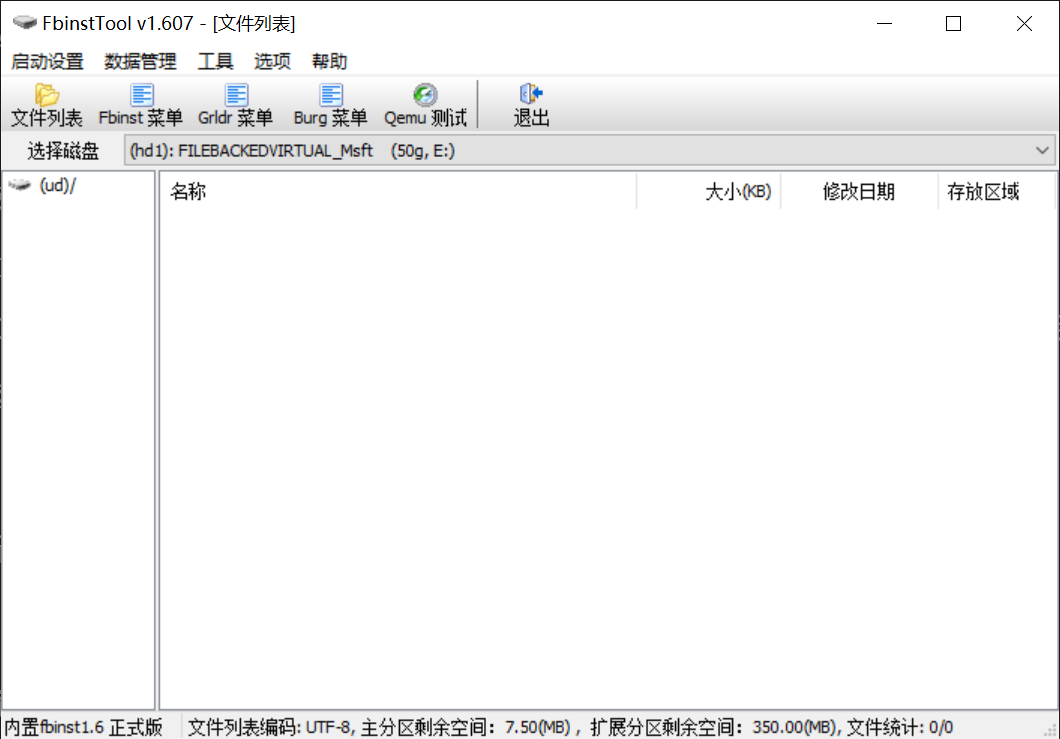
After formatting, a file named
mbr.ptappears in the file list. This is a backup of the original MBR. You can right-click and delete it.Import
grldrinto the USB drive: Right-click on the blank area and select “Import File” (this imports into the UD primary partition), then select thegrldrfile.Import the PE system ISO: Right-click on the blank area and select “Import File (Extended Partition),” choose the PE system ISO file, and wait for the import to complete.
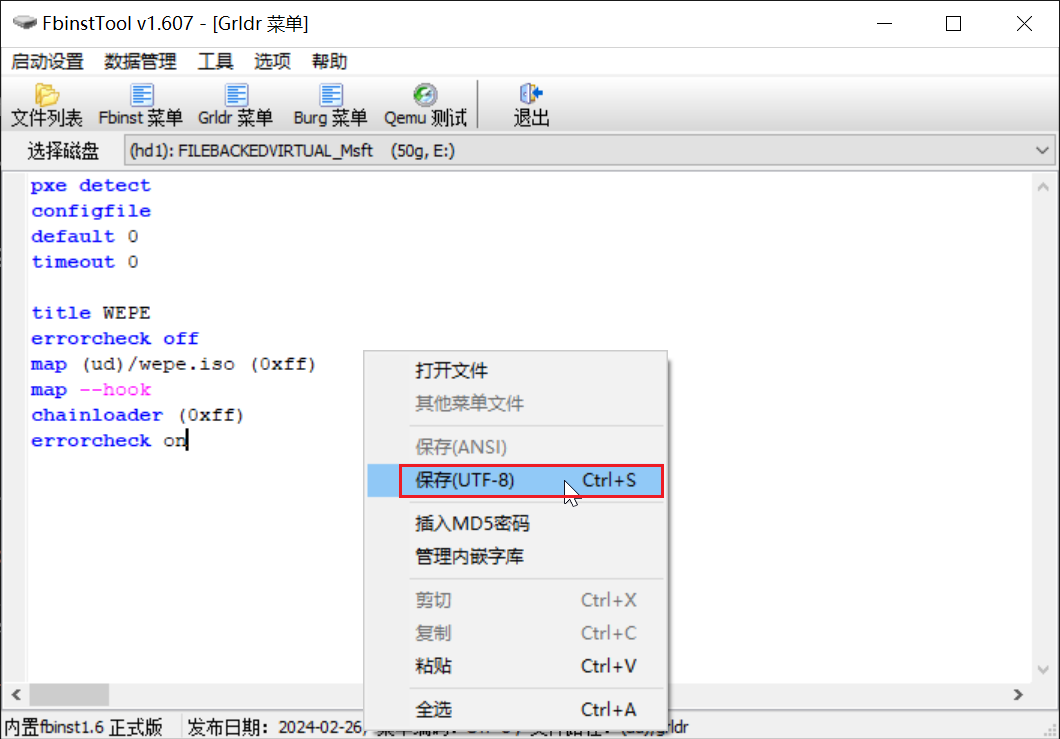
Edit the GRLDR menu: This is the only part that involves code. But you can simply copy and paste.
Click on the
Grldr Menutab at the top of the software, delete all existing content, and replace it with the following (case-insensitive):
1 | |
default 0: The default boot entry is the first one.timeout 0: The menu display timeout is 0 seconds.map (ud)/wepe.iso (0xff): Load thewepe.isofile from the UD partition into memory.map --hook: Immediately activate the virtual disk mapping.chainloader (0xff): Boot from the virtual optical drive.Right-click on the code area and select “Save (UTF-8)” to save the code.
That’s it! We have now created an FBinst bootable USB. You can test it on a computer.
Notice that the user data partition’s file system is FAT32. FAT32 cannot store individual files larger than 4GB. So, I recommend reformatting it to exFAT for regular small USB drives, or NTFS for solid-state USB drives (USSD) or SSDs.
Don’t worry, formatting the user data partition will not damage FBinst.
Check the disk structure in Disk Management:

In the image above, the 358MB of unallocated space is the UD partition, which contains grldr and the WePE ISO file. The 49.65GB E: drive can be used to store your personal files.
However, please note that this bootable USB can only boot computers with BIOS firmware. It cannot boot modern computers with UEFI firmware.
Next, we will continue to modify this USB drive so that it supports both FBinst for BIOS firmware and UEFI firmware. This is the legendary “All-in-One Triple-Partition” bootable USB.
Creating an All-in-One Triple-Partition Bootable USB
Building on the FBinst setup above, we can easily create an all-in-one triple-partition bootable USB.
UEFI boot requirements are simple: the USB drive needs a partition with a FAT32 file system that contains some boot files.
Steps:
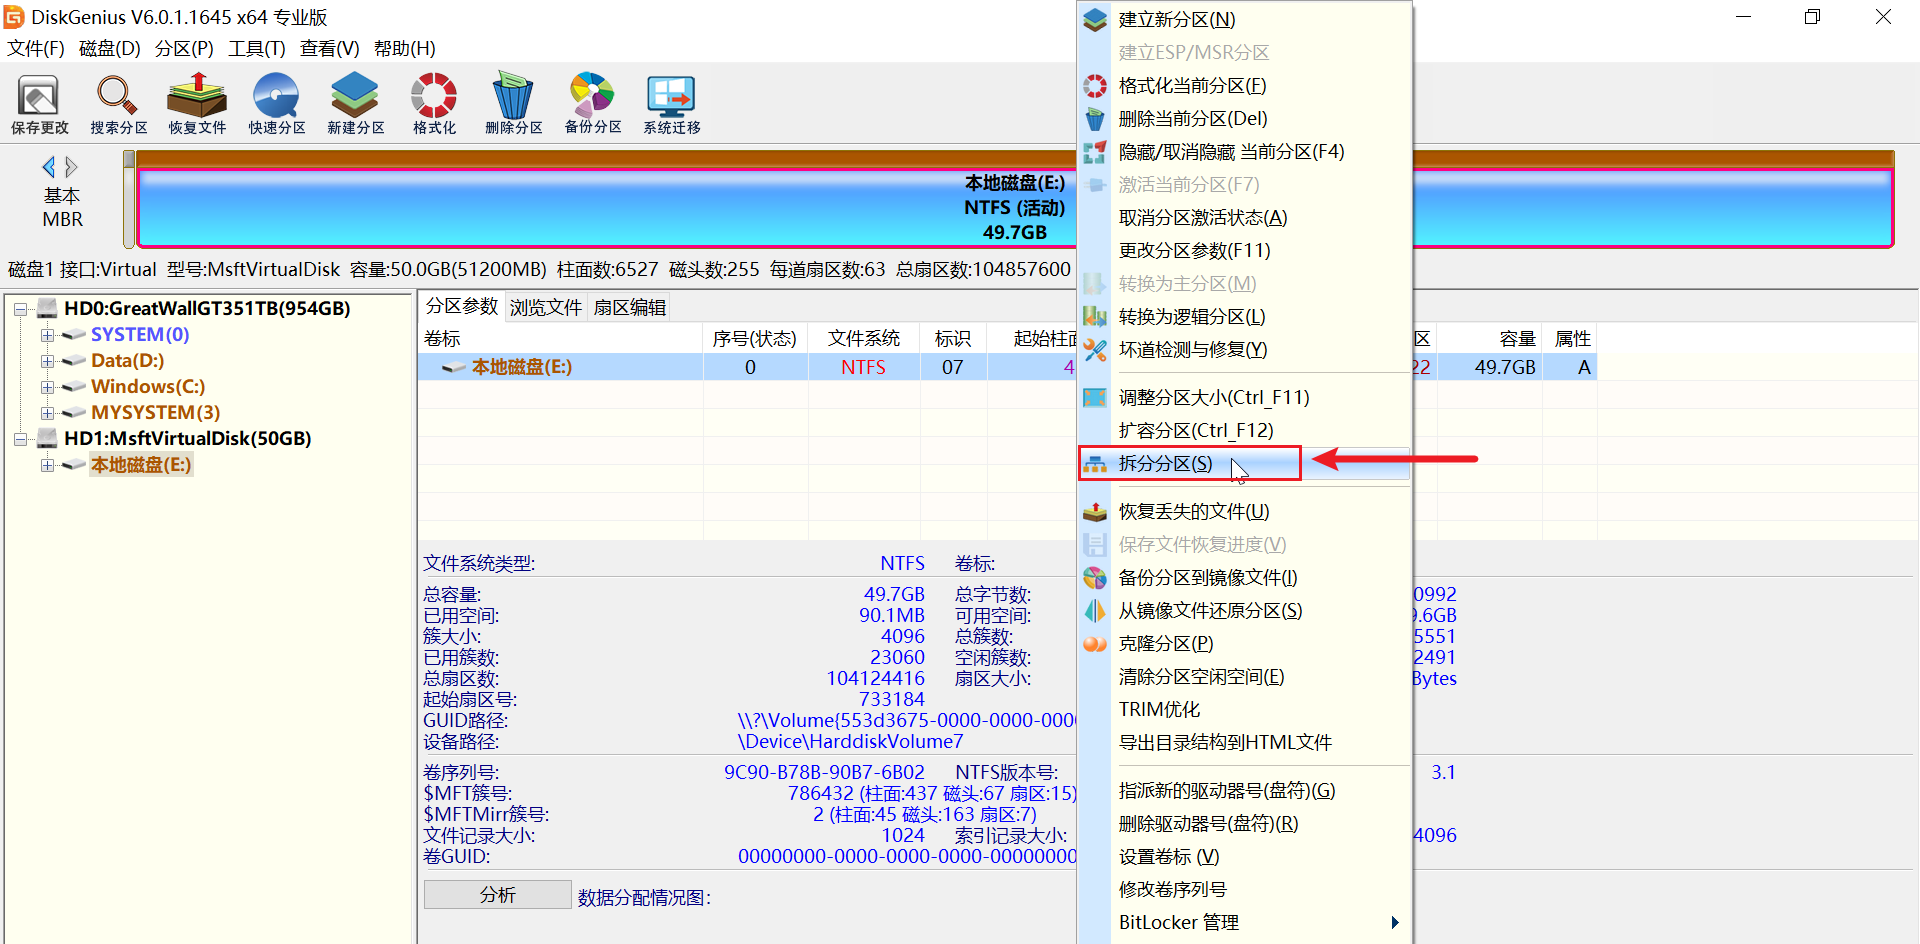
- Open DiskGenius.
- Right-click on the user data partition and select “Split Partition.”
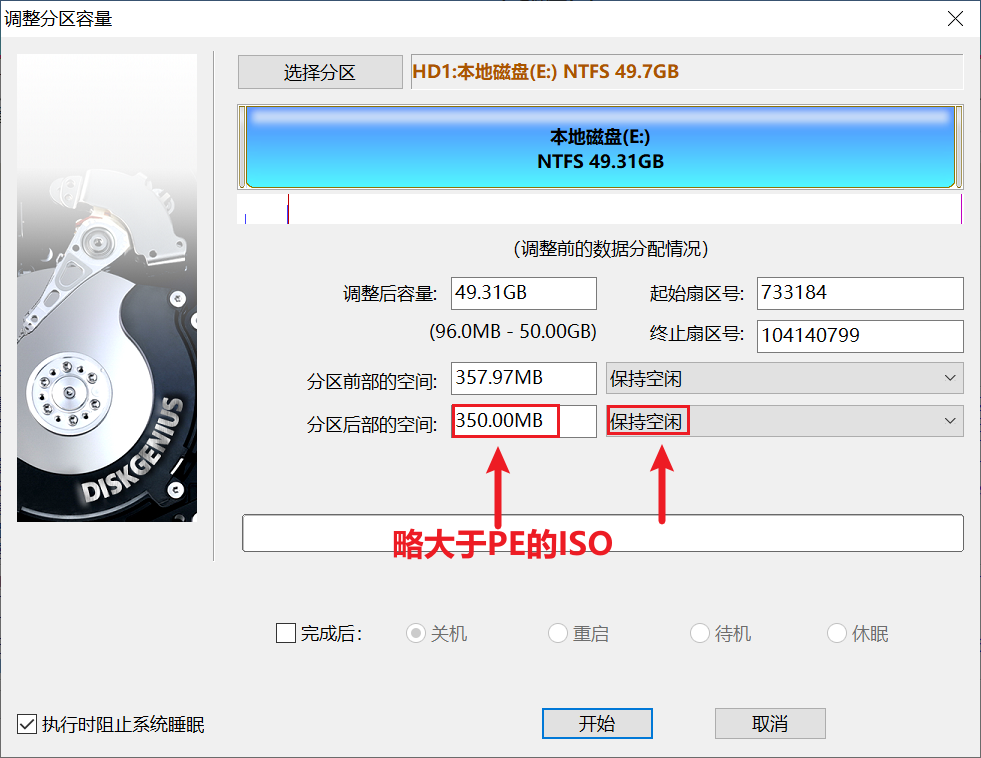
- Leave the “Space before partition” value unchanged. Modify the “Space after partition” to be slightly larger than the PE system ISO size. (For example, I set it to 350MB.)
- Then, on the right side, select “Keep Unallocated.” We will leave this space free for now and later format it as a FAT32 partition.
- Click “Start” at the bottom and wait for DiskGenius to complete the operation. Then click “Finish.”
- At this point, a gray unallocated space will appear at the very end of the USB drive. Right-click on this space and select the first option, “Create New Partition.”
- Choose
Primary Partition,FAT32file system, set the volume label toEFI, keep other settings as default, click “OK,” and then click “Save Changes” in the top-left corner of the software.
Don’t forget to click “Save Changes”!
- Then click “Yes” twice.
Now, we have manually created an EFI partition with a FAT32 file system. Next, we need to add the PE system and boot files to this EFI partition. The process is very simple.
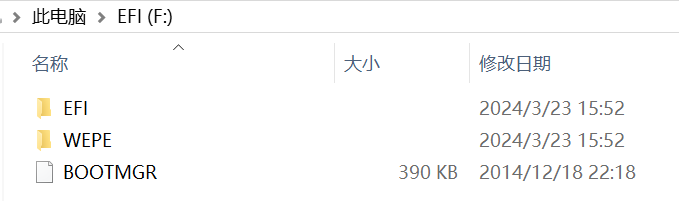
- Open “This PC,” find the EFI partition you just created, and open it.
- Locate your PE system ISO file and double-click it to mount and open it.
If you are using Windows 7 or earlier, you cannot double-click to open ISO files.
You will need to use an archive tool (e.g., 7-Zip, WinRAR) to open the ISO file, just like opening a compressed archive.
- Copy all the contents from the ISO file and paste them directly into the EFI partition you just created.
And there you have it—an all-in-one triple-partition PE system bootable USB.
This bootable USB can boot ancient antique machines as well as modern high-end computers—unbeatable and all-powerful.
How to Create an All-in-One Triple-Partition Bootable USB Without Formatting
Too much data on the USB drive and slow backups? You can create an FBinst all-in-one triple-partition bootable USB without formatting!
Let’s take a moment to think about the essence of FBinst:
- Essentially, it involves injecting bean’s MBR code into the first 446 bytes of the first sector, replacing Microsoft’s original MBR boot code, and then carving out an unallocated space at the very beginning of the USB drive for the UD partition.
So, we can directly use DiskGenius to manually meet these requirements. Leave some free space at the front of the USB drive and create an EFI partition at the back.
The method is also simple.
Steps:
- Insert the USB drive and open DiskGenius.
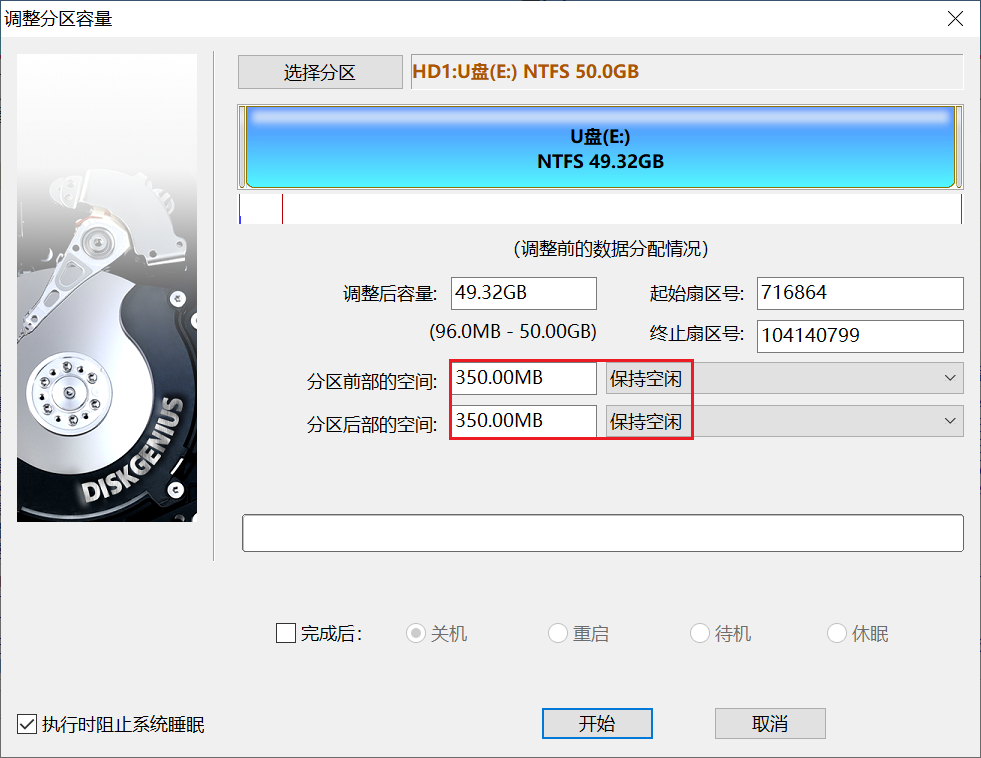
- Right-click on the USB partition and select “Split Partition.”
- Leave free space both before and after the partition. The size should still be slightly larger than the PE system ISO. For example, if I use WePE, I leave 350MB both before and after.
- Select “Keep Unallocated” for both.
- Then, create an EFI partition on the unallocated space at the end of the USB drive. The method is identical to the one described above for creating an EFI partition.
- The unallocated space at the front of the partition needs to be configured using FBinstTool to write the FBinst MBR boot code.
- Open FBinstTool, select your USB drive from the list, then click “Boot Settings” → “Format.”
- Uncheck “Force Format” and check “UD Extended Partition,” then enter the size. (Force Format means formatting the entire USB drive.)
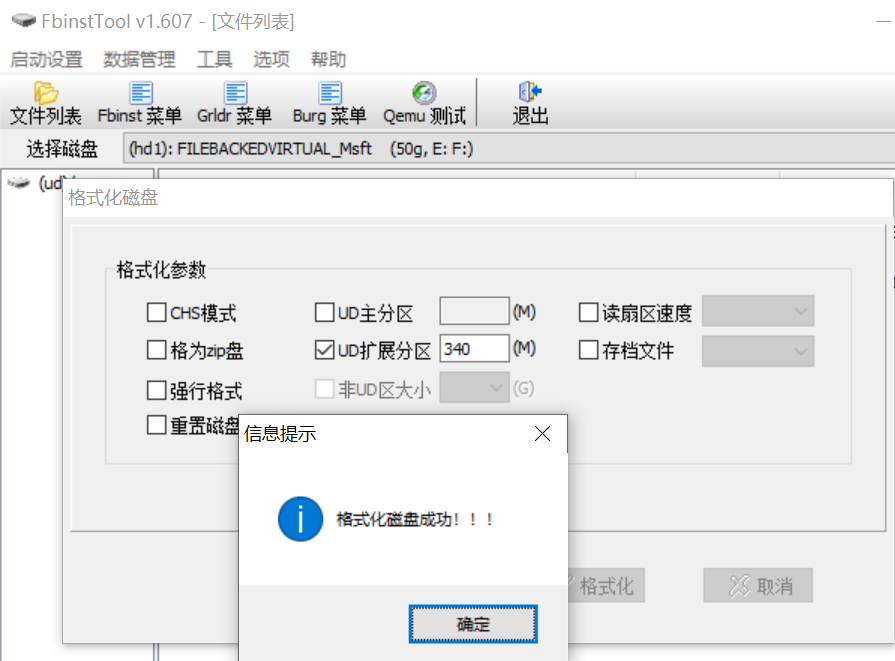
What value should you enter here? For example, if I left 350MB of free space at the front of the USB drive, can I enter 350 for the UD extended partition?
No, because the UD partition = Primary partition + Extended partition. If the extended partition is 350MB, there would be no space left for the primary partition!
The default UD primary partition size in the software is 8MB. So, the maximum I can enter for the UD extended partition here is 342MB. This time, I will enter 340MB.
The extended partition size must be larger than your PE system ISO.
Thus, without formatting the entire USB drive, we have obtained an all-in-one triple-partition bootable USB with FBinst built-in.
The subsequent steps for importing files into the UD partition and configuring the boot code are exactly the same as described earlier.
In fact, if you understand the theory, you can experiment with many more variations, especially when configuring GRLDR boot code.
You can try installing multiple PE systems on one USB drive, making them support both UD partition booting and EFI partition booting. You can also use GRLDR in the UD partition to chain-load BOOTMGR from the EFI partition, using GRLDR to start the Windows Boot Manager and then boot the PE system. Alternatively, you can directly place the PE system ISO file in the EFI partition or the user data partition and use GRLDR to load these ISO files directly to boot the PE system.
All of these depend on correctly writing the GRLDR boot configuration code. With today’s AI technology, as long as you understand the principles of boot loading, having AI help you write the GRLDR boot configuration code should not be difficult.
Feel free to explore these possibilities on your own. I won’t go into detail here. (I’ve tried them all, anyway.)