Reinstall Windows System Without PE, RE, USB, or Double-Clicking setup.exe: A Unique Trick (First on the Web)
No PE, No RE, No USB, No Double-Clicking setup.exe: A Unique Way to Reinstall Windows (First on the Web)
That’s right, you read that correctly: Today I’m introducing a method to cleanly reinstall Windows using nothing but an ISO file—no third-party media, no external system, purely on the local machine. No USB drive? No built-in RE on your PC? You can still perform an in-place reinstallation!
Note: This method does NOT involve double-clicking setup.exe inside the ISO!
Preparation
- A Windows ISO disc image file (this article uses Windows10_IoT_LTSC_2021)
- DiskGenius software
- BOOTICE software
Creating a New Partition
First, create a sufficiently large new NTFS partition on your disk. Requirements:
- The partition must be large enough to hold your Windows ISO file
How to Create a New Partition?
Use the built-in Disk Management tool in Windows.
- Right-click the Windows logo in the lower-left corner
- Click Disk Management
- Right-click a partition with ample free space, then select Shrink Volume
- Enter the amount of space to shrink: I entered 8000 (approximately 8 GB)
- Click through to confirm
At this point, a new unallocated space will appear after the partition you shrunk.
- Right-click the unallocated space and select New Simple Volume
- Make sure to choose NTFS as the file system; leave everything else as default and proceed to finish.
Rest assured, the above operations will not cause data loss.
Afterward, you’ll see a new partition of about 8 GB in File Explorer.
Why must it be NTFS?
Because NTFS can handle individual files larger than 4 GB, while FAT32 cannot.
Many Windows 10 and Windows 11 installation files (install.wim) exceed 4 GB, so NTFS is recommended.
Copying the ISO Contents
Select all files inside the ISO and copy them to the newly created partition.
You can open the ISO file directly by double-clicking it in File Explorer or using an extraction tool.
Editing the BCD File
- Navigate to
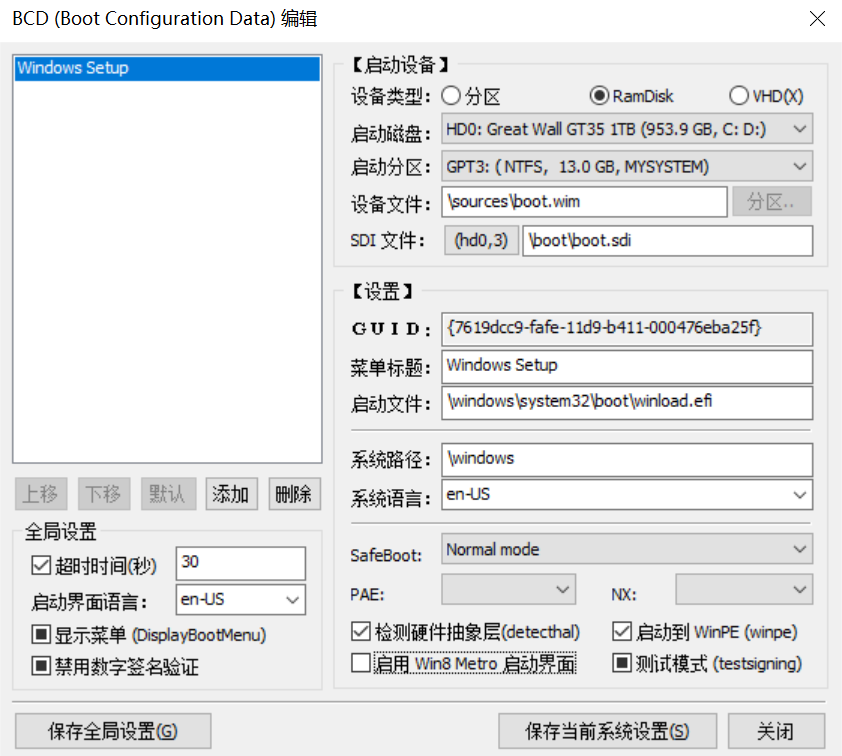
\efi\Microsoft\boot\inside the new partition and locate the BCD file. - Open BOOTICE, click BCD Edit → Other BCD File, then drag the BCD file onto the BOOTICE window (or select it manually).
- Click Smart Edit Mode
- Set Startup Disk to the disk containing the new partition
- Set Startup Partition to the new partition (identify it by drive letter and size)
- Leave Device File as default:
\sources\boot.wim - Click the boot button next to SDI File. In the dialog that appears, select the same startup disk and partition as above. Keep
\boot\boot.sdiunchanged. - Uncheck Enable Win8 Metro Boot Interface
- Click Save Current System Settings, then confirm
- Click Save Global Settings, then confirm
- Close → Exit
BCD editing is complete.
BCD editing is a crucial skill. If you want to dive deeper, follow our official account and read the featured article:
《93 [Long Read Alert] Must-Read for Beginners: Comprehensive Guide to Windows Boot and Startup》
Adding Boot Entry (for UEFI Firmware)
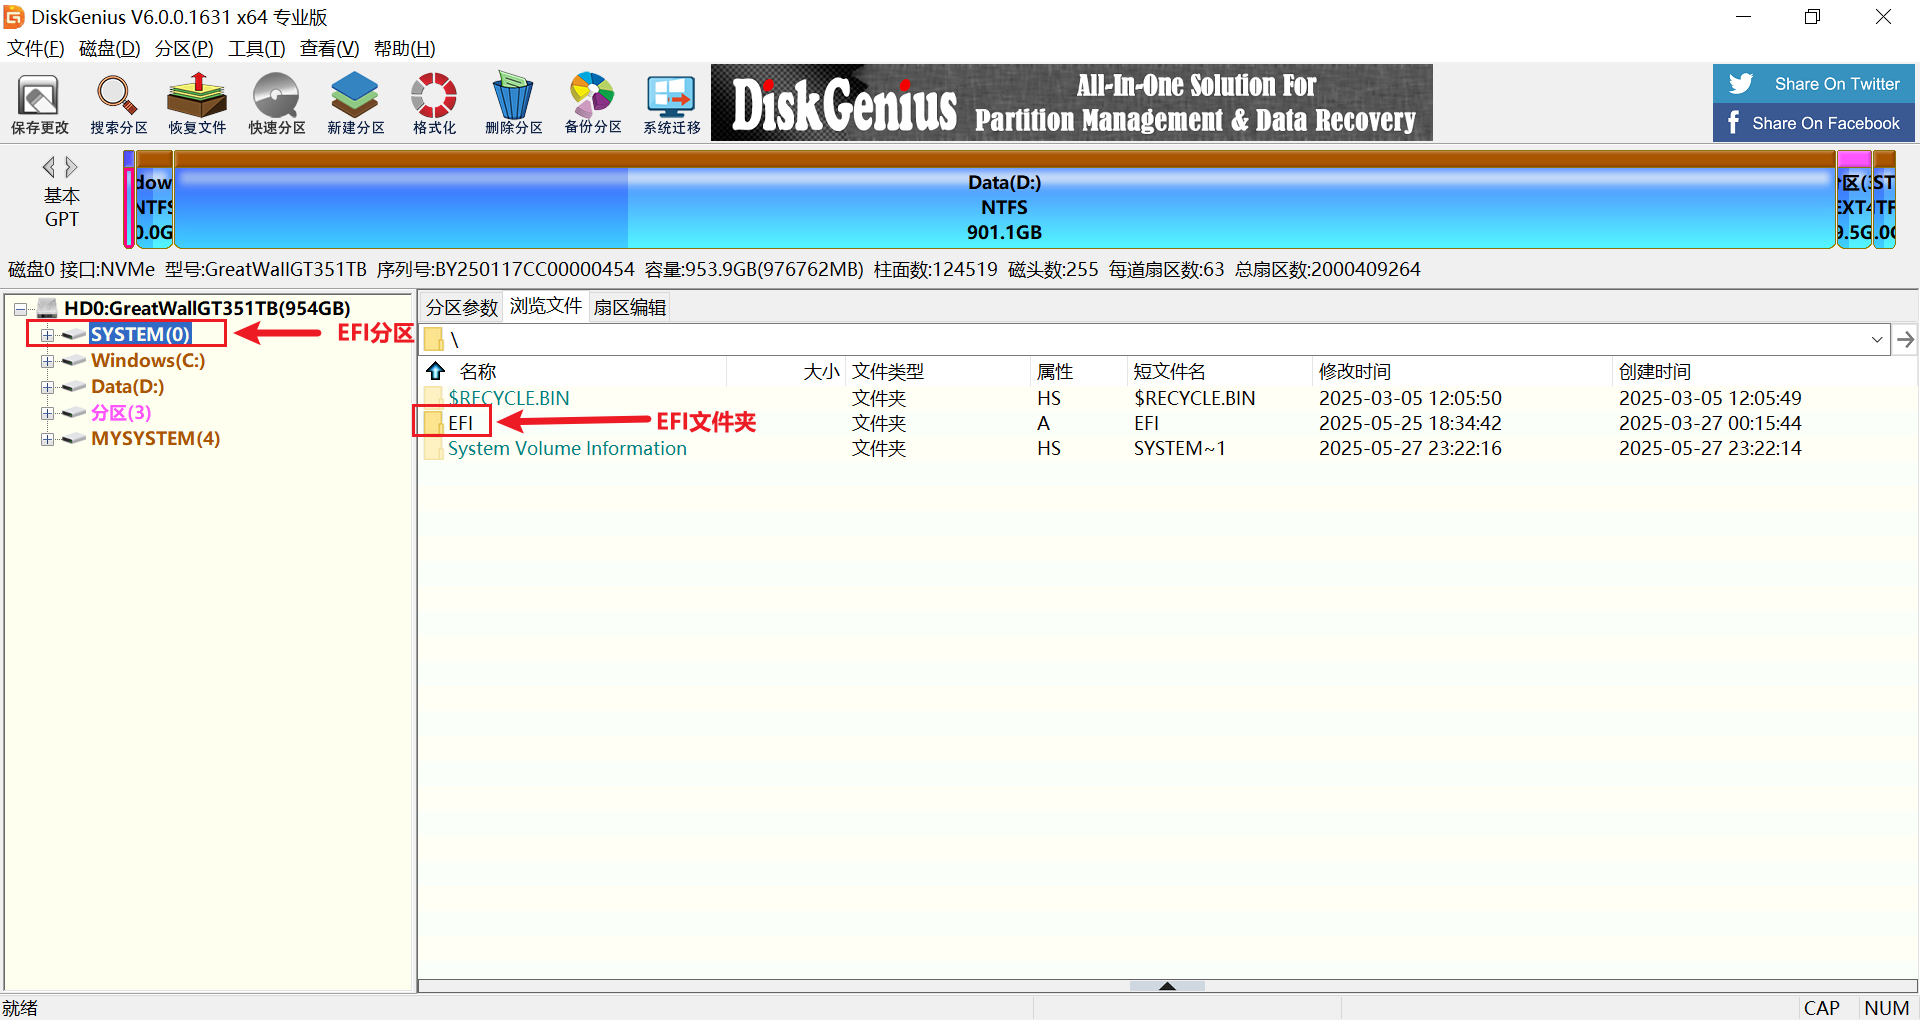
- Open DiskGenius, click on the EFI partition on your disk, then click Browse Files
What is the EFI partition?
The EFI partition is a small partition on UEFI-based computers, formatted as FAT32 or FAT16. It typically ranges from 100 to 500 MB. Its purpose is to boot the operating system on UEFI firmware.
The EFI partition contains a folder named EFI. You can identify it by this feature.
Delete the EFI folder in the root directory
- Select the folder and press Delete
Open the newly created partition, then drag and drop the
efifolder into the EFI partition.Close DiskGenius
Entering the Installation Phase
Simply restart your computer. It will automatically boot into the native Windows setup.exe installation phase. The remaining steps are standard installation procedures and are not covered here.
Restoring Disk Partitions
After installation, you’ll need to reclaim the space from the new partition and merge it back into its original partition.
- Open Disk Management
- Right-click the new partition, select Delete Volume, and confirm
- Right-click the original partition, select Extend Volume
- Proceed through the wizard