Installing Windows Using a PE System
Installing Windows Using a PE System
Foreword:
Since its inception, this public account has delved deeply into various aspects of Windows system installation, optimization, boot methods, bootloaders, and more, receiving widespread acclaim from readers.
However, I realized I never wrote a dedicated article explaining how to install Windows on a computer. So today, I’ll provide a complete guide on installing Windows.
This article will introduce the full process of installing Windows using a PE system, following what I consider the fastest and most beginner-friendly approach.
Pre-Installation Preparation
- An external storage device larger than 8GB (e.g., USB flash drive, external hard drive)
- A computer on which to install Windows
- A working 64-bit Windows system computer
Creating a Bootable PE USB Drive
Using a lightweight, clean PE system is essential for a smooth Windows installation.
We’ll use the WePE system.
Open the WePE download page:
https://www.wepe.com.cn/download.html
Download the WePE v2.3 version.
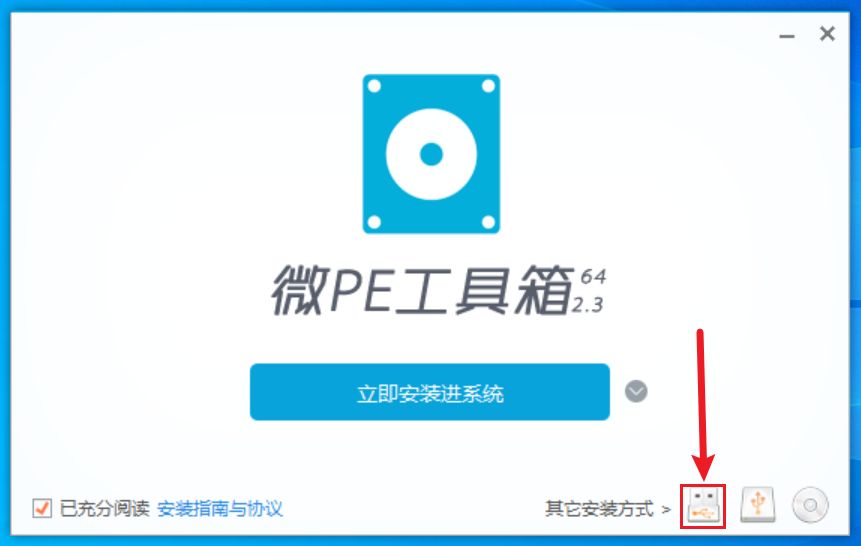
After downloading, you’ll get an executable. Insert the USB drive you want to turn into a PE drive, then open the WePE Toolbox.
Click the USB icon in the bottom-right corner to install the PE system onto the USB drive.
Confirm that the target USB drive is the one you intend to use for the PE system.
Note: Using the WePE Toolbox to create a PE USB drive will format the drive, erasing all existing data. Back up important data beforehand, or use a brand-new USB drive.
Click “Install PE to USB Drive” at the bottom.
The software will warn you that formatting carries a risk of data loss. Confirm your data is backed up, then proceed.
Wait about 1 minute, and the PE system will be successfully created.
The PE bootable drive can be used as a regular USB drive; you can store normal data in its main partition without any issues.
Downloading the Windows ISO File
Obtaining the official Microsoft Windows ISO file ensures a clean, original system installation.
- Microsoft Windows 10 ISO download page:
https://www.microsoft.com/en-us/software-download/windows10
- Microsoft Windows 11 ISO download page:
https://www.microsoft.com/en-us/software-download/windows11
We’ll use Windows 11 as an example to demonstrate how to download the ISO file.
- Open the Windows 11 ISO download page, scroll down to find
Download Windows 11 Disk Image (ISO) for x64 devices. - Click
Download. - Select
Windows 11 (multi-edition ISO for x64 devices). - Choose
Simplified Chineseas the language. - Click
64-bit Download.
This will download the official Microsoft Windows 11 ISO file.
The download method for Windows 10 is similar, but you may need to use a mobile or tablet device, or set your browser to mobile/tablet mode, as the desktop version may not show the ISO download button.
Once the download is complete, copy the ISO file to your PE USB drive for later use.
Booting into the PE System
The method to enter the PE system varies by motherboard model, but generally involves pressing a specific key during startup.
The WePE Toolbox’s “Installation Guide and Agreement” lists the boot hotkeys for almost all computers and motherboards.
For example: Huawei F12, Lenovo F12.
- Ensure the USB drive has been made into a PE bootable drive.
- Ensure the Windows ISO file is on the USB drive.
- Shut down the target computer and insert the USB drive.
- Press the power button, then immediately and repeatedly press the boot hotkey for your computer.
- Enter the boot device selection menu. This menu varies by computer but will list all bootable devices connected.
- Use the arrow keys to select your USB drive. You can usually identify it by its brand, capacity, etc.
- Press Enter to boot into the PE system.
Installing a Fresh Windows System in PE
Before installing Windows in the PE environment, confirm the following:
- Which partition will serve as the new C drive for Windows?
- Does the disk’s partition table and layout match the motherboard’s firmware?
Which Partition Should Be the New C Drive?
Generally, you can install directly into the partition containing the old Windows system. However, that partition must be formatted before installing the new system.
Does the Disk’s Partition Table and Layout Match the Motherboard’s Firmware?
In general, new motherboards (UEFI firmware) use the GPT partition table, while old motherboards (BIOS firmware) use MBR.
UEFI firmware requires a FAT file system EFI partition for booting.
BIOS firmware requires an active primary partition on the disk to store the BOOTMGR bootloader and boot folder.
If this sounds confusing, don’t worry—just format the old C drive in the PE system and install the new system into it without changing the disk partitions or partition table.
I’ve previously written detailed articles on the boot principles of Windows on BIOS and UEFI firmware—check the public account’s featured articles.
Here’s how to install the new system in PE:
- First, ensure the target system drive is empty and formatted as NTFS.
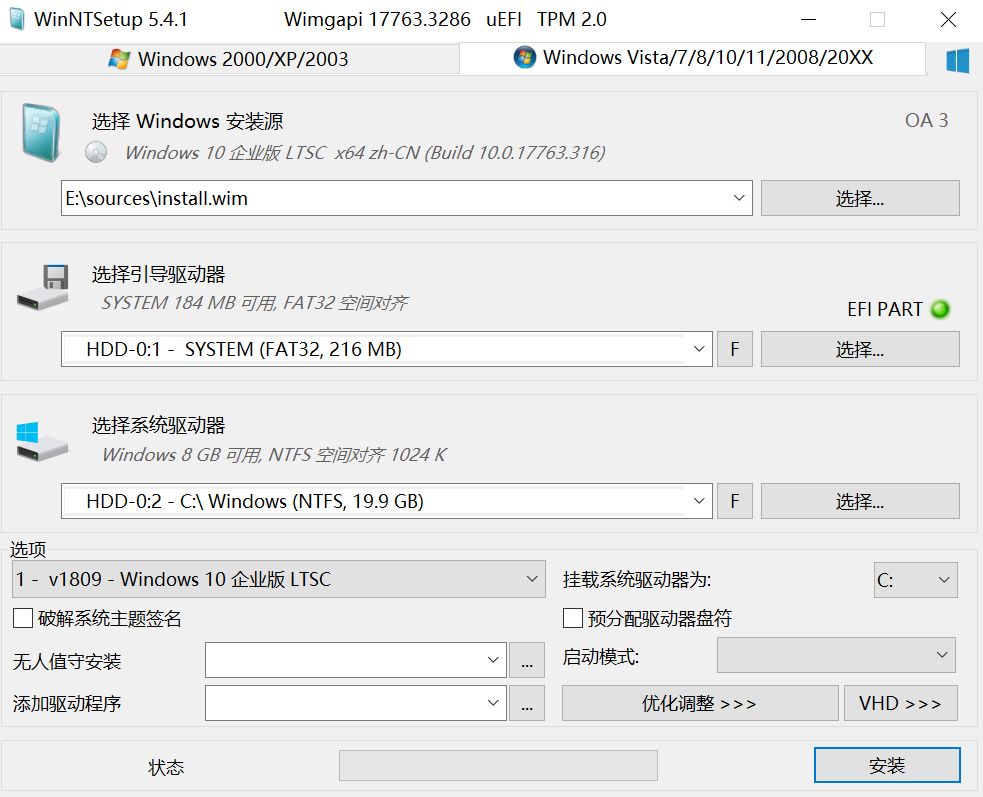
- Open the
Windows Installeron the WePE desktop (actually WinNTSetup). - Select the Windows installation source:
- Choose the Windows 10 or 11 ISO file.
- Select the boot drive:
- The installer usually auto-selects the correct one. For UEFI firmware, a green
EFI PARTwill appear on the right. - For BIOS firmware, three green dots will appear on the right.
- If any dot is red instead of green, the boot drive configuration is problematic and may prevent booting—adjust as needed.
- The installer usually auto-selects the correct one. For UEFI firmware, a green
- Select the system drive:
- Simply put, choose the new C drive—the partition where the system will be installed.
- Ensure this partition is an empty NTFS partition with no other system files.
- Options section:
- Choose the Windows edition to install:
- For personal use, Professional or Enterprise editions are recommended; avoid Home or Education editions.
- Choose the Windows edition to install:
- Leave other settings as default.
- Click
Installat the bottom right. - Click
OK.
Wait for the progress bar to complete, and Windows will be successfully installed.
Entering the New System
After the above steps, restart the computer, remove the USB drive, and boot into the newly installed Windows system to experience the out-of-box experience (OOBE).
The OOBE interface differs significantly between Windows 10 and Windows 11, but the basic operations are similar. One key tip: do not connect to the internet during OOBE.
For desktops, unplug the Ethernet cable; for laptops, skip connecting to Wi-Fi.
In modern Windows 11, you’re required to sign in with a Microsoft account if connected to the internet. However, there’s a way to bypass this.
Bypassing the forced Microsoft account sign-in:
- Press
Shift+F10on the keyboard (you may need to press Fn on some laptops). - Click on the cmd window that appears.
- Type
start ms-cxh:localonlyand press Enter.
This command works for both Windows 10 and Windows 11.
You’ll then be taken to the account creation screen. Create a local account without requiring internet. It’s advisable not to set a password at this stage, as it forces you to set security questions. You can set a new password later via the Control Panel.
It’s recommended to use an all-English account name without symbols or spaces to avoid compatibility issues with some software.
Follow the on-screen prompts—the process is straightforward and won’t be detailed here.
You’ll then see the desktop of your new system for the first time.
Post-Installation
Although the system appears ready to use, it’s still a bare-bones setup. You need to further configure it for daily use.
Install Microsoft Visual C++ Redistributables
Since the new system is very clean, it lacks common Microsoft runtime libraries, which may cause many applications to fail (e.g., “The program can’t start because xxxxx.dll is missing”). Download and install the Microsoft Visual C++ Redistributable package. The latest version as of now is 20250619. Download link:
https://wwa.lanzout.com/b0b8rs19a#9527
Password: 9527
Install Drivers
The new system may not have proper hardware drivers installed, and sometimes even the network driver is missing, making it impossible to download drivers. For driver installation methods, please refer to my previous article “Struggling with Drivers After Reinstalling Windows? Several Essential Driver Installation Tips, Recommended to Save.”
After completing the above steps, you can start using your brand-new Windows system normally.