Revisiting C Drive Space Saving: WizTree Scans C Drive at a Glance, See How WimBoot + Directory Links Trick the System
Revisiting C Drive Space Savings: How WizTree Scans C Drive at a Glance, and How WimBoot + Directory Links Trick the System
Clean, minimal, powerful, efficient — these are my relentless pursuits for Windows systems and everyday software.
In this era of skyrocketing hard drive and memory prices, let me continue crafting an article that is 100% AI-free, purely hand-typed, with zero filler content for this WeChat public account.
Preventing AI plagiarism checks for academic papers starts with writing public account posts. :- )
Today’s topic remains: How to maximize C drive space savings?
Is it inevitable that besides the Windows system, C drive must contain other things? Must C drive space keep shrinking?
Can’t there be some magical force that makes the “meter run backward”?
The answer is: Yes, there is, my friend.
Here, we have methods to make your computer data completely intact, system configuration unchanged, while making C drive “time travel backward” and storage space “run the meter backward.”
Because this is the WeChat public account dedicated to spreading Windows system operation and maintenance techniques: Lv She.
This time, we’re not just simply cleaning C drive — we’re swapping beams for pillars, crossing the sea under heaven’s nose, stealing the sky and replacing the sun. If this article only introduced how to clean, it would be no different from the filler posts on Zhihu, Bilibili, Xiaohongshu, or CSDN — neither innovative nor interesting :- (
This article will maintain the integration of theory with practice, stay close to the masses, and practice criticism and self-criticism (randomly inserted), explaining in simple terms the three treasures in the field of disk space saving: WizTree, WimBoot, and Directory Links, and fully introduce how they are applied in real production environments.
Alright, if you’re ready to learn how to sharpen your knife against C drive, please read this article that still retains the warmth of the author’s hands. I believe that regardless of your technical level, you will definitely benefit greatly.
WizTree
WizTree is a powerful disk analysis software. Within 5 seconds, it can display all files stored on C drive as colorful blocks of varying sizes on the screen, allowing you to intuitively see which files are taking up significant space and which are negligible.
This is the official WizTree website, which may be difficult to access due to China’s network environment. I’ve also provided the download link for the latest WizTree version as of November 24, 2025.
Follow me, send “wiz” in the background to get the download link for WizTree v4.28 24 portable version.
Run WizTree with administrator privileges, select C drive, and click Scan. In a very short time, you’ll get an overview of C drive file status:
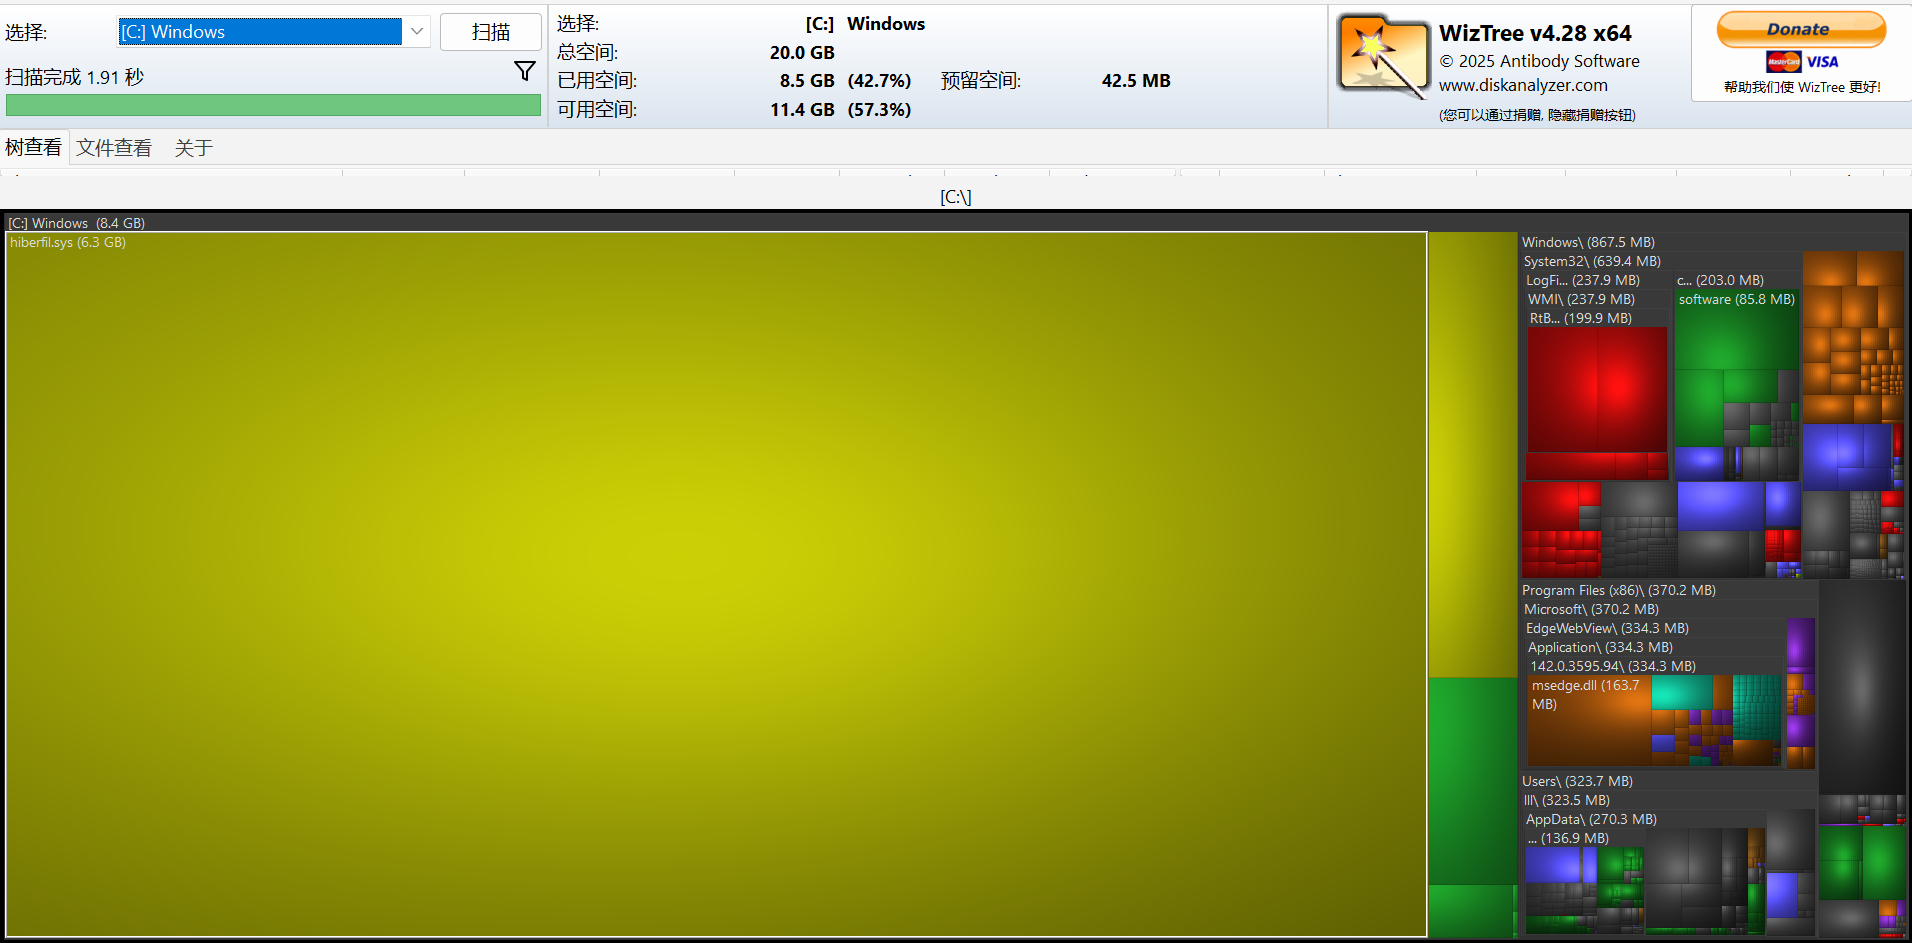
By observing the size of each color block, you can intuitively see which file or folder takes up the most space. Hovering your mouse over the blocks highlights them, and left/right-clicking on blocks allows various operations on files and folders.
At this step, our goal is to delete unnecessary files from C drive and clean up C drive space.
I’m not telling you which files on C drive take up the most space; instead, I’m letting you intuitively feel the size relationships between files on the entire disk, giving you the autonomy to decide which files to delete.
After manual cleanup, we need to perform deeper C drive cleaning — removing files that WizTree can’t identify but still take up significant space. This is where we use the veteran system optimization software Dism++.
Dism++ official website:
Open Dism++, click on Options -> Detailed Settings -> Enable Expert Mode. Then click on Space Recovery on the left.
You can directly refer to my selections:
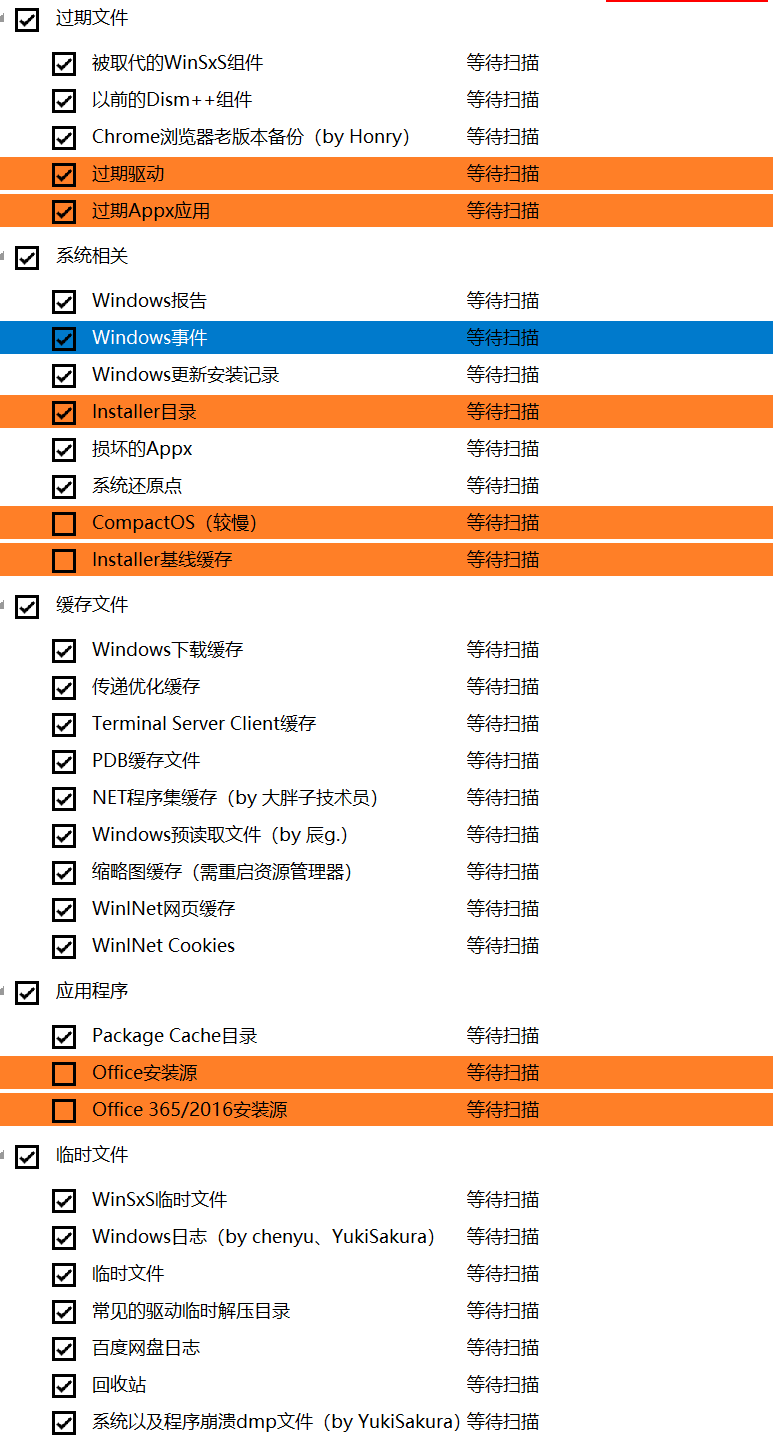
After selecting, click Scan, wait patiently, then click Clean. During the cleaning process, it will prompt to restart the Explorer. Wait for the cleaning to complete.
The amount of C drive garbage cleaned by Dism++ varies by system, typically freeing up about 1GB to 9GB of space.
After cleaning C drive, we can proceed to the next heavyweight operation: Directory Links.
Directory Links
First, what are directory links?
Directory links (soft links) in Windows are references that point to other directories or files in the file system (somewhat similar to shortcuts). They allow you to create a virtual path pointing to another location without copying the actual data. Through directory links, users can directly access files and folders at the original location without moving or copying them.
Okay, after reading the explanation above, are you confused?
Let me explain directory links in simpler terms below.
Directory links, also known as soft links, are an operation on folders. Directory links appear in the system almost identical to shortcuts, but they are not shortcuts.
When you create a directory link for a folder and double-click to open it, you’ll be amazed to find that the address bar in File Explorer shows the current path as the location of the directory link, not the source folder’s path.
Using this characteristic of directory links, we can easily “trick“ the operating system and applications into thinking that the files and directories they need are still in their original locations. Meanwhile, we’ve already moved their required folders elsewhere, and the files and folders they read are just “directory links” that take up no space.
Creating directory links can only be done for folders, not files.
This is a file system-level operation, meaning the operating system and applications completely cannot detect that the folder they’re accessing is actually a directory link.
Theoretically, we can perform the “move -> directory link back to original location” operation on all folders except system-critical folders (such as driver folders, Windows folder, user folders).
Directory links can cross partitions!
The value of the statement above should be clear to all of us: we can move software folders that stubbornly refuse to leave C drive to any location on other partitions using directory links!
Now that we’ve covered the theory, how do we practice it? How do we create directory links for folders?
Since directory links are a built-in feature of Windows, we can create them without any third-party tools — by using cmd command lines.
1 | |
But how many people enjoy typing commands? Here, I bring you an efficient tool for creating directory links: Link Shell Extension (LSE)
Note: Installing LSE requires the Microsoft Visual C++ Redistributable! Otherwise, the installer won’t have the necessary component dependencies to run!
LSE official website:
https://schinagl.priv.at/nt/hardlinkshellext/linkshellextension.html#contact
(May be blocked; follow me, reply “lse” in the background to get the high-speed download link for Link Shell Extension)
Microsoft Visual C++ Redistributable download URL:
https://wwa.lanzout.com/b0b8rs19a#9527
Password: 9527
Here’s how to use LSE:
- After installing LSE, File Explorer automatically restarts, and the browser opens LSE’s official website, indicating successful installation.
- Close the browser, right-click on a folder, and you’ll see “Select Source Link Point (L)“ in the context menu.
- Click “Select Source Link Point,” then go to another location, right-click in an empty area, and click “Create as… -> Directory Junction“
- This creates a directory link for the folder you selected.
- Open this directory link, and the address bar in File Explorer shows the location of the directory link, not the source folder’s location. (Successfully tricking the system)
However, the gap between ideal and reality is still significant.
When you think you’ve fully mastered the directory link feature and can happily move all folders from C drive to any location on D drive and link them back, you’ll find that many folders on C drive cannot be fully moved because they’re occupied by various processes and software.
Some files get moved, while others remain. This will drive you crazy.
Sometimes, even when all operations succeed, opening the moved software results in errors and failure to launch.
After continuous experimentation and experience summarization, I offer you a few suggestions:
- Don’t move folders, don’t cut! Copying is the safest approach! Copying won’t result in some files being moved while others remain. Ensure all files are copied before deleting the original folder on C drive.
- For the second scenario above where software fails to open, create a directory structure on C drive that matches the original. For example, if you want to move the Microsoft Office installation folder to D drive, don’t directly copy
C:\Program Files\Microsoft Officeto the root of D drive. The correct approach is to manually create aProgram Filesfolder on D drive, then copy theMicrosoft Officefolder toD:\Program Files, and finally create a directory link back toC:\Program Files. This perfectly solves the software error issue.
These are all from my personal practice, tested through the combination of theory and practice.
WimBoot Technology
WimBoot is the real big move for releasing C drive space.
Have you ever imagined C drive space only taking up 3GB? Yes, you read that right — not 3GB remaining, but 3GB occupied!
And your data, your system personalization settings — they’re all still there, not missing a thing!
This is WimBoot.
WimBoot is a new feature introduced by Microsoft starting from Windows 8, designed to reduce system file occupation on C drive and improve computer performance. For operations and maintenance personnel, what we value most is WimBoot’s superior characteristics in space occupation.
Additionally, due to WimBoot’s inherent nature, computers booting with WimBoot have an extra “benefit”: system restoration in case of accidents without needing to reinstall the system.
So, what principle makes WimBoot so powerful? In fact, in an operating system booting with WimBoot, none of the system files on C drive are actually stored there. The files we see on C drive are a type of file called “pointer files”.
Pointer files can point to (reference) files within a WIM package, like arrows. However, pointer files take up negligible space, so C drive’s actual usage is very small.
Therefore, installing a WimBoot system takes very little time, since generating pointer files is nearly instantaneous.
When we use system files on C drive, the system dynamically decompresses and extracts the files we need from the WIM package into memory. When we’re done using them, the system removes them from memory or puts them into the pagefile.sys paging file.
So, using WimBoot mode may cause your computer’s memory usage to be slightly higher than usual, but the impact is very limited.
With so many advantages of WimBoot, how do we harness this magical boot method? Please read on patiently.
The Correct General Approach to Installing a System with WimBoot for C Drive Space Savings
WimBoot, as the name suggests, is a way to boot the system using a WIM package. So, the first step is to obtain a WIM package. A WIM package is essentially a .wim compressed file.
How to obtain a WIM package?
We use the powerful tool Dism++ to package our current system into a WIM file.
Open Dism++:
- Click on
Restore Function -> System Backupin the top-left corner. - Click
Browseto select where you want to save the system backup package. - Under the “Save As” dialog, click
Save as typeto choose from 5 compression types:- No compression: Saves system files directly into the WIM without compression.
- WimBoot compression: A compression method suitable for WimBoot, but according to Dism++’s official statement, it has a very low compression ratio and isn’t very useful. Not recommended.
- Fast compression: Higher compression ratio than WimBoot compression, the default compression method, and the one I recommend.
- Maximum compression: Saves as ESD format, highest compression ratio, longest processing time, smallest resulting file.
※Note: ESD files cannot be used to create WimBoot.
- Click Save.
- If you’re backing up the current system from within it,
Volume Shadow Copyis checked by default (hot backup). - If you’re backing up Windows from within a PE environment, you don’t need to check Volume Shadow Copy. (Backing up in PE is recommended.)
- Click OK.
Wait for the backup to complete, and you’ll find the successfully backed-up WIM package at the location you selected.
After the backup, what should we do?
- Enter the PE environment, and use WinNTSetup (almost always included in PE, also known as Windows Installer) or other tools with WimBoot functionality to create WimBoot.
- First, ensure your backed-up WIM package is safely stored, then format the original system C drive.
Please note: The C drive displayed in PE may not be the original Windows system’s C drive! Judge by size, capacity, files, and other characteristics!
- Open WinNTSetup. The first item,
Select the location of the installation image file, choose the WIM package you just backed up. - Below, the boot partition selection is the same as for normal installation. Select the formatted C drive as the system drive.
- The only difference is that in the bottom-right corner, select
WimBootas the boot mode. - Install, confirm.
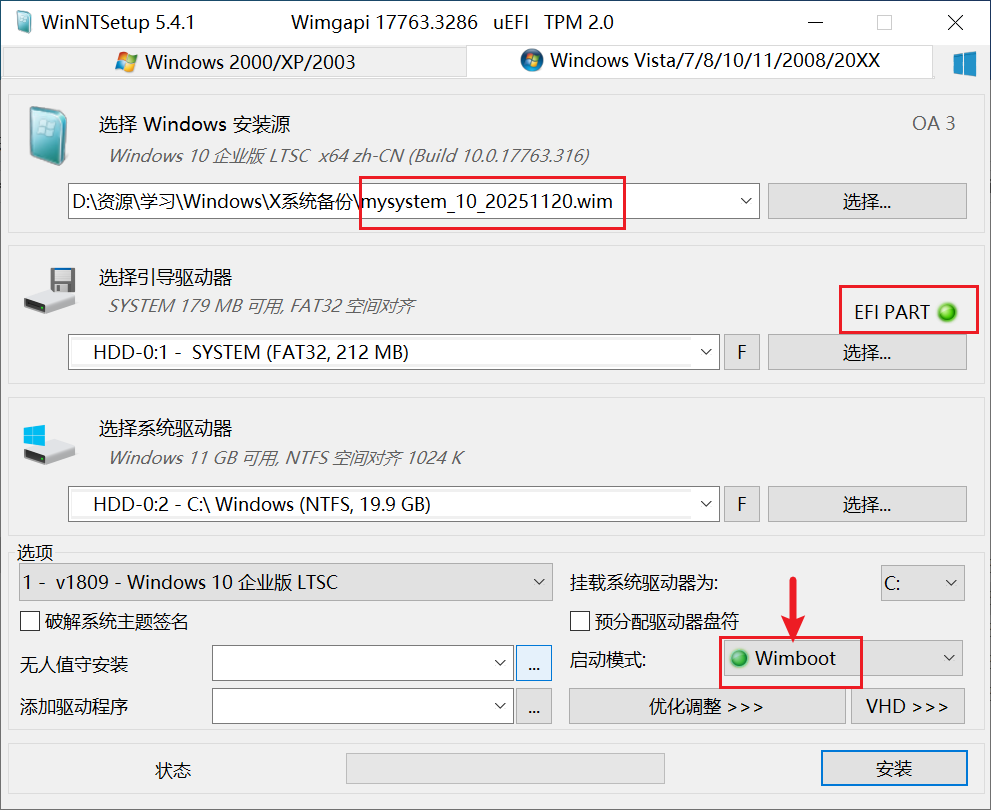
Installing a system with WimBoot is much faster than the normal method, finishing in under a minute because creating pointer files doesn’t take long.
Advantage Summary:
All self-installed software files are encapsulated into the WIM package, and all files on C drive become pointer files.
You have a self-DIY’d system WIM package, so if the system fails, you can restore it anytime using Windows Installer.
C drive takes up about 3GB.
I don’t recommend placing the WIM package on C drive. After all, our goal is to reduce C drive usage. You can put it on D drive or create a separate partition specifically for the WIM package.
This separate partition for the WIM package can have its drive letter removed in the system without any impact.
If the system fails, you can enter PE and use the backed-up WIM package to redo WimBoot.
Regularly backing up your system is a good habit.
However, you might find backing up the system once to be troublesome and time-consuming. That’s where WimBoot’s second feature comes in: support for incremental backups.
Incremental backup: Based on the original WIM package, only backs up the files that differ between the current system and the system in the WIM package. If files are identical, DISM only compares them during backup and doesn’t write them again into the WIM.
Since most system files are fixed and unchanged, incremental backups can save a lot of time.
The result of incremental backups is that the original WIM package contains multiple folders, each representing a system backup. Identical files are only backed up once in the WIM. Duplicate system files in each folder are referenced multiple times. The WIM package’s size won’t change drastically.
How to perform incremental backups:
- The method is almost identical to the first system backup.
- The only difference is: when selecting the location to save the backup WIM file, choose the WIM package you created earlier, not a new location.
- Click OK to start the backup.
If you think old backups in a WIM are useless and take up space, you can use Dism++’s “Export Image” feature to export the specific WIM image you want.
How to export an image
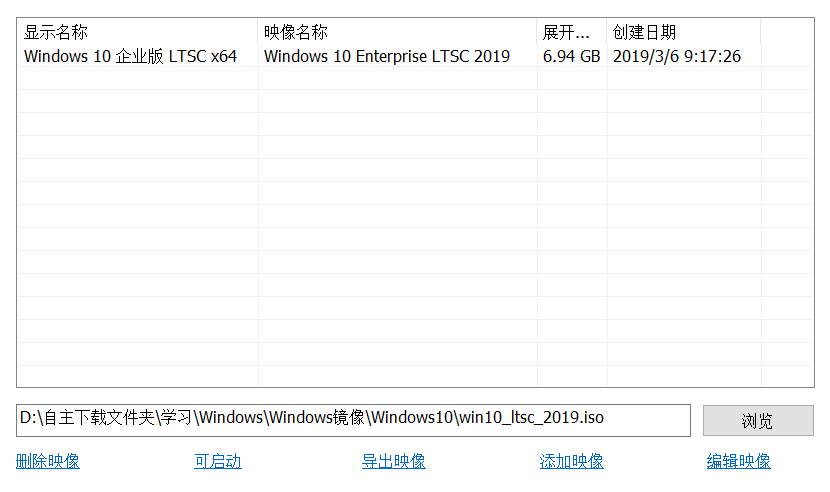
- Click on
File -> Open Image Filein the top-left corner of Dism++. - Select and open your WIM package.
- Select one image from the image file (click to select, judge which image you want to export by the backup time).
- Below, there are five options:
- Export Image: Exports the selected image individually.
Click this one. - Delete Image: Deletes the selected image.
- Bootable: For PE system images, adds a bootable flag.
- Add Image: Adds other system images to this system image package.
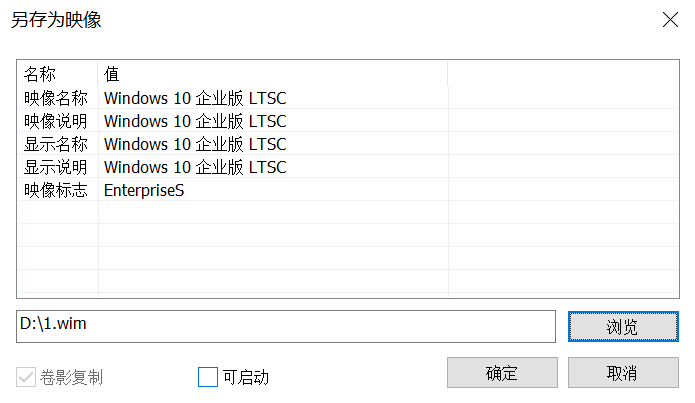
- Edit Image: Edits the selected image’s image name, image description, display name, display description, image flag, system architecture, creation date, expansion space, system version. (Double-click an entry to edit.)
- Export Image: Exports the selected image individually.
Then we can use WinNTSetup to call the exported WIM package to create WimBoot.
Frequently Asked Questions
After creating WimBoot, the WIM package cannot be deleted in PE, showing “process in use”?
The pointer files on your C drive system are silently calling data from this WIM. So, to delete this WIM package, you must first format the original Windows system C drive.
Unable to perform incremental backups directly on the WIM package?
Again, this is because the pointer files on your C drive system are silently calling data from this WIM. In this case, the WIM package is read-only. So, we need to copy and paste a copy of this WIM package and perform read/write operations on this copy.