A Comprehensive Reveal of the Full UEFI Firmware Boot Process for Windows
A Complete Deep Dive into How UEFI Firmware Boots Windows
Reading Order for This Series:
- Computer Firmware Boot Principles: Windows Boot Process Part 1
- A Complete Deep Dive into How UEFI Firmware Boots Windows
- Core Configuration: BCD File Deep Dive & BOOTICE Editing in Practice
- Booting Windows via BIOS Firmware
- General Methods for Repairing Windows Boot
Booting Windows via UEFI Firmware
Under normal circumstances, our Windows system is installed on a disk inside the computer. Therefore, to boot Windows, the UEFI firmware must first recognize the disk in the computer.
Under normal conditions, the UEFI firmware recognizing a disk is a straightforward process—no action is required from us.
The UEFI firmware can recognize both MBR and GPT disk partition tables. We only need to ensure the disk is properly connected to the computer (either to the motherboard or via a USB port).
After recognizing the disk, the UEFI firmware gets to work on it. The next step is to scan the disk’s partitions.
As we know, the space on a disk can be divided into many partitions. For example, the C: drive and D: drive can be different partitions on the same disk.
A fundamental parameter of a partition is its file system. Windows can only be installed on a partition with the NTFS file system. When you right-click a partition and view its properties, you can see its file system.
However, the UEFI firmware is somewhat “limited.” It can only recognize some older file system types, such as FAT32, FAT16, and FAT.
In other words, even if our disk has many partitions, the UEFI firmware can only recognize those with FAT32, FAT16, and FAT file systems.
Once it recognizes these partitions, the UEFI firmware can read the files within them.
※ On a Windows computer, the disk contains a very important partition called the EFI partition (or ESP partition).
EFI Partition
As the name suggests, this partition is specifically designed for UEFI use. The UEFI firmware boots Windows by reading the files in the EFI partition and executing the programs within them.
Therefore, it naturally follows that the EFI partition’s file system is FAT32 (or FAT16; for simplicity, this article uses FAT32 as the standard EFI partition file system).
The essence of an EFI partition is simply a partition with a FAT32 file system.
Thus, any partition with a FAT32 file system can be treated as an EFI partition and recognized by the UEFI firmware.
So, what exactly is inside the EFI partition? Why does it need to be a dedicated partition for the UEFI firmware? And why is it so critical in the Windows boot process?
Because the EFI partition contains the Windows boot files.
Below is the file structure directory of my own computer’s EFI partition (files not relevant to this discussion are omitted):
1 | |
Next, I will introduce a type of “application”: .efi programs.
*.efi Programs
Just like .exe software in Windows, .efi programs are executable applications that run within the UEFI firmware’s small operating environment. In the EFI partition directory above, we can see many files with the .efi extension. They are all efi programs and can only run within the UEFI firmware.
For example: bootx64.efi, bootmgfw.efi, memtest.efi, etc. The UEFI firmware runs these programs to further boot Windows or perform basic computer maintenance operations.
For Windows, bootx64.efi and bootmgfw.efi are both critical for booting. (Each one can independently boot Windows.) As for why there are two efi programs for booting Windows, we’ll explain that shortly.
How Does the UEFI Firmware Know What to Do?
Here’s the question: The UEFI firmware scans and recognizes the EFI partition and can access its files, but how does it know to run bootmgfw.efi or bootx64.efi?
This is where NVRAM comes into play.
In addition to storing the overall UEFI firmware code, NVRAM also records which EFI partition contains the efi program the firmware should run, along with detailed information about the program’s location.
The UEFI firmware reads this record to execute the appropriate efi program and proceed to the next step.
Every partition has its own unique “ID number.” Even if two partitions share identical characteristics (e.g., size, file system type), their ID numbers are different.
This ID number is called a GUID in computing. A GUID is a long string of digits and letters, randomly generated and unique.
In fact, NVRAM stores the GUID of the EFI partition, and the UEFI firmware uses this GUID to locate the correct EFI partition.
We could assign a GUID to any object around us—for example, a sunflower.
Generally speaking, NVRAM doesn’t store just one boot entry; it stores many boot entries pointing to various efi programs.
However, not all of these entries are valid. The UEFI firmware will attempt to boot from these entries in order, from top to bottom, and run the first efi program that succeeds.
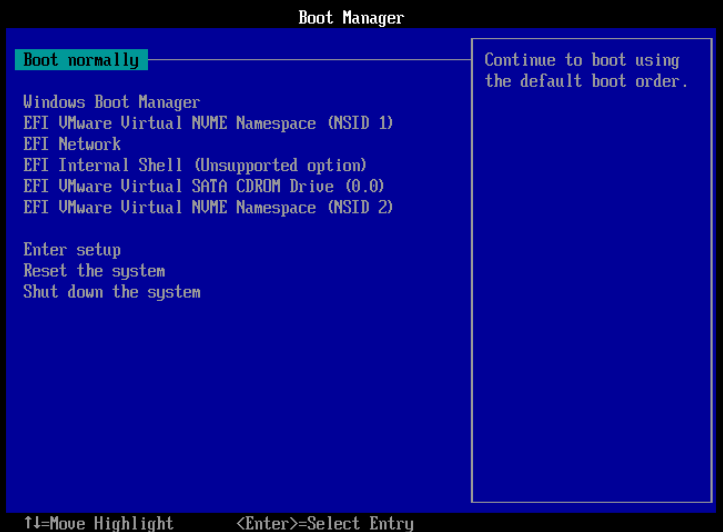
For example, the image above shows a UEFI boot menu selection screen. You can “intercept” the boot process by pressing the boot hotkey on your keyboard during startup to enter this menu. (The boot hotkey varies by computer brand; you can search online to find yours.)
As we can see, from Windows Boot Manager down to EFI VMWare Virtual NVME Namespace (NSID 2), these are all UEFI boot entries. They are all recorded in the motherboard’s NVRAM.
The UEFI firmware attempts to boot from these entries sequentially, from top to bottom, finding and running the efi programs they point to.
Reading Order for This Series:
- Computer Firmware Boot Principles: Windows Boot Process Part 1
- A Complete Deep Dive into How UEFI Firmware Boots Windows
- Core Configuration: BCD File Deep Dive & BOOTICE Editing in Practice
- Booting Windows via BIOS Firmware
- General Methods for Repairing Windows Boot