Brainstorm: Virtualizing a Removable USB Drive in Windows to Feed into VMware!
Brain Teaser: Virtualizing a Removable USB Drive in Windows to Feed VMware!
Disclaimer: All methods in this article are original ideas from the author. Any resemblance to existing work is purely coincidental.
Goal: Virtualize a removable USB drive in Windows so that the MicroPE Toolkit can recognize it and install a PE system onto it.
Purpose: Mount this virtual USB drive directly into a VMware virtual machine and boot the VM.
Tools: DiskGenius, OSFMount.
Approach
In this article, the fundamental difference between a USB drive and an internal hard drive lies in whether it can be plugged/unplugged via a USB port. Therefore, the file essence of a virtual USB drive and a virtual disk is the same—they are common formats like VHD, VHDX, VMDK, IMG, PMFX, GHO, etc. Since the virtual USB drive created here needs to be mounted to a VMware VM, we use the VMDK virtual disk format.
The main goal is to make this virtual VMDK disk have the attribute of “removable.”
Steps
Open DiskGenius, click on Disk → New Virtual Disk File → New VMware Virtual Disk File in the top-left corner.
Set the file path, file name (I set it as 1.vmdk), capacity (I set it to 1GB), adapter type (SATA), and click Create directly.
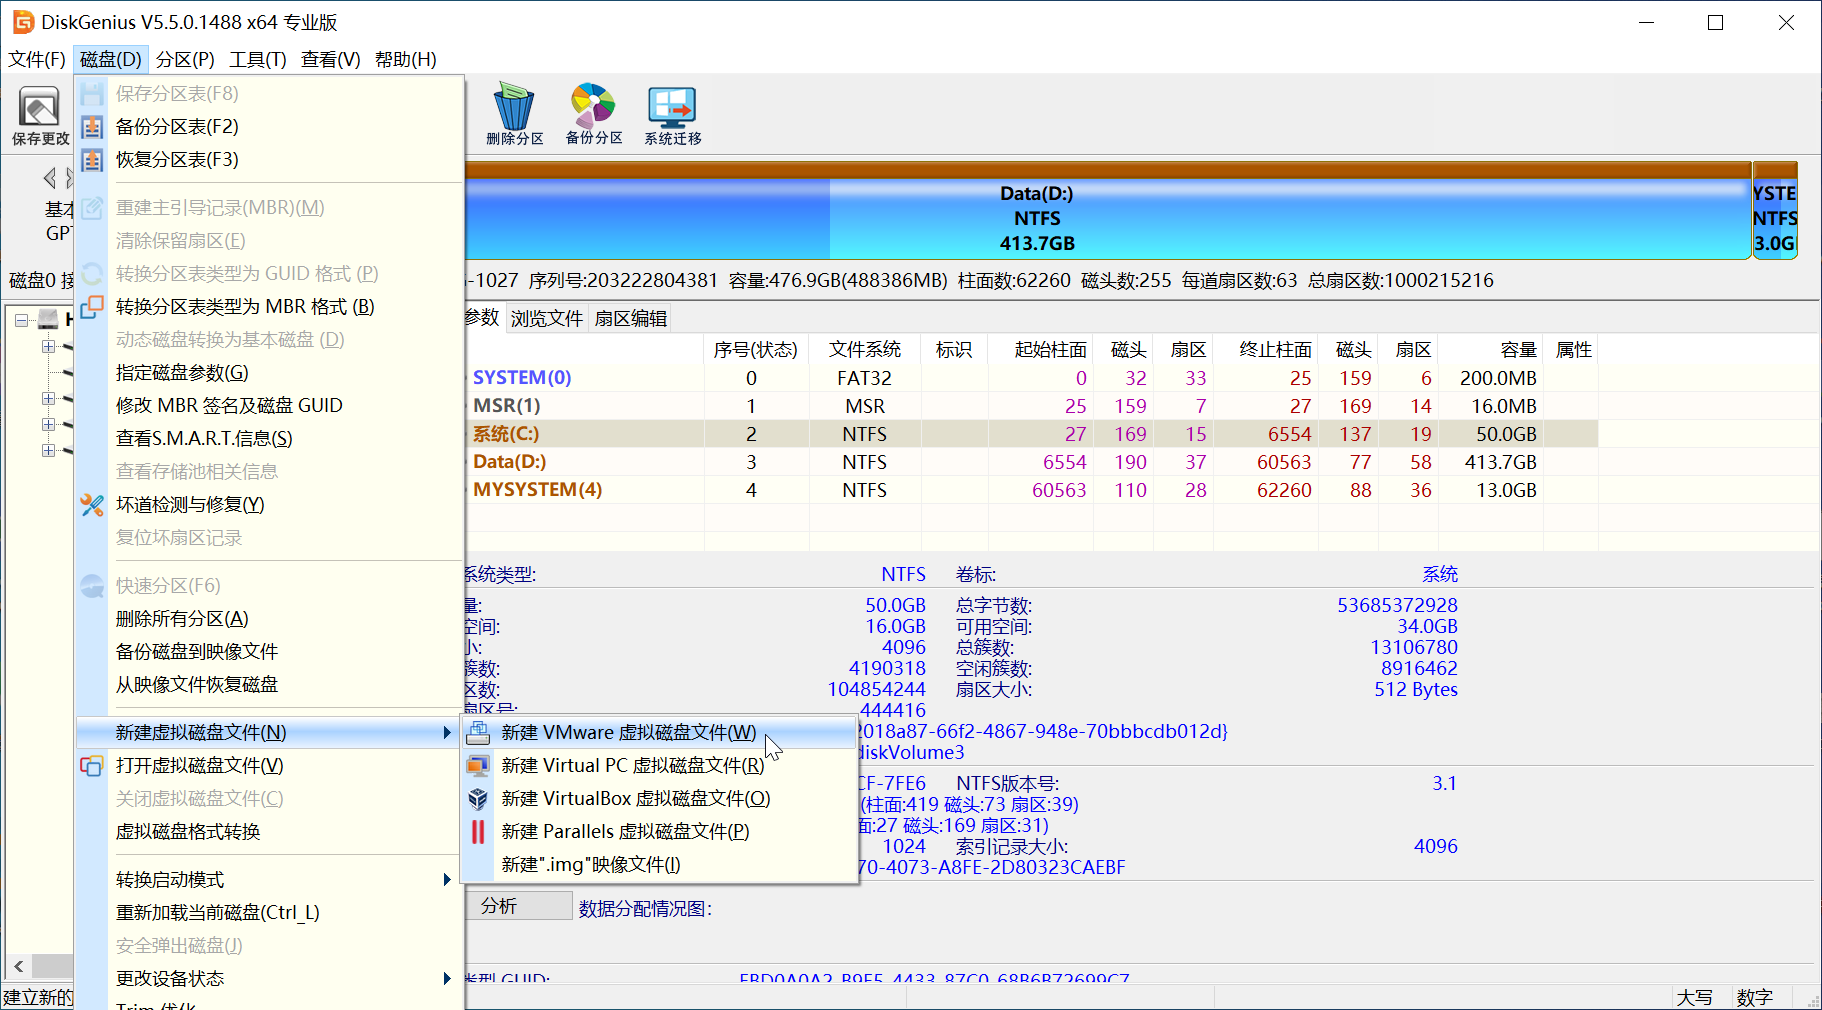
Partition this virtual disk arbitrarily. I partitioned it into a 1GB NTFS partition with a GPT partition table.
Open OSFMount, click Mount New to mount a virtual disk, select Disk Image File, choose 1.vmdk, and click Next.
Select Mount entire image as virtual disk (this mounts the entire image file as a virtual disk; if you choose Mount partition as virtual disk, you can mount a specific partition from the image file), then click Next.
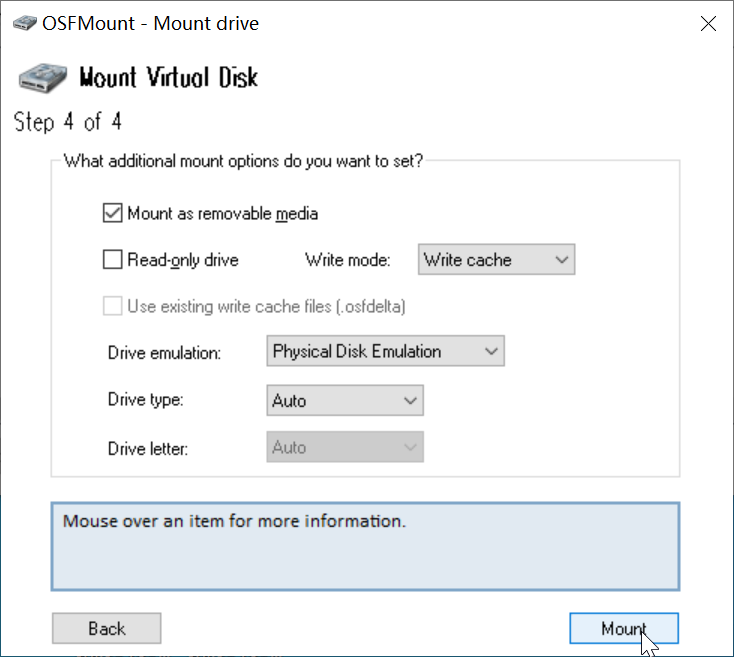
Check Mount as removable media and uncheck Read-only drive (since a read-only drive would prevent us from writing files to the virtual disk).
The write mode defaults to WriteCache and cannot be changed. This means that files written to the virtual disk after mounting will be stored externally in another file, which serves as the virtual disk’s cache file.
According to the OSFMount website, the purpose of not writing directly to the virtual disk is to maintain the integrity of the virtual disk file and prevent file corruption.
Select Physical disk emulation to emulate a physical drive, then click Mount.
At this point, the mounted virtual disk (1.vmdk) appears in File Explorer. On my computer, a 1GB NTFS partition is displayed. Right-click the Windows logo, select Disk Management, and you can see this virtual disk with the attribute “Removable.” This confirms that OSFMount has successfully mounted it as a USB drive.
Creating a Virtual PE Boot Drive with MicroPE Toolkit
Open the MicroPE Toolkit. Click the USB drive icon in the bottom-right corner to install PE to a USB drive. However, you’ll notice that our virtual USB drive does not appear in the USB drive list. This means the MicroPE Toolkit does not recognize the virtual USB drive.
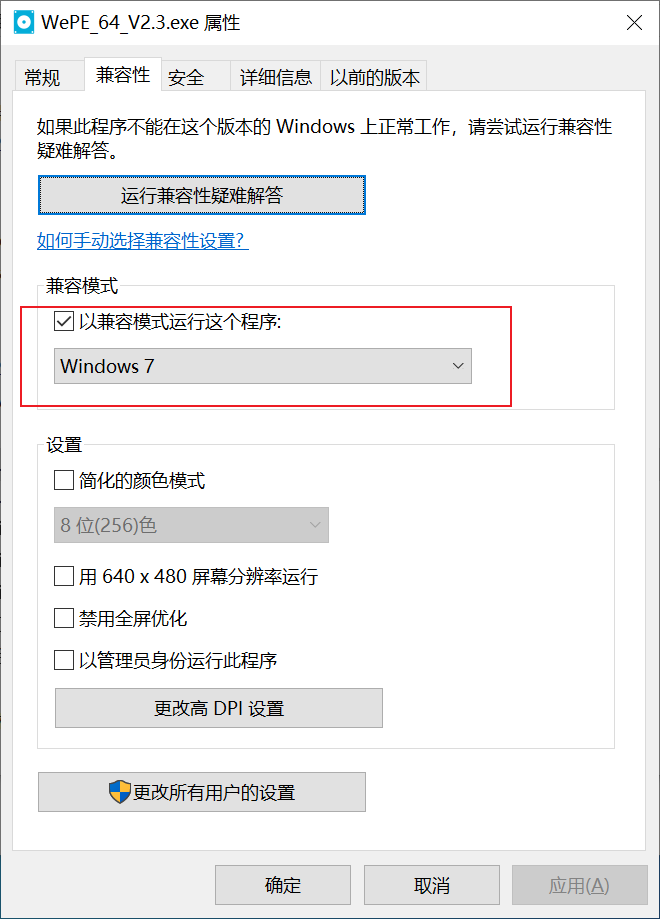
After extensive searching, the solution is as follows: Right-click the MicroPE Toolkit, go to Properties → Compatibility → Run this program in compatibility mode for Windows 7.
Reopen the software, and the virtual USB drive now appears in the list.
Click Install PE to USB Drive directly. Wait a moment, and the installation completes successfully. In File Explorer, two partitions appear: “MicroPE Toolkit” and “EFI.” This indicates the PE boot virtual drive has been successfully created.
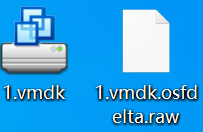
However, because the write mode is forced to WriteCache when mounting the virtual USB drive, the MicroPE Toolkit does not actually write the PE system files into 1.vmdk. Instead, it writes them into a separate cache file named 1.vmdk.osfdelta.raw.
This file resides in the same folder as 1.vmdk and is automatically generated by OSFMount during mounting. Only OSFMount can read this virtual cache; VMware obviously cannot.
After creating the MicroPE, the size of 1.vmdk.osfdelta.raw became 450MB, while 1.vmdk remained at about 7MB. This clearly shows that 1.vmdk does not contain the PE system files.
Therefore, if you directly mount 1.vmdk to a VMware VM, it will appear as a blank hard drive. So, we must find a way to truly write the data from the cache file into 1.vmdk.
Recreating 1.vmdk
The concept of “disk imaging” gave me inspiration.
Although a virtual disk is essentially a disk image, why not create another disk image from the virtual disk already mounted in File Explorer? (This is the idea of holistic/isolation methods.)
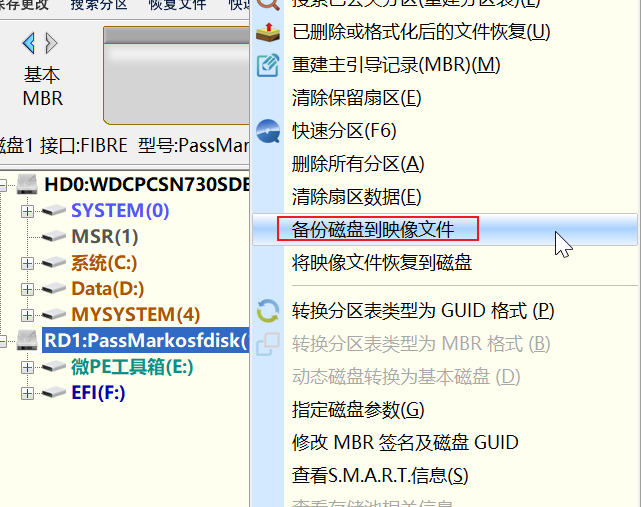
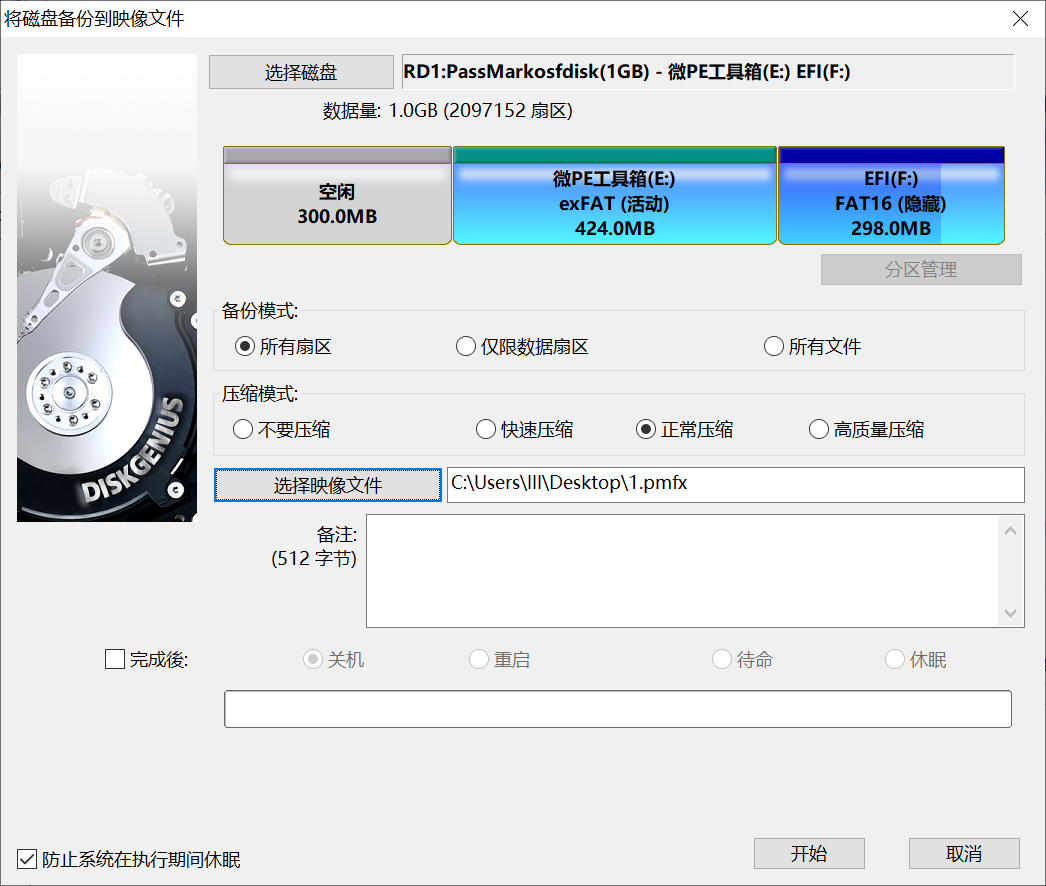
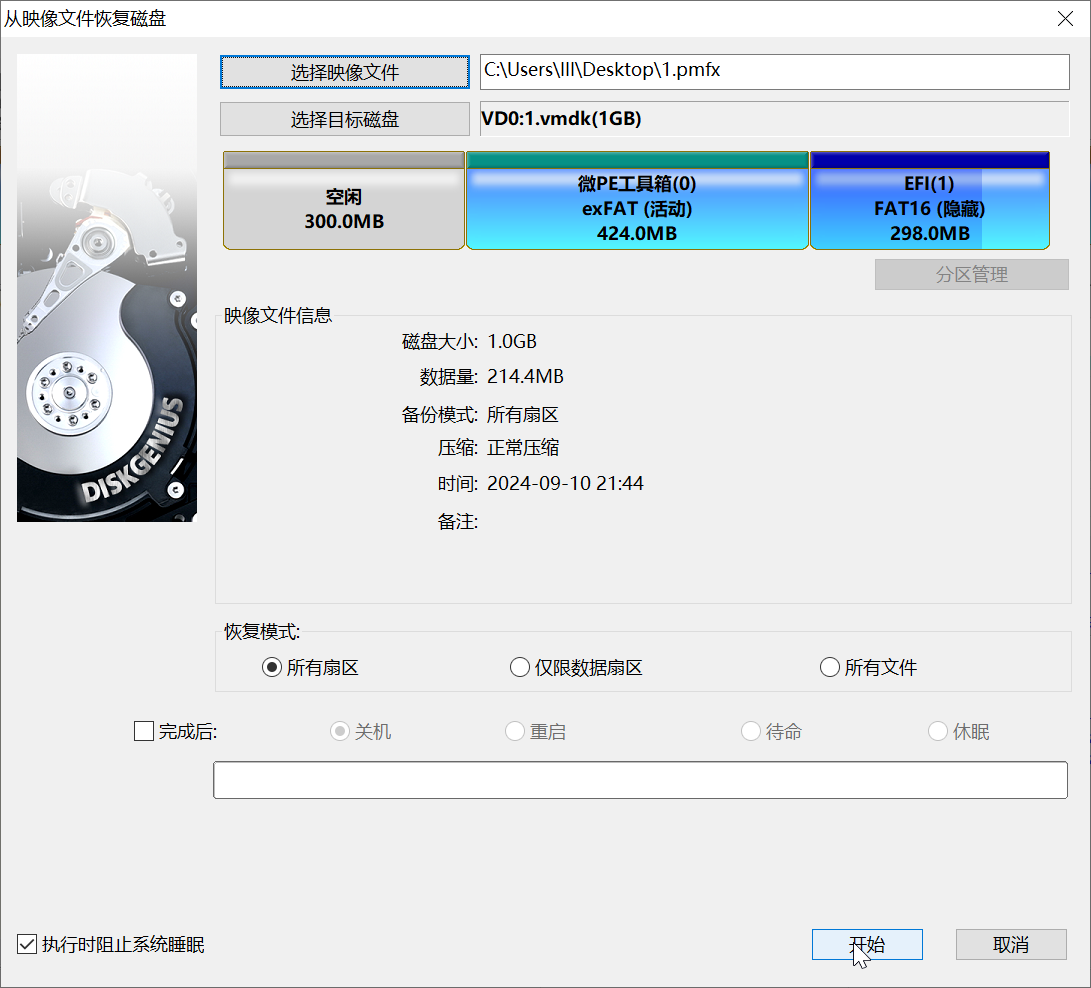
- Open DiskGenius, right-click the virtual USB drive, and select Backup Disk to Image File.
- Backup mode: All sectors.
- Click Select Image File, choose the save location and name for the image file (I named it 1.pmfx).
- Click Start; the operation completes quickly.
- Close DiskGenius.
Now, the newly generated 1.pmfx is an image that merges the data from both 1.vmdk and 1.vmdk.osfdelta.raw. However, VMware still cannot recognize the PMFX disk image format. So, we have one final step: restore the PMFX image file into the VMDK virtual disk.
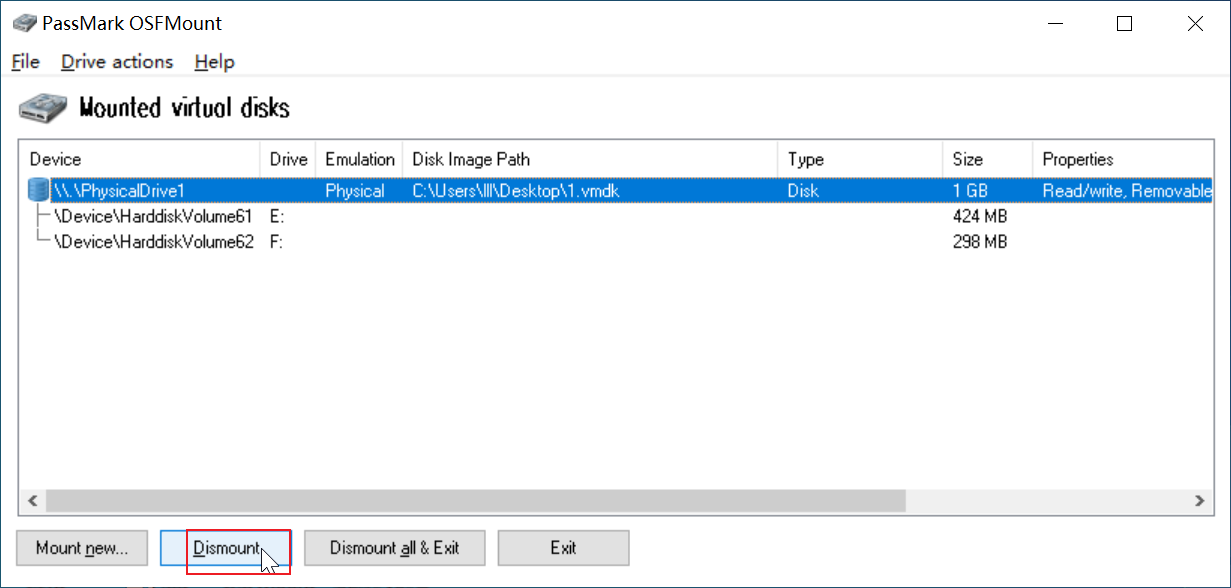
- In OSFMount, click the virtual USB drive, then click Dismount to unmount it.
- Open DiskGenius, click Disk → Open Virtual Disk File, and select 1.vmdk to open it.
- Right-click the virtual disk VD0:1.vmdk, and select Restore Image File to Disk. Choose the previously backed-up 1.pmfx.
- Click Start, then confirm.
- Change the disk partition table to GPT (a personal preference; UEFI firmware works best with GPT, though MBR is also acceptable).
- Complete the operation.
Booting a VMware VM with 1.vmdk
The operation is relatively simple.
- Create a new virtual machine (as usual).
- Click Edit Virtual Machine Settings → Hard Disk → Remove.
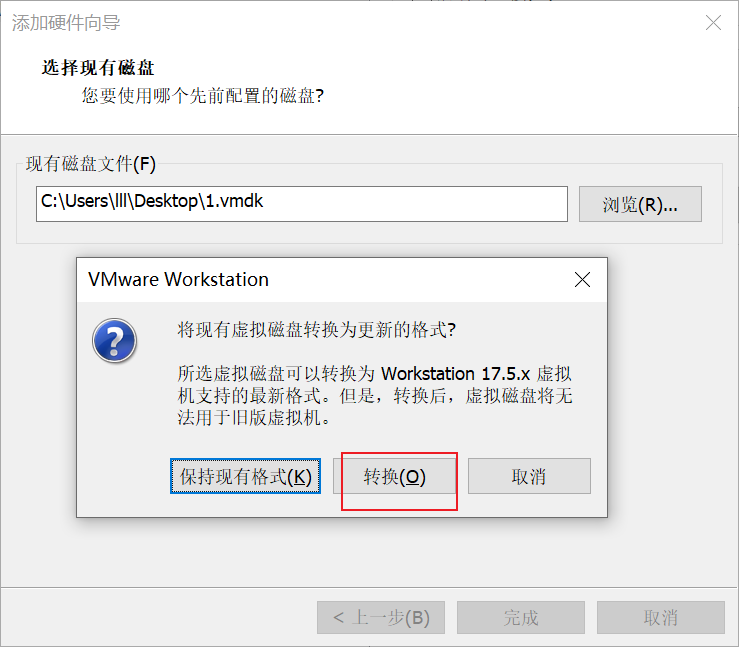
- Click Add → Hard Disk → Next → Next → Use an existing virtual disk → Select 1.vmdk → Finish.
- If prompted to convert the format, click Convert.
- Confirm.
Start the virtual machine, and you will immediately enter the Windows Boot Manager’s operating system selection menu, then boot into the PE system.
As for the method described in this article, I am not sure of its significant practical value. However, it may find applications in the future and can deepen our understanding of virtual disk files, which is why I am sharing it here.