Deep Dive into Windows RE: A Powerful Tool for System Maintenance
Deep Dive into Windows RE: A Powerful Tool for System Maintenance
In daily use of Windows, users inevitably encounter issues such as system boot failures or the inability to operate normally. At such times, a tool that is both familiar and unfamiliar—Windows Recovery Environment (Windows RE)—often turns the tide. This article will provide a comprehensive understanding of Windows RE’s features, how it works, and how to use it.
What is Windows RE?
Windows Recovery Environment, abbreviated as Windows RE, is a built-in feature of the Windows operating system. Windows RE is typically installed in a hidden partition on the system disk and loads automatically when the system fails to boot.
Its core purpose is to provide a set of diagnostic and repair tools, allowing users to repair or manage the system even when it cannot boot normally.
At its essence, Windows RE is essentially a graphical user interface version of Windows PE, officially released by Microsoft.
However, its functionality still falls far short of the various third-party Windows PE tools commonly used in China.
Where is Windows RE Located?
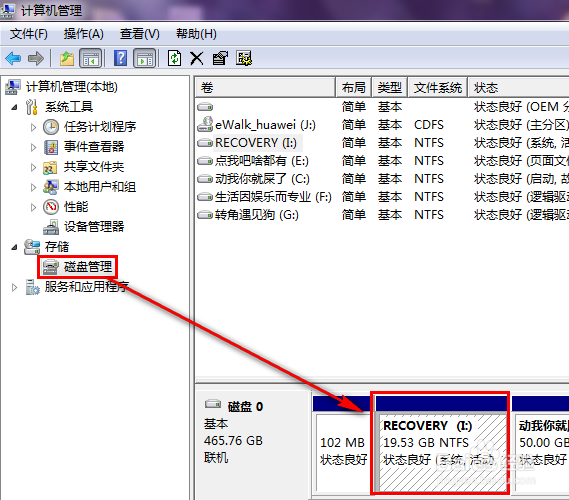
Windows RE is placed by the operating system in a hidden partition on the disk, typically named “Recovery.”
This partition does not appear in Windows File Explorer because it lacks a drive letter and does not support being assigned one for mounting. This is determined by the partition parameters of this partition.
In Disk Management, right-clicking this recovery partition shows all options as grayed out, indicating they are non-operable.
Key Features of Windows RE
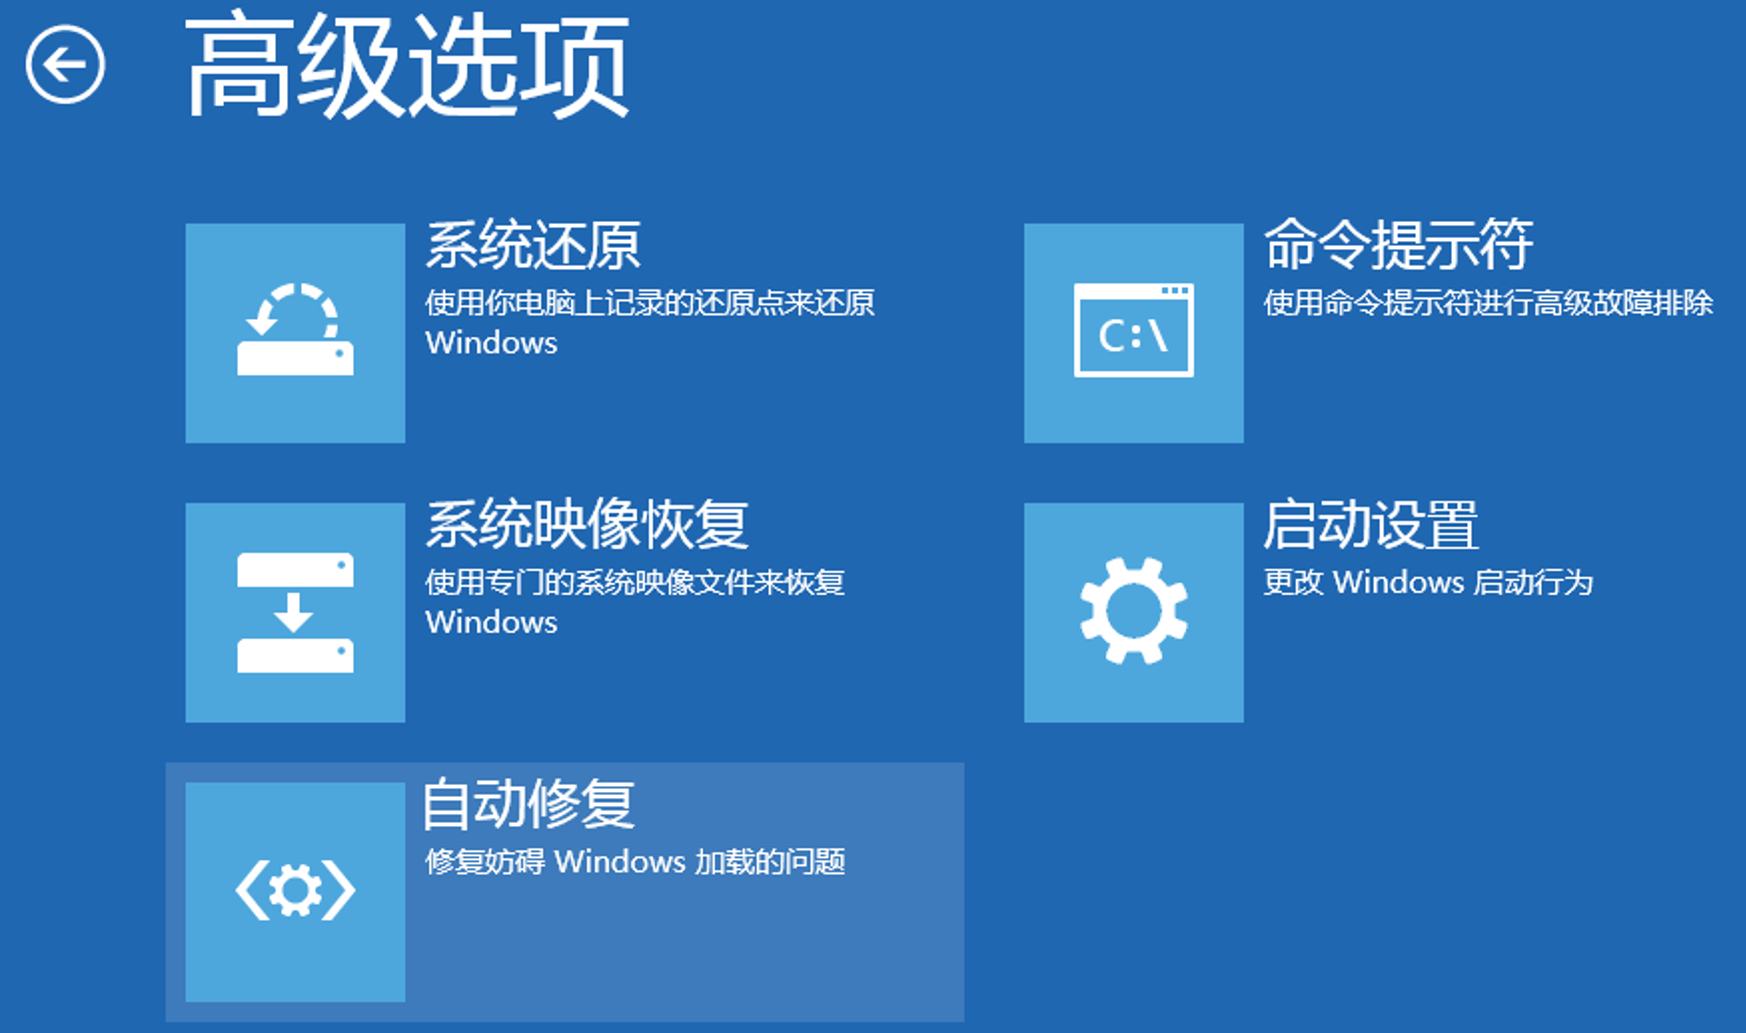
Windows RE offers the following main features, each addressing different system issues:
1. Startup Repair
- Purpose: Fixes issues that prevent the system from booting normally, such as missing or corrupted boot files.
- Features: This tool automatically scans system boot configuration files (e.g., BCD) and attempts to repair related problems.
2. System Restore
- Purpose: Restores the system to a previously created restore point, undoing changes that may have caused problems.
- Use Cases: Failed software installations, incorrect configuration changes.
- Exception: The system may have no restore points available, making restoration impossible.
3. Command Prompt
- Purpose: Provides a text-based interface for users to manually execute advanced repair commands.
- Advanced Operations: Includes repairing disk partitions, fixing boot records (using the
bootreccommand), and more.
4. System Image Recovery
- Purpose: Uses a pre-created system image file to restore the system to the state captured in that image.
- Advantages: Fast recovery speed and complete restoration of the system environment.
5. Windows Startup Settings
- Purpose: Allows users to troubleshoot issues by entering special startup modes such as Safe Mode or Safe Mode with Networking.
- Common Applications: Driver conflicts, malware investigation.
How to Enter Windows RE?
For experienced system maintenance personnel, one of the most frustrating tasks is figuring out how to enter UEFI or BIOS firmware during boot to select a USB boot drive for PE, as different brands of computers vary greatly.
If you cannot boot into Windows normally and cannot access the firmware interface, you can try using Windows RE, the built-in PE on your computer, for debugging.
This is especially useful for Windows on ARM devices (e.g., Windows tablets).
Windows RE offers multiple ways to enter:
1. Automatic Trigger
When the system fails to boot three or more times consecutively, Windows RE loads automatically.
2. Manual Trigger
- Open the Start menu and click the Power button.
- Hold down the
Shiftkey while clicking Restart. - The system will automatically enter the advanced startup menu. Select Troubleshoot > Advanced Options to access Windows RE.
3. Using Installation Media
- Boot the system using a USB or DVD installation disk.
- On the installation screen, select Repair your computer to enter Windows RE.
4. Using Hotkeys
On many computers, rapidly pressing F8 during boot can enter Windows RE.
Underlying Principles of Windows RE
Windows RE is a specialized version based on Windows PE (Preinstallation Environment). Windows PE is a lightweight operating system primarily used for installing, deploying, and repairing Windows.
Lightweight: Contains only the essential kernel and a minimal set of drivers, ensuring fast boot times.
Flexible and Extensible: Windows RE supports customization, allowing enterprise or advanced users to add custom tools.
Customization and Management of Windows RE
Advanced users can customize Windows RE to a certain extent. For example:
1. Enable or Disable Windows RE
- Command: In the command prompt, use
reagentc /enableorreagentc /disableto enable or disable Windows RE.
2. Add Tools
- Integrate custom diagnostic tools or scripts into the Windows RE WIM file to enhance its functionality.
3. Create Recovery Media
- Tool: Use Windows’ built-in Recovery Drive feature to create a USB recovery medium for emergencies.
Windows RE is a lifesaver for novice users and a reliable assistant for IT professionals, stepping in when Windows PE is unavailable.
While Windows RE is feature-rich, many of its functions require using the command-line interface (CMD). This can be a challenge for some IT personnel.
However, computer maintenance professionals can use their own USB drives within Windows RE to run programs and software from the USB drive, improving work efficiency.
In the next article, I will explain how to use a USB drive within the Windows RE environment and run applications from it.