[Ultra-Long Article Warning] A Must-Read for Beginners: Comprehensive Guide to Windows System Boot and Startup, with Practical Operations and Maintenance
[Long Read Warning] A Must-Read for Beginners: A Comprehensive Guide to Windows System Booting and Startup Operations
During the Windows system startup process, a critical file plays a guiding role in booting Windows: the BCD file, short for Boot Configuration Data.
If this BCD file has even a slight configuration error, we won’t be able to boot Windows normally, resulting in a blue screen or black screen error.
Therefore, knowing how to repair the BCD file is an important skill. It not only deepens our understanding of how Windows boots but also helps us solve computer problems at critical moments.
Some might say we can simply use boot repair tools to fix the boot and BCD, making it unnecessary to learn how to manually edit and repair it.
In reality, no boot repair tool is a silver bullet. I’m not saying it will fail; I’m saying that BCD booting requires a reasonable combination of software and hardware configurations, considering multiple factors.
Let me give you an example.
On a UEFI firmware, I want to repair the Windows system boot (BCD) on an MBR partition table disk. If we use a common boot repair tool (like Dism++), it will most likely repair a boot suitable for BIOS firmware.
However, our firmware is UEFI, not BIOS.
Because Dism++ only knows the general boot repair mode—MBR partition table disk paired with BIOS firmware—it doesn’t know that UEFI firmware can also use an MBR partition table.
This is just a small example. To make the computer’s boot mode better suit our usage habits, we need to configure the BCD boot menu in detail, and the prerequisite for detailed configuration is learning.
In the final part of this article, I will explain general methods for repairing boot on various firmware types.
Studying the principles is the purpose of all learning and the source of all correct operations.
Through this article, I will explain in detail and in an easy-to-understand way how the Windows system actually boots and how it is guided.
If you’re willing to learn, follow my train of thought and thoroughly understand Windows booting.
If you have questions, feel free to join my WeChat group to ask.
The Main Content Begins.
Let’s start from the moment we press the power button.
Motherboard Power-On
The moment you press the power button, a circuit board inside the computer called the “motherboard” starts receiving power.
Once the motherboard is powered on, the next step is to load the firmware.
What is Firmware?
The term “firmware” might sound like a physical entity, something solid.
※ However, in reality, firmware is a micro-system, a piece of software, a piece of code stored in the motherboard’s NVRAM.
NVRAM stands for Non-Volatile Random Access Memory.
In simple terms, NVRAM is a small module on the motherboard that can store data. Even without power, the data in NVRAM is not lost, similar to a USB drive.
RAM, on the other hand, is Volatile Random Access Memory, which is what we commonly call memory.
The characteristic of memory is that without power, it cannot retain any data.
So when we shut down and restart, the computer’s state from the last boot is not preserved.
Types of Firmware?
Currently, there are two types of firmware: BIOS and UEFI.
- BIOS
- Used by older computers. Generally, computers before 2015 used BIOS, or had both BIOS and UEFI firmware.
- UEFI
- Used by the vast majority of computers today, generally backward compatible with BIOS.
I won’t go into detail about the advantages and disadvantages of BIOS vs. UEFI firmware here. You can search for that yourself.
I will only introduce their differences and pros/cons when necessary.
Different firmware types mean different boot modes, and naturally, different boot methods.
Firmware Self-Test
After the motherboard is powered on, the firmware is loaded. Once loaded into memory, it starts running. The motherboard hands over control of the entire computer to the firmware.
Both firmware types first check the hardware environment they’re running in—this is called self-testing.
This is a quick process. If it fails, the computer will get stuck at the first step: a hardware fault.
Typically, these are major hardware failures, such as CPU, fan, memory, or display issues. We won’t discuss these hardware faults here. Let’s continue booting the computer.
From this point on, the boot methods of UEFI and BIOS diverge.
We’ll first introduce the UEFI boot method, then the BIOS boot method.
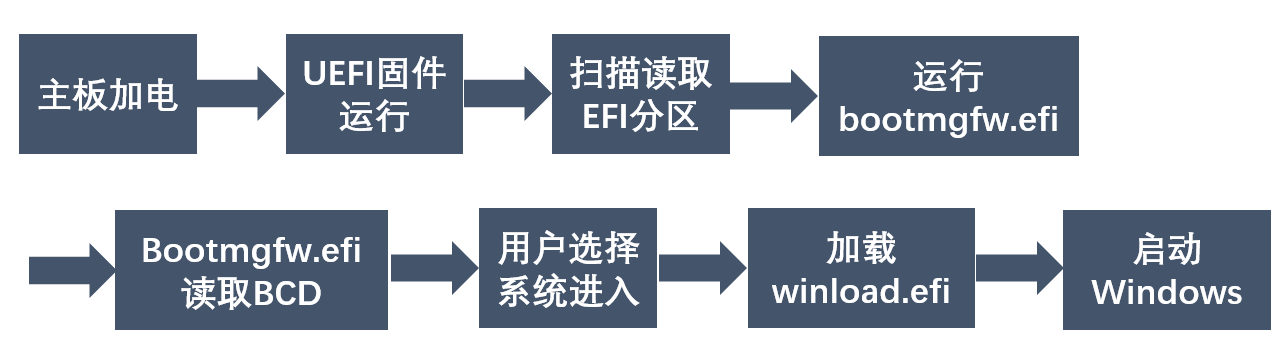
UEFI Firmware Booting Windows System
Generally, our Windows system is installed on a disk inside the computer. So, to boot Windows, the UEFI firmware must first recognize the disk.
Under normal circumstances, recognizing a disk is straightforward for UEFI firmware—we don’t need to do anything.
UEFI firmware can recognize both MBR and GPT disk partition table types. We just need to ensure the disk is properly connected to the computer (on the motherboard or via USB).
After recognizing the disk, the UEFI firmware “works on” the disk. Its next step is to scan the disk’s partitions.
We know that disk space can be divided into many partitions. For example, the C: drive and D: drive can be different partitions on the same disk.
The basic parameter of a partition is its file system. Windows can only be installed on a partition with the NTFS file system. When you right-click a partition and view its properties, you can see its file system.
However, UEFI firmware is a bit “dumb.” It can only recognize some older file system types, such as FAT32, FAT16, and FAT.
In other words, even if our disk has many partitions, UEFI firmware can only recognize partitions with FAT32, FAT16, and FAT file systems.
After recognizing these partitions, the UEFI firmware can read the files inside them.
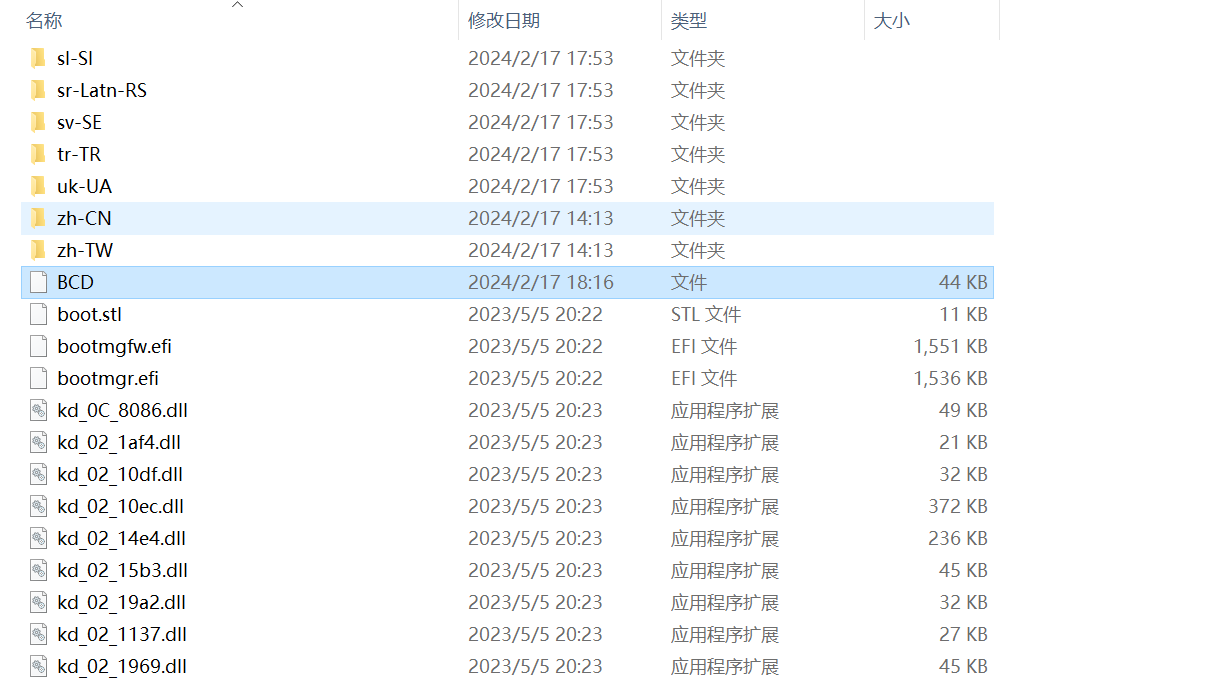
※ On a Windows computer, the disk has a very important partition called the EFI partition (or ESP partition).
EFI Partition
As the name suggests, this partition is specifically for UEFI. The UEFI firmware boots Windows by reading files in the EFI partition and running programs inside it.
So, naturally, the EFI partition’s file system type is FAT32 (or FAT16; for simplicity, this article uses FAT32 as the standard EFI partition file system).
The essence of an EFI partition is a partition with a FAT32 file system.
Therefore, any partition with a FAT32 file system can be considered an EFI partition and be recognized and read by UEFI firmware.
So, what’s inside the EFI partition? Why is it a dedicated partition for UEFI firmware? Why is it so important in the Windows boot process?
Because the EFI partition contains the Windows boot files.
Here is the file structure directory of my own computer’s EFI partition (files not relevant to the discussion are omitted):
1 | |
Next, I’ll introduce a type of “application”: .efi programs.
*.efi Programs
Like .exe software in Windows, .efi programs are software that run within the UEFI firmware’s small system. In the EFI partition file directory above, we can see many files with the .efi extension. They are efi programs that can only run in the UEFI firmware.
For example: bootx64.efi, bootmgfw.efi, memtest.efi, etc. The UEFI firmware runs them to further boot Windows or perform basic computer maintenance.
For Windows, bootx64.efi and bootmgfw.efi are both key to booting Windows. (Each can independently boot Windows.) As for why there are two efi programs for booting Windows, we’ll explain that shortly.
How Does UEFI Firmware Know What to Do?
Here’s the question: The UEFI firmware scans and recognizes the EFI partition and can access its files, but how does it know to run bootmgfw.efi or bootx64.efi?
This is again thanks to NVRAM.
In addition to the overall UEFI firmware code, NVRAM also records which EFI partition contains the efi program the firmware should run, along with detailed location information.
The UEFI firmware reads this record to run the corresponding efi program and proceed to the next step.
Different partitions have unique “ID numbers.” Even if two partitions have identical characteristics (e.g., size, file system type), their ID numbers are different.
This ID number is called a GUID in computing. A GUID is a long string of numbers and letters, randomly generated and unique.
In fact, NVRAM records the GUID of this EFI partition, and UEFI uses this GUID to find the correct EFI partition.
We could also assign a GUID to any object around us, like a sunflower.
Generally, NVRAM doesn’t just record one boot entry; it records many boot entries pointing to efi programs.
However, these entries aren’t always valid. The UEFI firmware tries boot entries from top to bottom in order and runs the first efi program that succeeds.
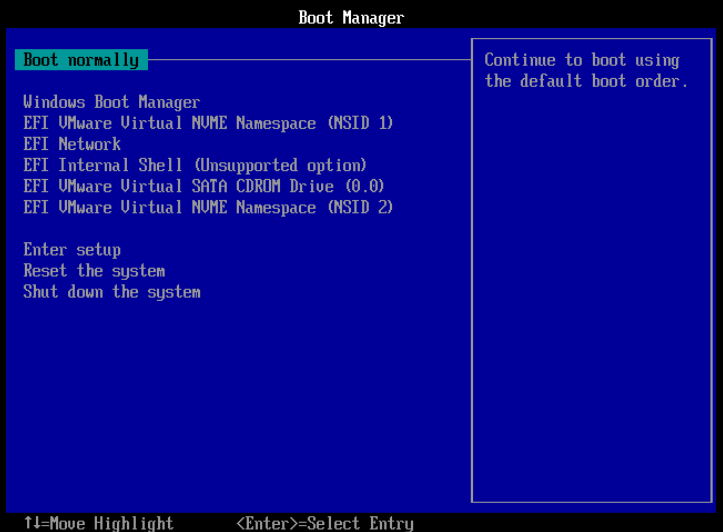
For example, the image above shows a UEFI boot menu selection screen. We can “intercept” the boot process by pressing the boot hotkey during startup to enter this menu page. (Different computer brands have different boot hotkeys; you can search online.)
We can see, from Windows boot manager to EFI VMWare Virtual NVME Namespace (NSID 2), these are all UEFI boot entries. They are all recorded in the motherboard’s NVRAM.
UEFI tries boot entries from top to bottom, finding and running the efi programs they point to.
What Do bootx64.efi and bootmgfw.efi Do?
After understanding and running efi programs, we’ll introduce what these two efi programs actually do to boot Windows.
First, rest assured: bootx64.efi and bootmgfw.efi are just different names; their file content is the same—they are identical programs. So, their operating principles are the same.
As for why there are two identical efi programs with different names, I’ll explain later.
bootmgfw.efi is the Windows Boot Manager.
You may have seen these two interfaces:
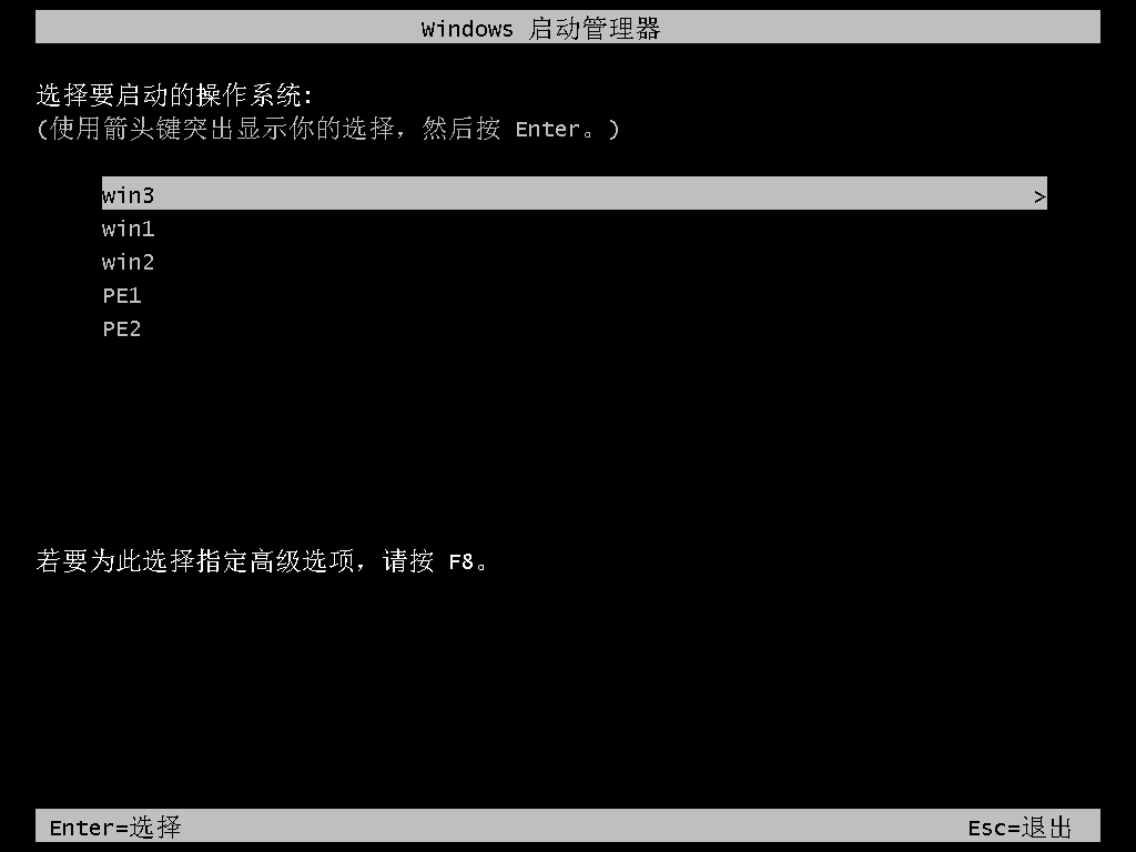
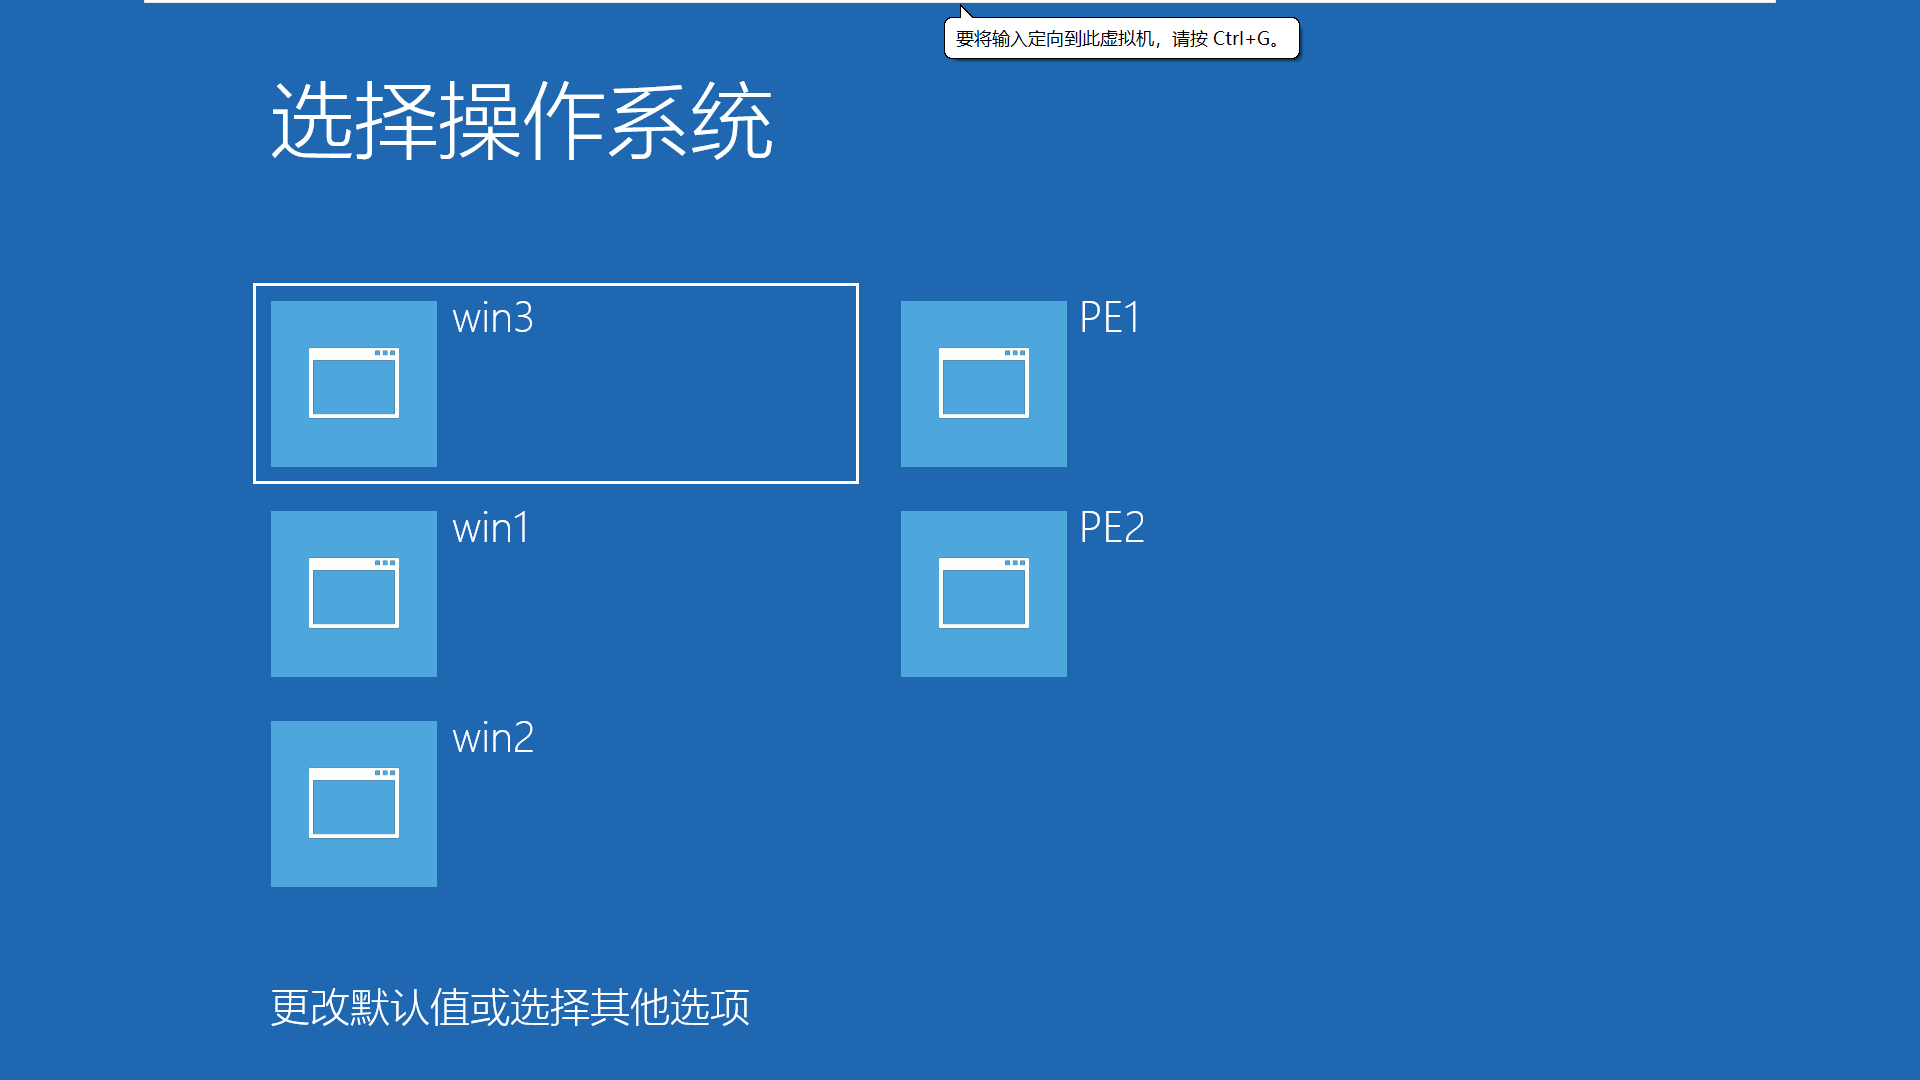
Both interfaces are the Windows Boot Manager interface, meaning they are both interfaces of bootmgfw.efi.
Why two interfaces?
Because Microsoft introduced a tile-style flat design starting with Windows 8, making it easier for touch devices.
The black one is the older Windows Boot Manager interface, while the blue one is the Metro interface introduced after Windows 8, which is more modern.
Their essence is the same, but the blue interface is more visually appealing. However, the newer interface may slow down boot time on multi-boot systems.
We can manually configure the BCD file to choose either interface.
I’ll explain how to configure the BCD file later.
bootmgfw.efi, the Windows Boot Manager, lists the operating system boot menu for us to choose from.
For example, the image above shows win1, win2, win3, PE1, and PE2 systems that can be booted.
So, the next question is: Where does this list of bootable systems come from?
BCD File
That’s right, the BCD file contains this system list.
What is a BCD file?
BCD file (Boot Configuration Data), boot configuration data.
The BCD file records boot information for operating systems, including system location, boot mode, boot program, system menu name, etc. It can be thought of as the dictionary index for Windows booting.
BCD files are only applicable to Windows systems.
The BCD file is like the boot order record in NVRAM—both record menus. However, NVRAM boot order is for UEFI, while BCD is for bootmgfw.efi.
The BCD file is located in the same folder as bootmgfw.efi. Generally, the locations of files in the EFI partition cannot be changed; changing them may cause the UEFI firmware and efi programs to fail to find the files, leading to boot failure.
For more details, you can read my 60th article, “An In-Depth Exploration of UEFI Booting: Is the Location of efi Boot Programs Fixed?”
Learning how to edit BCD is a key step toward advanced system operations.
Editing BCD
We cannot edit BCD with a regular text editor because the data is encrypted. We can use third-party GUI tools to edit BCD or use Microsoft’s command-line tool bcdedit.
Since command-line tools are less user-friendly for beginners, I’ll introduce a third-party tool called BOOTICE for editing the BCD menu. Interested students can learn the command-line method later.
BOOTICE can be downloaded from various platforms. I provide a download link for convenience:
https://wwkd.lanzn.com/ijYzt2iud92f
Open BOOTICE, click on "BCD Edit" -> Select current system BCD -> Smart Edit Mode to edit your own computer’s BCD.
BCD is important boot configuration data; operate with caution. Incorrect operations can prevent the system from booting.
It’s recommended to practice editing BCD in a virtual machine.
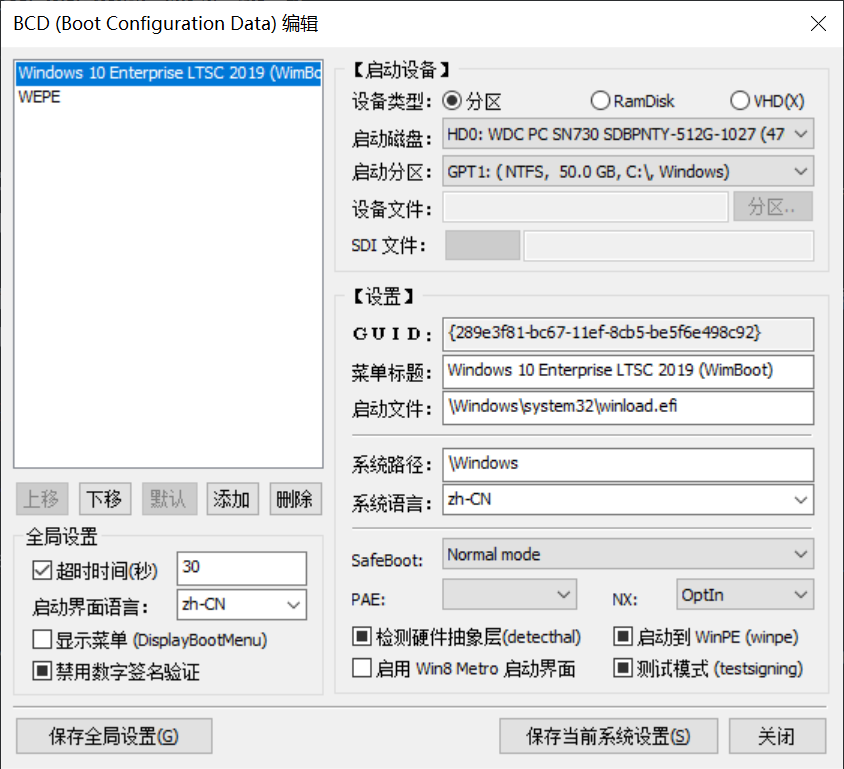
This interface is roughly divided into two parts: the left panel and the right panel. The upper part of the left panel shows the appearance of the operating system boot menu displayed on the Windows Boot Manager (bootmgfw.efi) interface. The rest are BCD editing options.
I will explain them in detail.
- “Move Up, Move Down, Default, Add, Delete”: Move a boot entry up or down in the menu, set it as the default boot entry, add a new boot entry, or delete a boot entry.
- Global Settings
- Timeout: When there are multiple boot entries, set the wait time. After this time, the default boot entry will automatically start.
- Boot Interface Language: Select the language for the Windows Boot Manager interface. Whether it takes effect also depends on the language files in the language folder of the EFI partition.
- Display Menu: If checked, the Windows Boot Manager menu will always be displayed during boot, regardless of the number of boot entries.
- Disable Digital Signature Verification: Disable digital signature verification for boot programs.
- Boot Device
- Device Type: The boot type of the system. A normal Windows system boots from a partition. (i.e., Windows is installed on a partition). Ramdisk and VHD are two other boot types, which will be introduced in the future.
- Boot Disk: The disk where the Windows system is installed.
- Boot Partition: The partition where the Windows system is located (commonly referred to as the C: drive).
- Device File, SDI File: These are dependency files for Ramdisk and VHD, not required for normal Windows boot. They will be introduced in the future.
- Settings
- GUID: The “ID card” (Globally Unique Identifier) of this boot entry, which cannot be changed.
- Menu Title: The menu name displayed in the Windows Boot Manager, used to distinguish which menu corresponds to which system. We can name it arbitrarily. (Chinese characters are not recommended.)
- Boot File: The first program run to boot Windows. For UEFI firmware computers, this program is located at
\Windows\system32\winload.efion the system drive. - System Path:
\Windows—this is also fixed. - System Language: The system language.
- safeboot: Safe boot, usually normal mode.
- PAE: Enabling this allows a 32-bit CPU to access more than 4GB of memory.
- NX: A technology that prevents malicious code from loading.
- Detect HAL: Check whether the abstraction layer between the operating system and hardware is normal.
- Boot to WinPE: If this boot entry boots a PE system, check this option.
- Enable Win 8 Metro Interface: When checked, bootmgfw.efi will display the blue tile-style Windows Boot Manager interface. If unchecked, it uses the black background interface.
- Test Mode: I’m not sure. Currently, it doesn’t seem very important. I won’t introduce it.
- Save Current System Settings: Save the settings for a specific boot entry.
- Save Global Settings: Save the entire BCD file.
The above is an introduction to all button functions in the BOOTICE BCD editing interface.
Now that the functions are explained, how to edit BCD is obvious. I’ll emphasize a few points based on experience.
- To create a new BCD menu for Windows 7/8/8.1/10/11, click
Add -> New Win7/8/8.1 Boot Entry. - For a standard Windows installation, the device type is
Partition. - Select the disk where the Windows system is located for Boot Disk.
- Select the partition where the Windows system is located for Boot Partition.
- Choose a menu title yourself, preferably in English.
- Boot File: For UEFI firmware, it’s winload.efi. (For BIOS firmware, it’s winload.exe.)
- System Path and System Language don’t need to be changed.
- Don’t forget to add a backslash (\) before all paths!
- Keep safeboot, PAE, and NX at their default settings.
- Do not enable the Win 8 Metro interface. (Besides aesthetics, it has no other function and slows down menu selection.)
- Do not check or half-check Boot to WinPE.
- After each edit, first click
Save Current System Settings, thenSave Global Settings. - Timeout should be set according to your habit (enough time to react).
- Keep other options at their default settings.
You might wonder: Why do some options have three check states: checked, unchecked, and half-checked?
There’s no unified explanation online, but based on my experience, a half-checked state means this feature is enabled if possible, disabled if not—a middle ground. Whether it’s enabled depends on the boot environment conditions at startup.
This concludes the BCD editing explanation.
After BCD editing, the operating system boot is almost complete.
The Final Stage of UEFI Booting Windows
bootmgfw.efi reads the BCD file, lists the operating system boot menu on the Windows Boot Manager interface, and waits for the user to select a system to boot.
After the user selects a boot entry, bootmgfw.efi loads and runs the boot file recorded in the BCD file for that entry (i.e., \Windows\system32\winload.efi).
Then, bootmgfw.efi hands over control of the computer to the winload.efi program.
The winload.efi program is responsible for loading the Windows system kernel and starting Windows.
The Windows system boot under UEFI firmware mode is now complete.
Q&A
- Why can’t I see the EFI partition in File Explorer?
- The importance of the EFI partition is obvious. If a user mistakenly changes files inside, it could prevent Windows from booting after shutdown. For such an important partition, the operating system hides it from users.
- You can see the EFI partition using the system’s built-in
Disk Managementtool or use third-party software like DiskGenius to browse and edit files inside.
- Why are there two identical files, bootx64.efi and bootmgfw.efi?
- In fact, the UEFI specification designates bootx64.efi as the default boot program for UEFI firmware. That is, when NVRAM has no records, the UEFI firmware defaults to loading bootx64.efi.
- The location of bootx64.efi is fixed, at
\EFI\boot\bootx64.efion the EFI partition. - Microsoft uses bootx64.efi as a backup boot option. If bootmgfw.efi is damaged or missing, the UEFI firmware can boot bootx64.efi and still start Windows.
- For more details, please read my 59th article: “A Detailed Explanation of Windows Boot Manager, Bootmgfw.efi, Bootx64.efi, and bcdboot.exe.”
BIOS Firmware Booting Windows System
With the foundation of UEFI firmware, understanding BIOS firmware booting Windows is easier.
BIOS firmware, as an older type, will inevitably be phased out in the future. However, a certain number of computers still use it, so it’s worth studying.
BIOS Firmware Requirements for Disks Booting Windows
Unlike UEFI, BIOS firmware has specific requirements for the disk where Windows is installed:
- The disk partition table must be MBR.
- There must be an active primary partition (active partition).
BIOS Firmware Has No Version Requirements for Windows.
BIOS Firmware Boot Method
Unlike UEFI’s file-dependent boot mode, BIOS firmware boots the system by running code, making it less flexible.
Partition Table:
Currently, there are two types of disk partition tables: MBR and GPT (also called GUID). MBR is an older partition table type, while GPT is a newer one.
BIOS firmware can only recognize MBR partition tables, while UEFI firmware can recognize both.
These two partition table types can be converted to each other without affecting the existing data on the hard drive (lossless conversion).
A disk with an MBR partition table supports a maximum of 4 primary partitions and can only recognize disks up to 2TB. However, you can create more partitions by using logical partitions.
A disk with a GPT partition table supports up to 128 partitions and can recognize disks up to 9.4ZB.
As you can see, GPT is a more advanced partition table type, offering more flexible management.
As long as the disk has an MBR partition table and is intact, it can be recognized by BIOS.
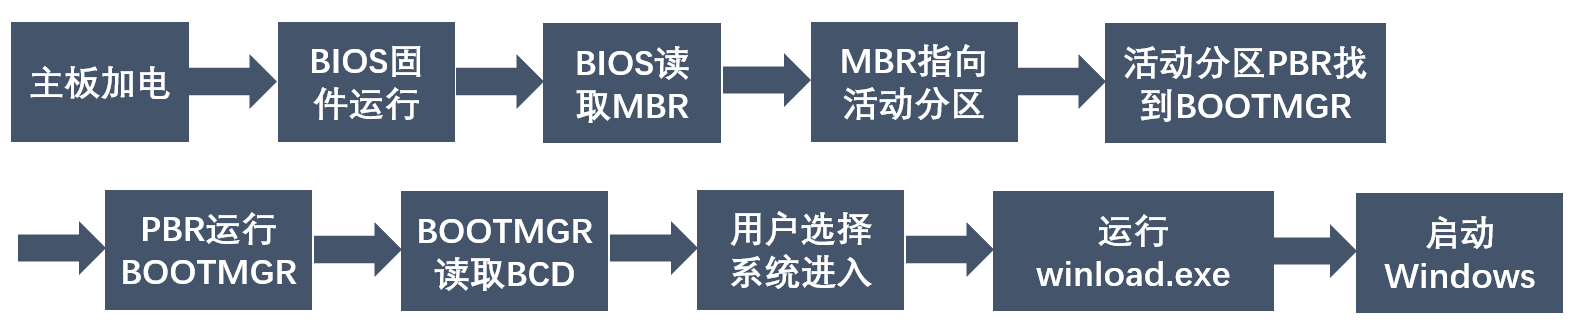
The first step in BIOS booting is to read the disk’s Master Boot Record (MBR).
Master Boot Record (MBR)
First, note a naming conflict:
The Master Boot Record is called MBR. A disk partition table type is also called MBR. To avoid confusion, we’ll refer to the Master Boot Record as MBR and the partition table type as “MBR partition table.”
What is MBR?
The Master Boot Record (MBR) is a piece of code stored in the first sector of a hard drive using an MBR partition table.
Simply put, MBR is a piece of code located at the first sector of a disk.
What Does MBR Do?
MBR has two main functions:
Records the partition structure of the entire hard drive. For example, if an MBR partition table disk has 3 partitions, it records which sectors these partitions are located on, etc. This information is stored in MBR for BIOS to read.
Records the active partition. If an MBR partition table disk has an operating system, the partition containing the OS may be the active partition. If the disk has no OS and is just for data storage, the active partition is optional.
A disk with an operating system must have an active partition.
Which partition is the active partition is recorded in MBR using 1 byte of space.
The active partition can be manually set using tools like DiskGenius.
So, the first step of the BIOS boot process is taken: by reading MBR, BIOS knows which partition is the active partition.
From here on, everything happens within that active partition.
Partition Boot Record (PBR)
The Partition Boot Record (PBR), also known as the Volume Boot Record (VBR), is similar to MBR—it’s also a piece of code.
It continues from the Master Boot Record and is responsible for the next step of booting the system.
If MBR manages the entire disk, PBR manages the partition it belongs to.
For disks using an MBR partition table, each partition has its own PBR. The PBR is located in the first sector of its partition.
- The PBR of a regular partition records parameters related to that partition, such as file system type and partition size.
- The PBR of the active partition also records the location of
BOOTMGR.
What is BOOTMGR?
BOOTMGR is a file, the Windows Boot Loader, a program that runs within BIOS. It is the counterpart to bootmgfw.efi.
In other words, BOOTMGR is equivalent to bootmgfw.efi in UEFI firmware. They have similar functions—both are Windows Boot Managers.
Its location is fixed; it can only be in the root directory of the active partition. Because PBR assumes it can only be there.
One of the functions of the active partition’s PBR is to find BOOTMGR and run it.
Once BOOTMGR runs, the boot process becomes largely similar to UEFI’s.
BOOTMGR’s Work
BOOTMGR is generally located in the root directory of the active partition, and since the active partition is usually the C: drive, it’s typically in the C: drive root.
It is a protected operating system file. If you don’t uncheck “Hide protected operating system files” in File Explorer, it won’t be displayed even if you show hidden items.
Because it’s so critical for Windows booting.
BOOTMGR’s function is the same as bootmgfw.efi in UEFI: read the BCD file and load/list the operating system menu it contains.
The BCD file for BIOS mode booting is located in the boot folder of the active partition. Typically, it’s at C:\boot\BCD.
Editing BCD for BIOS
Compared to BCD under UEFI, there’s only one difference:
- The Boot File becomes
\Windows\system32\winload.exe.
Other configurations are the same as UEFI.
This makes sense: UEFI must run efi programs, so it’s winload.efi. Under BIOS, the program to run is winload.exe.
After BOOTMGR lists the menu from the BCD file, the user selects a valid system and presses Enter.
Then, BOOTMGR, based on the information in the BCD file, runs winload.exe located in the \Windows\System32 folder.
After that, winload.exe loads the Windows operating system kernel.
BIOS booting ends here.
UEFI Boot Flowchart
BIOS Boot Flowchart
General Methods for Repairing Windows System Boot
When we encounter a Windows system with boot issues, what method should we use to quickly repair its boot?
I recommend using the Dism++ tool to repair the boot.
Using Dism++ to Repair Windows System Boot
Dism++ is almost built into all mainstream PE systems. Of course, it can also be used within a Windows system.
Open Dism++.
- Click on the system that needs boot repair.
- Click on
Recovery -> Boot Repair. - Click
OK. - Boot repair is complete.
[Notes and Issues]
Dism++ determines whether to repair UEFI mode boot or BIOS mode boot by detecting the disk partition table type.
The default is UEFI+GPT, BIOS+MBR.
So, if you use an MBR partition table disk on a UEFI motherboard to install Windows, Dism++ will default to repairing the BIOS boot (i.e., rebuilding MBR, repairing BOOTMGR, and creating a BCD file suitable for BIOS).
If you encounter the above situation and must use an MBR partition table for some reason, Dism++’s boot repair function will be ineffective. In this case, there are two options to repair the boot for
UEFI firmware + MBR partition table:Option 1:
First, use DiskGenius to convert the disk partition table to GPT. Then, use Dism++ to repair the boot.
Next, open the EFI partition in DiskGenius, copy the BCD file at
\EFI\Microsoft\Boot\BCDto any other location. (Note: Do not copy it to this disk. You can copy it to the PE system’s system drive, e.g., the PE desktop.)Then, use DiskGenius again to convert the disk partition table back to MBR.
Finally, replace the original BCD file with the copied one.
Why copy and replace the BCD? Because the BCD file may lose boot information when the partition table type of its disk changes.
Option 2:
First, use DiskGenius to find and open a normal EFI partition on another computer.
Then, copy the EFI folder from its root directory into the EFI partition of the MBR disk that needs boot repair.
Finally, edit the BCD file on the target disk to ensure it can boot the Windows system on that disk.
The Introduction to the Windows System Boot Process Ends Here.
Please forgive any shortcomings. Experts, please be gentle!!!
Welcome to join my WeChat group for discussion and exchange.